10 Minutes
Android Emulator Setup Guide for App Testing
Fix Bugs Faster! Log Collection Made Easy
The Android emulator is an Android virtual device that is used to test and debug Android code. It looks and behaves the same as a physical Android device, and while it has some limitations (more of which later), it provides real time and cost savings for developers.
Unlike the iPhone, which is limited to one manufacturer and a specific number of iOS versions, there are thousands of Android device types out there. Android themselves say there are over 24,000 (yep, that’s not a mis-print) different device types worldwide.
As devs, we simply can’t have physical access to all these devices when building Android app. However, with Android Emulators, we can easily install the APK/AAB file and test the app code on loads of different types, without a physical device. In fact, a single emulator allows us to:
- Test multiple instances and customize resources for better performance.
- Easily change device configuration and API level and test the code in various API labels.
- Import hardware profiles to test our app.
- Debug the code and execute the automation code script.
So, the Bugfender team thought we’d do an article on this awesome tech. We’re going to show you how to set up an Android Emulator, so you can bring this vital technology into your Android developer toolkit, and give you loads of hints and tips to customize the emulator to your specific needs.
Table of Contents
Who this article is for
- Rookie Android devs and small software companies who want to make their Android application testing more efficient via virtual machine technology.
- Those with a geographically diverse audience whose app will be used on loads of different devices.
- Those who are building Google Play games, which will naturally throw up all kinds of edge cases.
- Those who are getting used to Android O and want a way to test for all the challenges it provides.
Ready to go? Then let’s get into the weeds. And, just to be double-clear, we’re talking about the official Android Studio Emulator here (we’ll mention some more niche alternatives further down).
Ok, first, let’s start with the tools we’ll need
In Android Studio, we can use lots of tools to test the app with Android Emulators. The tools are as follows:
- Android Virtual Device Manager (AVD Manager), a command-line tool that allows us to create the virtual device in Android Studio. AVD Manager provides an option to customize the virtual Android device, such as RAM size , storage and API version.
- With the help of a command, we can install the APK file in the emulator and test it. This helps us to pull and push the code from Git using the Git command.
- It’s also important to use Logcat, another command-line tool, in tandem with Android Studio. This helps us to analyze the real-time system logs and debugging messages from the emulator, and find out the exact cause of an app crash.
Now let’s create an Android Emulator
Step 1: Android Studio and Java setup
First, download Android Studio and complete the installation process, which is very intuitive. You need to install Java on your machine to run Android Studio, and don’t forget to set HOME_PATH on your computer.
If you are using Linux or Mac, then you need to install through the command prompt. You should not forget to select the Android SDK and emulator components during installation. Android Studio will launch after installation.
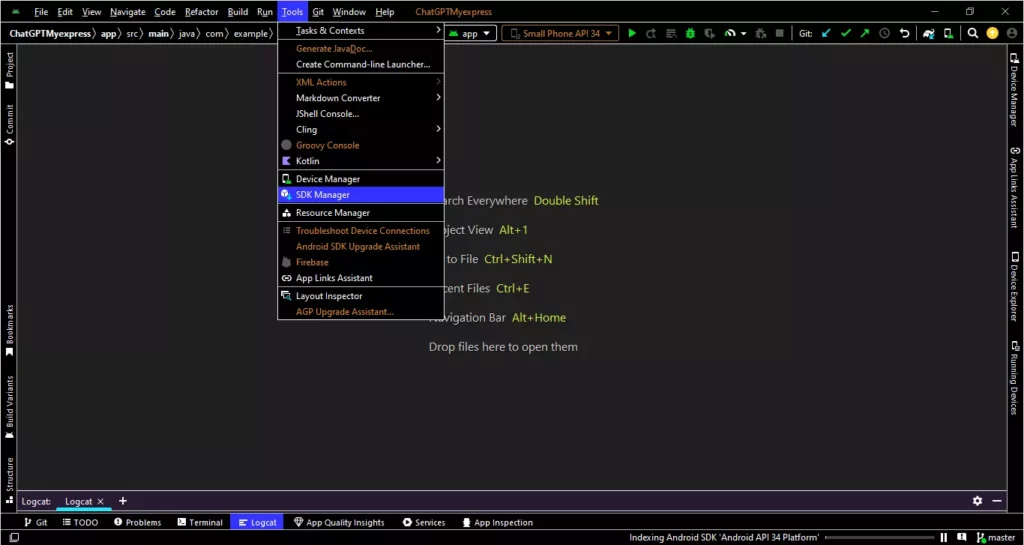
Now, move to the Tools menu and click SDK manager. Take a look at the image below for reference.
Step 2: Create the emulator
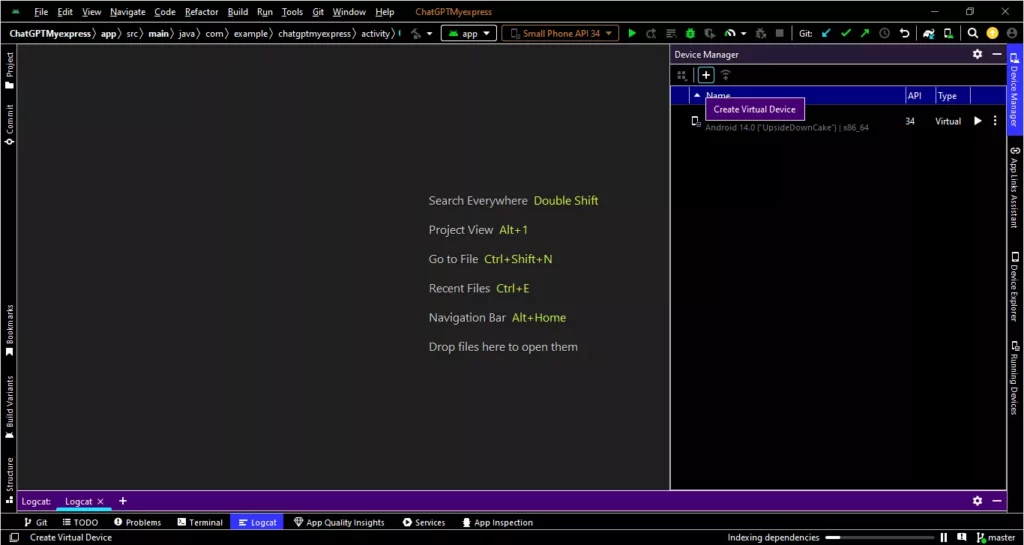
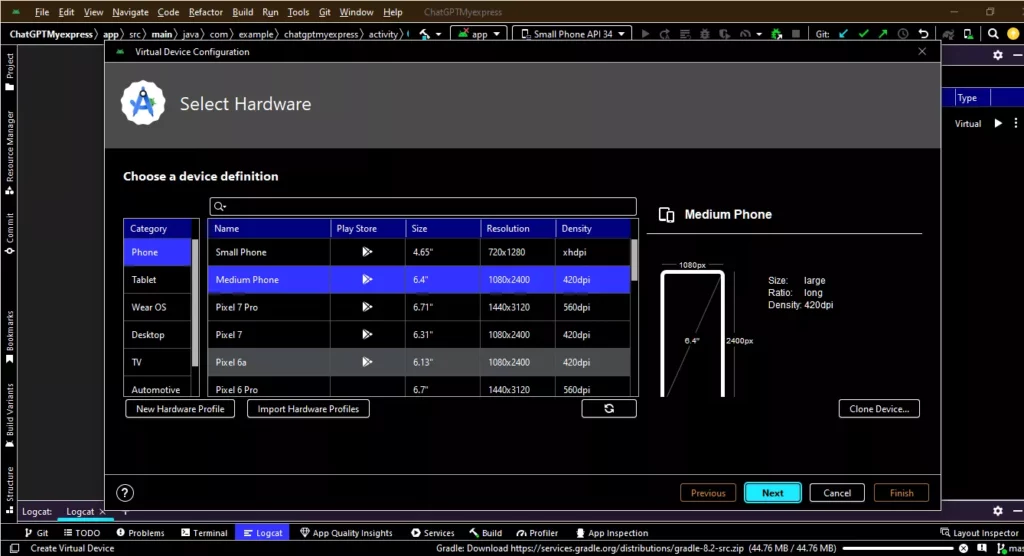
A window will open from the right side, as you can see in the image below. There is a plus button, and when you click it, the hardware window will open.
Select the device you want to use, and click the Next button.
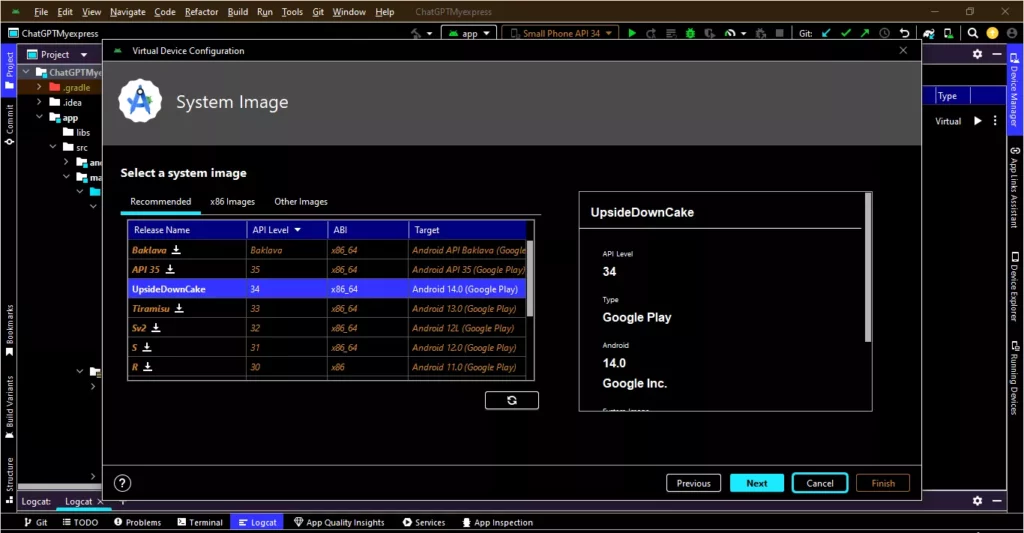
Step 3: Select system image
Now, it’s time to choose the Android version you want. One of the awesome things about Android Emulator is that there are loads of pre-configured devices (like Pixel), and you can add your own if it’s not built in.
If the specific Android version you’re looking for is not pre-installed, then click the button beside it. You need to download and select the version before proceeding to the next window.
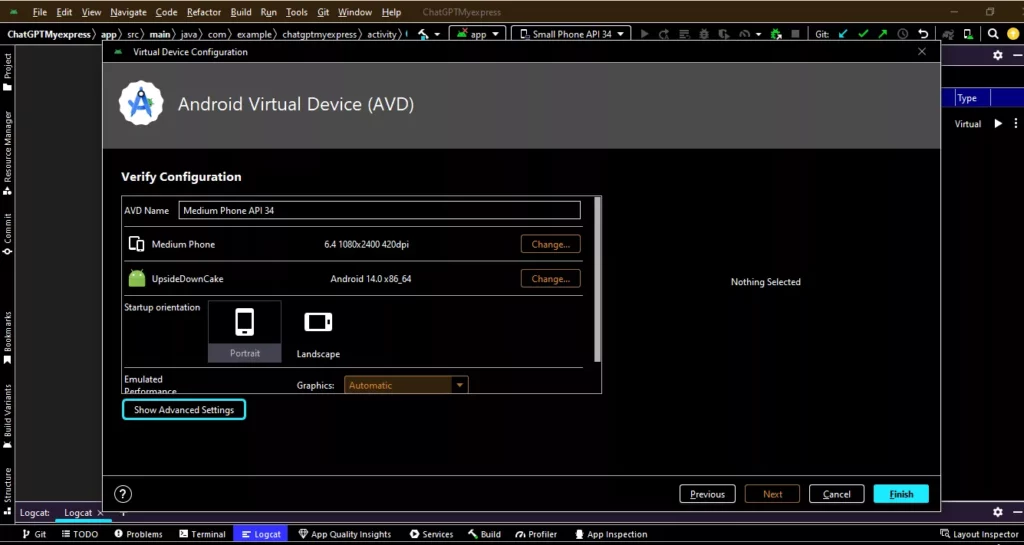
Step 4: Verify configuration
Here you need to provide a meaningful name for the virtual device. Remember, you can change the device orientation at this step, which is very handy.
After selecting the device, click the Finish button.
Advanced configuration and tips
Ok, so we’ve learned how to create a virtual Android device, which is a great start. Now, it’s time to customize it as per our requirements.
You can customize several things, like hardware, software, device boot, and system image. Ready to take a look?
Hardware customization
You can change the hardware via the new hardware profile or import hardware profile section. You can set device type, screen size, screen resolution, and memory size. There are lots of screen sizes available.
You can also use the previously created custom hardware. In fact, you can customize whether the Android device will open in portrait mode or landscape mode. There are several resolution devices available.
For the sensor section, there are various options you can adopt and adapt. Accelerometers, GPS… all the nuts and bolts that will define the look, feel and function of your app (quick FYI: we typically use the back camera to take a picture on a virtual device).
System image
You need to keep three things in mind during the installation of the system image.
- The Google API system image is used when you need maps and Firebase tests on an emulator.
- The Google Play system image helps us to install the apps from the Play Store.
- The x86 image is used for faster performance.
There are two types of processors you can choose to install. Either Intel (HAXM) processors or AMD Hypervisor processors, which allow you to run a Windows hypervisor platform. Note that AMD processors are faster than HAXM.
RAM and storage customization
By default, we get 2048 MB of RAM and storage out of the box during device creation. But to make things even better, we can customize the size as per our requirements. Remember that you’ll need at least 4 GB of RAM to run the apps on a virtual device smoothly.
And just quickly, some pro tips
Through trial and (a lot of!) error, we’ve discovered these little nuggets while using Android Emulator at Bugfender.
- Use Intel HAXM or AMD Hypervisor for better performance.
- Enable Quick Boot to save the startup time of the device.
- Use the foldable device profile to test dual apps.
- Update the Android SDK, Emulator, and Android Studio regularly for better performance (this may seem obvious, but it’s easy to forget when you’re right in the middle of a testing sprint).
How to work with different Android versions
Now, it gets complicated. To make our test as thorough as possible, it’s vital to test our app in different Android versions (remember that some of your users will be using different software editions).
To do this, we need to install different Android APIs from the SDK manager. The benefit of testing the app in various APIs is fewer bugs; we don’t need to create virtual devices separately to use various APIs.
Here’s how to switch APIs on a single device:
- Navigate to the Android Studio menu.
- Select SDK device manager from the tools menu, and choose which API you want to use to test the app.
- Click the ****button if the API is not found.
- After clicking next, choose a hardware profile. After that, select System Image and click Finish to complete the process of device creation.
We need to repeat the same process each time we need to change the API and test it. On the other hand, we can handle the API label in the build.gradle file.
How to test with Android Emulators
This is the bit you’ve been waiting for, right?
After clicking the Finish button, we need to revisit the device manager section again. Here, we can find a list with the emulator name along with the API level. It’s important to choose one of them, and click it.
On the right-hand side, a Start button will appear. When we click on the Play button, the emulator will start to launch.
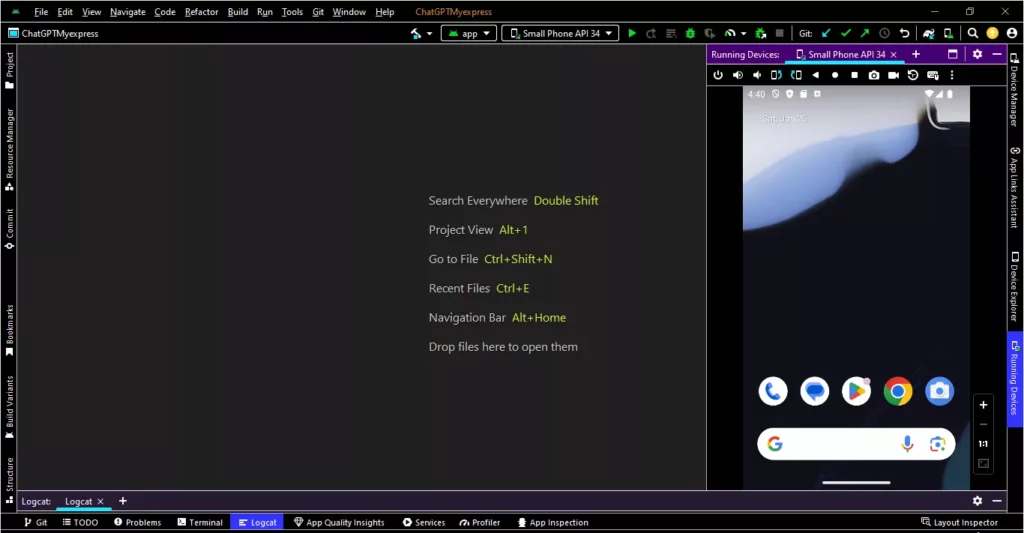
Now we have to wait a few minutes to boot the device. After booting, the device will get ready for operation. Sometimes it takes 5-10 minutes to get ready, so don’t fret if you think it’s dragging.
And finally, it’s time to run our app in the emulator!
To do this, simply click the Run button and select the virtual device. The app will appear on the screen after successfully installing on the device.
And that’s it! Your Android Emulator is ready to go.
Some stuff to try
With Android Emulator set up, there’s loads of stuff we can do right away. Exciting, right? Here’s some stuff you should definitely play around with.
- Emulator supports various system images for advanced testing, as well as quick boot and snapshots for faster startup. Even if your current app project doesn’t require these, it’s worth trying them out to see how they look and feel.
- Think of all the different edge cases your audience may throw up. Change the RAM size, SSD size and CPU core.
- Test the app on various network types, like 2G, 3G, 4G, and 5G. Remember, your users will be running your app in all different locations: homes, offices, planes, trains… you get the point.
- Look at the pre-configured devices that Emulator provides. Their Pixel and and Emulator provides pre-configured popular devices like Pixel.
- Take screenshots and create video recordings, and it’s great for a bug fix.
Different Emulators to use
Remember when we mentioned at the top that the official Android Studio emulator has some limitations? Well, it’s time to unpack that in a bit more detail.
There are some minor drawbacks to Android’s official emulator. GPU capacity is a bit limited (which is not great for graphics-intensive apps) and there can be issues around speed and storage. So, we’d recommend using the official emulator in tandem with other, more niche products, to ensure your tests are as good as possible.
- Cloud-based emulators can be great. We’d recommend Bluestacks or NoxPlayer.
- Genymotion is another Cloud-based emulator, and it’s also great for advanced-level testing.
- If you’ve built a gaming app, we’d recommend LDPLayer. One of the key USPs is that you can download all kinds of Android games for free.
- Firebase Test Lab is great for the breadth of devices and operating systems it provides. We can switch between Android Sdk versions with a simple bit of code, like so:
android { compileSdkVersion 33 defaultConfig { minSdkVersion 21 targetSdkVersion 33 } }
This isn’t about choosing the best Android emulator; there are loads of blog posts out there for that. Instead, we’d urge you to use a blend of emulators for your specific needs.
Annnddd we’d done!
Fun, right? You should now have a good working knowledge of how to set up an Android Emulator, how to use it and how to add different tools to your kit.
Remember, once you’ve installed the Android Emulator, be sure to play around with it as much as you can. There’s loads you can do with it, so don’t be afraid to get creative.
And if you have any questions about Android Emulator or any other aspect of Android app testing, don’t be afraid to reach out to us. Happy Coding!
Expect The Unexpected!
Debug Faster With Bugfender

Anupam Singh
Anupam Singh is a Native Android Developer as well as Hybrid Mobile App Developer. More than 10 years of experience in Developing Mobile Apps. He is a technology blogger. Follow him on Linkedin to stay connected.