18 Minutes
Android Geofencing: How to Set Up and Troubleshoot Location Triggers
Fix Bugs Faster! Log Collection Made Easy
You’re probably familiar with Android Geofencing already, but in case this is your first rodeo, it’s a location-based system that can receive access to a mobile device’s location data, and trigger all kinds of functions when users pass in and out of specific areas. The ads our users see, the content they can stream, the offers they receive via push notifications… all can be triggered by geofencing.
Geofencing and location updates can be tricky, particularly for those who are still starting out in Android app development. So in this article we’re going to unpack it for you, looking specifically at:
- How to set up Android Geofencing.
- How to create an Android Geofence API.
- How to handle geofence transitions.
- How to deal with edge cases and unexpected problems.
And loads of other stuff around geofence monitoring. By the end of the article, you should have a sound working knowledge of geofencing, which you can take into your day-to-day work as an Android developer.
Table of Contents
- First, can you give me a bit more context?
- Now, how do we create Geofencing in an Android application?
- Ok, awesome. Now, let’s create a geofence transition in our app
- Ok, let’s look at how to create an Android geofence API
- Testing Android geofencing using Google Maps
- Android Geofencing FAQ
- What is Android Geofencing and how does it work?
- How do I set up Android Geofencing in an app?
- What permissions are needed for Android Geofencing?
- How do I visualize a geofence on Google Maps?
- How do geofence transitions work in Android?
- What is a PendingIntent in geofencing and why is it used?
- How do I build a backend geofence API using Node.js and Firebase?
- Why is my Android geofence not triggering?
- What’s the best geofence radius for Android apps?
- How can I test Android geofencing in the emulator?
- And we’re done!
First, can you give me a bit more context?
Why sure.
Android Geofencing allows a mobile app to define a circular, virtual boundary with the three parameters of latitude, longitude and radius. This. in turn, allows the creation of a notification when the mobile device enters, exits or stays within the geofence area defined by these parameters.
Geofencing is activated through the GeofencingClient API. The Google Play Service provides location tracking, and Google Maps provides geofence visualization. The location of the Android device is established through GPS, cellular networks and WiFi.
A key point to note here is that Google Maps does not work with the geofencing app system directly. Instead, it indicates the device’s location on a map, as the following code demonstrates:
              // Initialize Geofencing Client

var geofencingClient: GeofencingClient = LocationServices.getGeofencingClient(this)

                   // Define a geofence

val geofence = Geofence.Builder()
            .setRequestId("MyGeofence")
            .setCircularRegion(37.7749, -122.4194, 500)
            .setExpirationDuration(Geofence.NEVER_EXPIRE)
            .setTransitionTypes(Geofence.GEOFENCE_TRANSITION_ENTER or Geofence.GEOFENCE_TRANSITION_EXIT)
            .build()
Now, how do we create Geofencing in an Android application?
Ok, let’s get into it.
As we mentioned earlier, we can use Google Play services to create geofencing technology in an Android mobile app. But how do we go about implementing it?
Well to get started, we’ll need to add Google Play service dependencies in the build.gradle file provided via Android Studio, and sync the project. Google Maps is optional, so if we need to visualize a device’s location information, or indicate where a geofenced area is on a map, we’ll need to go ahead and add Google Maps specifically. Here’s some code to show you how:
dependencies {
    implementation 'com.google.android.gms:play-services-location:21.0.1'
    implementation 'com.google.android.gms:play-services-maps:18.1.0'
}
Now let’s add location services and background permission in the AndroidManifest.xml file.
<uses-permission android:name="android.permission.ACCESS_FINE_LOCATION"/>
<uses-permission android:name="android.permission.ACCESS_COARSE_LOCATION"/>
<uses-permission android:name="android.permission.ACCESS_BACKGROUND_LOCATION"/>
Runtime permission is also required on Android OS 6.0 API onwards.
val myRequest= registerForActivityResult(ActivityResultContracts.RequestMultiplePermissions()) { permissions ->
                if (permissions[Manifest.permission.ACCESS_FINE_LOCATION] == true) {
                    Log.d("MyGeofence", "permission granted")
                } else {
                    Log.e("MyGeofence", "permission denied")
                }
            }
        myRequest.launch(
            arrayOf(Manifest.permission.ACCESS_FINE_LOCATION, Manifest.permission.ACCESS_BACKGROUND_LOCATION)
        )
Great, now we’re cooking! Let’s initialize the Geofencing Client API and define the Geofence object.
// Initialize Geofencing Client

var gClient: GeofencingClient = LocationServices.getGeofencingClient(this)
     // Define a geofence

val geofence = Geofence.Builder()
            .setRequestId("MyGeofence")
            .setCircularRegion(37.7749, -122.4194, 500)
            .setExpirationDuration(Geofence.NEVER_EXPIRE)
            .setTransitionTypes(Geofence.GEOFENCE_TRANSITION_ENTER or Geofence.GEOFENCE_TRANSITION_EXIT)
            .build()
Ok, we’re nearly done. But next, we need to define location-sensitive requests and pending intent. This is required to trigger an event when the geofencing Android app enters or exits a geofenced location.
     // Create Geofencing Request

 val gRequest = GeofencingRequest.Builder()
            .setInitialTrigger(GeofencingRequest.INITIAL_TRIGGER_ENTER)
            .addGeofence(geofence)
            .build()

      // Create Pending Intent

        val intent = Intent(this, MyGeofenceBroadcastReceiver::class.java)
        val pIntent = PendingIntent.getBroadcast(
            this, 0, intent , PendingIntent.FLAG_UPDATE_CURRENT or PendingIntent.FLAG_MUTABLE
        )

        // Add Geofence

       gClient.addGeofences(gRequest , pIntent )
            .addOnSuccessListener {
                Log.d("MyGeofence", "successfully added")
            }
            .addOnFailureListener { e ->
                Log.e("MyGeofence", "Failed to add", e)
            }
Lastly, we need to create a broadcast receiver class to receive pending intent, and notify the user when they enter or exit the geofenced area.
class MyGeofenceBroadcastReceiver: BroadcastReceiver() {
    override fun onReceive(context: Context, intent: Intent) {
        val myGeofencingEvent = GeofencingEvent.fromIntent(intent)
        if (myGeofencingEvent.hasError()) {
            Log.e("MyGeofenceReceiver", "error: ${geofencingEvent.errorCode}")
            return
        }

        when (myGeofencingEvent.geofenceTransition) {
            Geofence.GEOFENCE_TRANSITION_ENTER -> Log.d("MyGeofenceReceiver", "Entered!")
            Geofence.GEOFENCE_TRANSITION_EXIT -> Log.d("MyGeofenceReceiver", "Exited!")
            else -> Log.d("MyGeofenceReceiver", "Unknown")
        }
    }
}
Ok, awesome. Now, let’s create a geofence transition in our app
When we talk about a geofence transition, we’re talking about when we define a circle with a certain radius on a map. It triggers when the mobile device enters, exits or stays within the boundary of the circle. This is something that Android app developers often struggle with, but really it’s pretty simple.
The geofencing API helps to create transitions, and triggers can be handled through the BroadcastReceiver class.
class MyGBR: BroadcastReceiver() {
    override fun onReceive(context: Context, intent: Intent) {
        val myGf = GeofencingEvent.fromIntent(intent)

        when (myGf.geofenceTransition) {
            Geofence.GEOFENCE_TRANSITION_ENTER -> Log.d("MyGBR", "Entered!")
            Geofence.GEOFENCE_TRANSITION_EXIT -> Log.d("MyGBR", "Exited!")
            Geofence.GEOFENCE_TRANSITION_DWELL -> Log.d("MyGBR", "Dwell!")
            else -> Log.d("MyGBR", "Unknown")
        }
    }
}
Note that we need to register BroadcastReceiver class in AndroidManifest.xml file.
<receiver android:name=".MyGBR"
    android:exported="false">
    <intent-filter>
        <action android:name="com.google.android.gms.location.GeofenceTransition"/>
    </intent-filter>
</receiver>
Ok, let’s look at how to create an Android geofence API
Here, we will create a geofence API with the help of Node.js and Firebase (remember that Firebase is used to store data). We will need to use the Restful API in our Android application later.
First, let’s create a directory and install node.js.
mkdir geofence-api
cd geofence-api
npm init -y
npm install express firebase-admin cors body-parser
Now it’s time to create a Firebase Store project and download the serviceAccountKey.json file. Then, we can incorporate this file into the project directory, and create a server.js file for backend code.
To get things going, let’s create a Restful API.
const express = require("express");
const admin = require("firebase-admin");
const bodyParser = require("body-parser");
const cors = require("cors");

const app = express();
app.use(cors());
app.use(bodyParser.json());

admin.initializeApp({
  credential: admin.credential.cert(require("./serviceAccountKey.json")),
});

const db = admin.firestore();
const geofenceCollection = db.collection("geofences");

// Add a new geofence
app.post("/create-geofence", async (req, res) => {
  try {
    const { id, latitude, longitude, radius } = req.body;
    await geofenceCollection.doc(id).set({
      latitude,
      longitude,
      radius,
    });
    res.status(200).json({ message: "Geofence created successfully!" });
  } catch (error) {
    res.status(500).json({ error: error.message });
  }
});

// Get all geofences
app.get("/geofences", async (req, res) => {
  try {
    const snapshot = await geofenceCollection.get();
    const geofences = snapshot.docs.map(doc => ({ id: doc.id, ...doc.data() }));
    res.status(200).json(geofences);
  } catch (error) {
    res.status(500).json({ error: error.message });
  }
});

// Remove a geofence
app.delete("/delete-geofence/:id", async (req, res) => {
  try {
    const { id } = req.params;
    await geofenceCollection.doc(id).delete();
    res.status(200).json({ message: "Geofence deleted successfully!" });
  } catch (error) {
    res.status(500).json({ error: error.message });
  }
});

// Start server
const PORT = process.env.PORT || 5000;
app.listen(PORT, () => console.log(`Server running on port ${PORT}`));
Nice, clean code right? Note that the endpoint of the API will be http://your-server-ip:5000/.
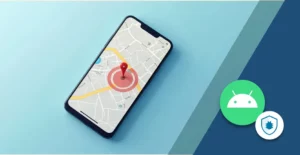
Testing Android geofencing using Google Maps
Next, we need to implement Google Maps in our app to test the geofencing function. This is a really important part of the process, as geofencing can throw up lots of edge cases.
Let’s initialize the map in Kotlin code; the SupportFragmentMagaer class will provide an instance of MapFragment.
class MyMapActivity : AppCompatActivity(), OnMapReadyCallback {

    private lateinit var gfClient: GeofencingClient
    private lateinit var gMap: GoogleMap

    private val gfLatLng = LatLng(37.7749, -122.4194)
    private val gfRadius = 500f // 500 meters
    private val gfId = "MyMapActivity"

    override fun onCreate(savedInstanceState: Bundle?) {
        super.onCreate(savedInstanceState)
        setContentView(R.layout.activity_main)

        // Initialize Geofencing Client
        gfClient = LocationServices.getGeofencingClient(this)

        // Load the Google Map
        val mapFragment = supportFragmentManager.findFragmentById(R.id.map) as SupportMapFragment
        mapFragment.getMapAsync(this)

        // check permissions
        checkPermission()
    }

    override fun onMapReady(map: GoogleMap) {
        gMap = map
        gMap.uiSettings.isZoomControlsEnabled = true

        // Add marker and circle for geofence
        gMap.addMarker(MarkerOptions().position(gfLatLng).title("Geofence Location"))
        gMap.addCircle(
            CircleOptions()
                .center(gfLatLng)
                .radius(gfRadius.toDouble())
                .strokeColor(0xFFFF0000.toInt()) // Red outline
                .fillColor(0x22FF0000) // Transparent fill
        )

        gMap.moveCamera(CameraUpdateFactory.newLatLngZoom(gfLatLng, 15f))

        // Set up geofencing
        createGeofence()
    }

    private fun createGeofence() {
        if (ActivityCompat.checkSelfPermission(this, Manifest.permission.ACCESS_FINE_LOCATION) != PackageManager.PERMISSION_GRANTED) {
            Log.e("MyMapActivity", "Location permission not granted")
            return
        }

        val geofence = Geofence.Builder()
            .setRequestId(gfId)
            .setCircularRegion(gfLatLng.latitude, gfLatLng.longitude, gfRadius)
            .setExpirationDuration(Geofence.NEVER_EXPIRE)
            .setTransitionTypes(Geofence.GEOFENCE_TRANSITION_ENTER or Geofence.GEOFENCE_TRANSITION_EXIT)
            .build()

        val gfRequest = GeofencingRequest.Builder()
            .setInitialTrigger(GeofencingRequest.INITIAL_TRIGGER_ENTER)
            .addGeofence(geofence)
            .build()

        val intent = Intent(this, MyGBR::class.java)
        val pIntent = PendingIntent.getBroadcast(
            this, 0, intent, PendingIntent.FLAG_UPDATE_CURRENT or PendingIntent.FLAG_MUTABLE
        )

        gfClient.addGeofences(gfRequest, pIntent)
            .addOnSuccessListener {
                Log.d("MyMapActivity", "Geofence added successfully")
            }
            .addOnFailureListener { e ->
                Log.e("MyMapActivity", "Failed to add geofence", e)
            }
    }

    private fun checkPermission() {
        val requestPermissionLauncher =
            registerForActivityResult(ActivityResultContracts.RequestMultiplePermissions()) { permissions ->
                if (permissions[Manifest.permission.ACCESS_FINE_LOCATION] == true) {
                    Log.d("MyMapActivity", "Location permission granted")
                } else {
                    Log.e("MyMapActivity", "Location permission denied")
                }
            }
        requestPermissionLauncher.launch(
            arrayOf(Manifest.permission.ACCESS_FINE_LOCATION, Manifest.permission.ACCESS_BACKGROUND_LOCATION)
        )
    }
}
class MyGBR: BroadcastReceiver() {
    override fun onReceive(context: Context, intent: Intent) {
        val myGf = GeofencingEvent.fromIntent(intent)

        when (myGf.geofenceTransition) {
            Geofence.GEOFENCE_TRANSITION_ENTER -> Log.d("MyGBR", "Entered!")
            Geofence.GEOFENCE_TRANSITION_EXIT -> Log.d("MyGBR", "Exited!")
            Geofence.GEOFENCE_TRANSITION_DWELL -> Log.d("MyGBR", "Dwell!")
            else -> Log.d("MyGBR", "Unknown")
        }
    }
}
<receiver android:name=".MyGBR"
    android:exported="false">
    <intent-filter>
        <action android:name="com.google.android.gms.location.GeofenceTransition"/>
    </intent-filter>
</receiver>
Now, the fun bit; we can open the emulator and run the code.
Click on the ‘More’ section with the three-dot icon, then move to the location information section and enter the above latitude and longitude. Remember to check the logcat after entering the geofenced area, and again when exiting.
What if Android geofencing does not trigger?
If moving in or out of the geofenced area is not triggering an event, you’ll need to troubleshoot the error. This will likely have arisen from one or more of the following issues:
- Whether device location permission granted or not.
- Whether the latest Google Play service installed or not (if not, be sure to update).
- Whether GPS is enabled with an option for high location accuracy.
- Whether the
PendingIntentis properly used with correct flags. - Whether the radius is correct (if not, increase and then test again).
- Whether geofence permissions have expired (check geo fence expiry and transition type).
Also, be sure to ceck logcat messages and errors, and debug each line with a mock location.
If everything is working fine and set up correctly, restart the device and try again.
Android Geofencing FAQ
What is Android Geofencing and how does it work?
Android Geofencing uses latitude, longitude, and radius to define a virtual area. When a device enters or exits this area, it triggers events through the GeofencingClient API.
How do I set up Android Geofencing in an app?
To set up Android Geofencing, add location permissions, initialize the GeofencingClient, create a geofence, and use a BroadcastReceiver to handle transitions.
What permissions are needed for Android Geofencing?
You need ACCESS_FINE_LOCATION, ACCESS_COARSE_LOCATION, and ACCESS_BACKGROUND_LOCATION permissions, plus runtime handling for Android 6.0 and above.
How do I visualize a geofence on Google Maps?
To show a geofence on the map, draw a marker and circle using the Google Maps API. This gives users a visual of the geofenced area.
How do geofence transitions work in Android?
Geofence transitions are triggered when the user enters, exits, or dwells in the set area. You handle these using the GeofencingEvent inside a BroadcastReceiver.
What is a PendingIntent in geofencing and why is it used?
A PendingIntent lets the geofencing service send events to your app, even when it’s not running. It links transition triggers to your logic.
How do I build a backend geofence API using Node.js and Firebase?
You can build a backend using Express and Firebase to store and manage geofence data. These APIs connect with the app to create or remove geofences.
Why is my Android geofence not triggering?
Check permissions, GPS status, radius size, Google Play Services updates, and your PendingIntent setup. Use logcat for deeper debugging.
What’s the best geofence radius for Android apps?
Use a radius between 100 to 500 meters. It balances accuracy and performance across most devices and network conditions.
How can I test Android geofencing in the emulator?
Use the emulator’s location settings to send test coordinates. Monitor the logcat to confirm whether the geofence was entered or exited.
And we’re done!
Well, nearly. No coding article would be complete without some take-home points, so here are some key things to remember when testing the geofencing function of an Android app:
- The radius should be defined between 100 and 500 meters for better performance.
- High Accuracy mode must be selected for fast location-tracking.
PendingIntent.FLAG_MUTABLEmust be used for Android 12+ device testing.- Test a mock location, to ensure it is working properly in the emulator, before testing the real app.
If we are still encountering errors, we can register geofences using GeofencingClient and check the event in the BroadcastReceiver class.
Any other questions? Just write to us. We’re always happy to chat Android Geofencing, or any other Android coding topic. So whatever questions you’ve got, hit us up.
Happy Coding!
Expect The Unexpected!
Debug Faster With Bugfender

Anupam Singh
Anupam Singh is a Native Android Developer as well as Hybrid Mobile App Developer. More than 10 years of experience in Developing Mobile Apps. He is a technology blogger. Follow him on Linkedin to stay connected.