14 Minutes
Swift Logging Techniques: A Complete Guide to iOS Logging
Fix Bugs Faster! Log Collection Made Easy
Logging plays a crucial role in app development. As well as debugging everyday issues with the product, a good logger will monitor application behavior and gain insights into user interactions. This is particularly crucial for iOS developers given the frequency of Apple’s official updates and the ferocious competition in the marketplace.
This article explores various logging tools, from traditional methods like NSLog to advanced options such as Apple’s Unified Logging System and third-party solutions like our very own Bugfender (yep, we’re going to flex a little here but, well, it’s our article right?! And we’ll be totally impartial, promise).
Table of Contents
Swift Logging Frameworks and Tools
Swift developers have access to a variety of logging frameworks and tools, each offering different logger types and capabilities. Let’s explore some of the most popular options:
Apple’s Unified Logging System
This is Apple’s recommended approach for logging in modern iOS and macOS applications. It provides a centralized system for capturing, storing, and accessing iOS logs across Apple platforms.
NSLog
NSLog is the traditional method for logging in both, Objective-C, the original iOS programming language, and its successor, Swift. While it’s simple to use, NSLog has limitations in terms of performance and flexibility. For a deep dive into NSLog, check out our comprehensive guide to NSLog.
CocoaLumberjack
CocoaLumberjack is a popular third-party logging framework known for its flexibility and performance. It offers features like log levels, multiple loggers, and log filtering. Learn more about CocoaLumberjack in our detailed CocoaLumberjack tutorial.
SwiftyBeaver
SwiftyBeaver was a popular logging tool for Swift, known for its ease of use and colorful console output. However, it’s important to note that SwiftyBeaver is now deprecated (in other words, obsolete). For developers looking for a powerful alternative with remote logging capabilities, Bugfender is an excellent choice.
NSLogger
NSLogger is another third-party logging tool that offers features like remote logging and a desktop viewer application. For more information, check out our guide to NSLogger.
SwiftLog
SwiftLog is Apple’s open-source logging API for Swift. It aims to provide a common logging interface that can be used across different Swift platforms and frameworks.
Apple’s Unified Logging System
Let’s dive deeper into Apple’s recommended logging solution: the Unified Logging System.
Core Concepts of Apple’s Unified Logging System
The Unified Logging System introduces several key concepts:
- Subsystems and Categories: These help organize and filter logs.
- Log Levels: Different levels of importance for log messages.
- Privacy: Built-in privacy controls for sensitive information.
Getting Started with Apple’s Unified Logging System
Basic Setup
To use the Unified Logging System, which serves as a robust logging backend for your application, you first need to import the os framework, you first need to import the os framework like so:
import SwiftUI
import os

@main
struct demoApp: App {
    @UIApplicationDelegateAdaptor(AppDelegate.self) var appDelegate

    var body: some Scene {
        WindowGroup {
            ContentView()
        }
    }
}
Once you have imported the os framework, you can create a Logger instance. You can use this later to log your messages, which you can view in the Xcode console log section or retrieve from your iOS device log archive. The Logger class supersedes the old os_log and OSLog framework methods used in previous iOS versions and it’s the recommended Apple approach to logging. The new Logger API simplifies some of the complexities of os_log and automatically handles privacy and performance considerations more intuitively.
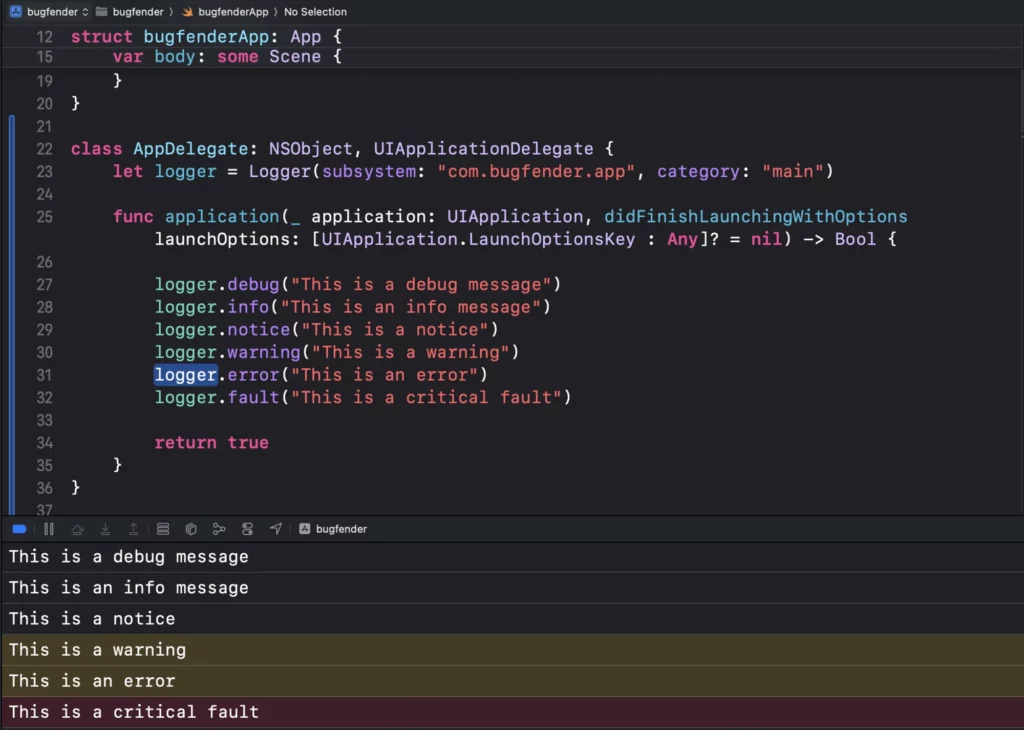
class AppDelegate: NSObject, UIApplicationDelegate {
    let logger = Logger(subsystem: "com.yourcompany.app", category: "main")

    func application(_ application: UIApplication, didFinishLaunchingWithOptions launchOptions: [UIApplication.LaunchOptionsKey : Any]? = nil) -> Bool {
        // Logger usage will go here
        return true
    }
}
Usage of Logger Object
Once you’ve created a logger, it’s pretty straightforward. You can use it to write log messages and you will get your log output in the console app when you run the code:
logger.log("This is a log message")
As you can see, we are using the log function to send a log entry to the Xcode debug console.
Writing Log Messages
Log Levels
The Unified Logging System provides several log levels, also known as logging levels, which allow developers to indicate the importance or severity of a log message, from debug level information to critical errors:
func application(_ application: UIApplication, didFinishLaunchingWithOptions launchOptions: [UIApplication.LaunchOptionsKey : Any]? = nil) -> Bool {
    logger.debug("Debug message")
    logger.info("Info message")
    logger.notice("Notice message")
    logger.error("Error message")
    logger.fault("Critical fault message")
    return true
}
Data Values
You can include dynamic values in your log messages, making use of structured logging to ensure that data is organized and easy to analyze:
let userCount = 42
logger.info("Current user count: \(userCount)")
Log Formatting
Colors
While the Unified Logging System doesn’t directly support colors, Xcode’s console will help you out by color-coding messages based on their log level.
Value Formatting
You can format values in your log messages:
 let price = 19.99
 let formattedPrice = String(format: "%.2f", price)
 logger.info("Item price: $\(formattedPrice)")
Alignment
For tabular data, you can use string formatting to align values:
let userId = 12345
let userName = "John Doe"
logger.info("User ID: \(String(format: "%-10d", userId)) Name: \(userName)")
Advanced Usage of Apple’s Unified Logging System
Privacy
The Unified Logging System provides built-in privacy controls, which are essential when implementing structured logging, especially in applications that handle sensitive user information.
import os.log

let email = "[email protected]"
logger.info("User email: \(email, privacy: .private)")
Network Requests Logging
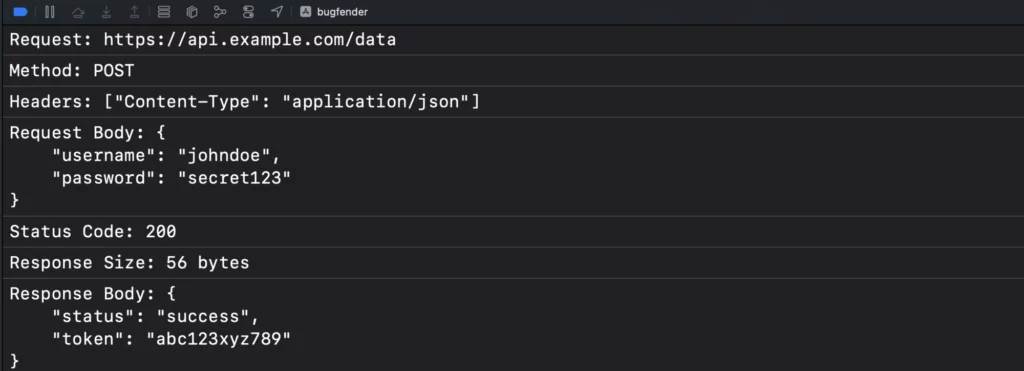
Here’s an advanced example of how you might log network requests with additional details:
    func logNetworkRequest(_ request: URLRequest, response: HTTPURLResponse?, data: Data?) {
        let networkLogger = Logger(subsystem: "com.bugfender.app", category: "network")

        networkLogger.info("Request: \(request.url?.absoluteString ?? "Unknown URL", privacy: .public)")
        networkLogger.info("Method: \(request.httpMethod ?? "Unknown method", privacy: .public)")
        networkLogger.info("Headers: \(request.allHTTPHeaderFields?.description ?? "No headers", privacy: .private)")

        if let httpBody = request.httpBody, let bodyString = String(data: httpBody, encoding: .utf8) {
            networkLogger.debug("Request Body: \(bodyString, privacy: .private)")
        }

        networkLogger.info("Status Code: \(response?.statusCode ?? 0, privacy: .public)")

        if let data = data {
            let responseSize = ByteCountFormatter.string(fromByteCount: Int64(data.count), countStyle: .file)
            networkLogger.info("Response Size: \(responseSize, privacy: .public)")

            if let responseString = String(data: data, encoding: .utf8) {
                networkLogger.debug("Response Body: \(responseString, privacy: .private)")
            }
        }
    }


    func exampleNetworkRequest() {
        let url = URL(string: "<https://api.example.com/data>")!
        var request = URLRequest(url: url)
        request.httpMethod = "POST"
        request.addValue("application/json", forHTTPHeaderField: "Content-Type")

        let bodyData = """
        {
            "username": "johndoe",
            "password": "secret123"
        }
        """.data(using: .utf8)
        request.httpBody = bodyData

        // Simulating a response
        let response = HTTPURLResponse(url: url, statusCode: 200, httpVersion: nil, headerFields: nil)
        let responseData = """
        {
            "status": "success",
            "token": "abc123xyz789"
        }
        """.data(using: .utf8)

        // Log the request and response
        logNetworkRequest(request, response: response, data: responseData)
    }
Bugfender and Remote Logging
While local logging is crucial for development, remote logging takes your debugging capabilities to the next level by serving as an external logging backend that aggregates logs from user devices. This means you can reproduce any error on any device, without requiring direct access or proximity to the device that’s having issues.
Bugfender serves just this purpose. It’s (we like to think) a powerful remote logging platform that allows you to collect logs from your users’ devices in real-time, helping you diagnose and fix issues that are difficult to reproduce locally.
What is Remote Logging?
Remote logging involves sending log data from a user’s device to a centralized server. This allows developers to:
- Monitor app behavior across multiple devices
- Diagnose issues in production environments
- Gather usage statistics and crash reports
- Provide better customer support
Getting Started with Bugfender
Installation
To add Bugfender to your project using Swift Package Manager:
- In Xcode, go to File > Swift Packages > Add Package Dependency
- Enter the Bugfender repository URL:
https://github.com/bugfender/BugfenderSDK-iOS - Follow the prompts to add the package to your project
Configuration
In your AppDelegate, import and configure Bugfender:
import BugfenderSDK

class AppDelegate: NSObject, UIApplicationDelegate {
    func application(_ application: UIApplication, didFinishLaunchingWithOptions launchOptions: [UIApplication.LaunchOptionsKey: Any]?) -> Bool {
        Bugfender.activateLogger("YOUR_APP_KEY")
        Bugfender.enableNSLogLogging() // Capture console logs
        Bugfender.enableUIEventLogging() // Log user interactions
        Bugfender.enableCrashReporting() // Log crashes automatically

        return true
    }
}
Basic Logging with Bugfender
Bugfender provides simple methods for logging at different levels:
Bugfender.print("This is a regular log message")
Bugfender.warning("This is a warning message")
Bugfender.error("This is an error message")
Advanced Bugfender Features
Device-Associated Data
Associate custom data with devices for easier filtering and analysis:
Bugfender.setDeviceString("Premium", forKey: "userTier")
Bugfender.setDeviceInteger(42, forKey: "userAge")
Bugfender.setDeviceBOOL(true, forKey: "isPremiumUser")

// Advanced: Logging user actions with associated data
func logUserAction(_ action: String, details: [String: Any]) {
    Bugfender.print("User Action: \(action)")
    for (key, value) in details {
        Bugfender.setDeviceString("\(value)", forKey: "action_\(action)_\(key)")
    }
}

// Usage
logUserAction("purchase", details: ["item": "Premium Subscription", "price": 9.99, "currency": "USD"])
Sending Issues
For important events or errors, you can send issues with additional context:
func sendDetailedIssue(title: String, description: String, context: [String: Any]) {
    var fullDescription = description + "Context:\n"
    for (key, value) in context {
        fullDescription += "- \(key): \(value)\n"
    }

    let issueUrl = Bugfender.sendIssueReturningUrl(withTitle: title, text: fullDescription)
    if let url = issueUrl {
        print("Issue created. View it at: \(url.absoluteString)")
    }
}

// Usage
sendDetailedIssue(
    title: "Payment Failed",
    description: "User encountered an error during checkout process",
    context: [
        "User ID": 12345,
        "Payment Method": "Credit Card",
        "Amount": "$59.99",
        "Error Code": "PF001"
    ]
)
User Feedback
It’s easy to implement a user feedback system with custom UI and handling:
class FeedbackViewController: UIViewController {
    @IBOutlet weak var subjectField: UITextField!
    @IBOutlet weak var messageTextView: UITextView!

    func sendFeedback() {
        guard let subject = subjectField.text, !subject.isEmpty,
              let message = messageTextView.text, !message.isEmpty else {
            // Show an alert to the user
            return
        }

        let feedbackUrl = Bugfender.sendUserFeedbackReturningUrl(withSubject: subject, message: message)
        if let url = feedbackUrl {
            print("Feedback sent! View it at: \(url.absoluteString)")
            // Show a success message to the user
        } else {
            // Show an error message to the user
        }
    }
}
Customizing Log Collection
Here’s an advanced example of a custom log interceptor that filters logs based on multiple criteria:
class AdvancedLogInterceptor: NSObject, BFLogInterceptor {
    func intercept(_ interceptedLog: BFInterceptedLog) -> BFInterceptedLog? {
        // Only send logs that are errors, warnings, or contain specific keywords
        if interceptedLog.level == .error || interceptedLog.level == .warning {
            return interceptedLog
        }

        let importantKeywords = ["payment", "login", "logout", "crash"]
        if importantKeywords.contains(where: interceptedLog.text.lowercased().contains) {
            return interceptedLog
        }

        // Don't send logs from specific subsystems
        let ignoredSubsystems = ["com.thirdparty.analytics", "com.thirdparty.ads"]
        if let subsystem = interceptedLog.subsystem, ignoredSubsystems.contains(subsystem) {
            return nil
        }

        // Default: don't send the log
        return nil
    }
}

// In AppDelegate:
let interceptor = AdvancedLogInterceptor()
Bugfender.enableNSLogLogging(withInterceptor: interceptor)
Integrating with Other Tools
Bugfender provides methods to get URLs for the current session and device, which can be useful for integrating with other tools:
if let sessionUrl = Bugfender.sessionIdentifierUrl() {
    print("Current session URL: \(sessionUrl.absoluteString)")
}

if let deviceUrl = Bugfender.deviceIdentifierUrl() {
    print("Current device URL: \(deviceUrl.absoluteString)")
}
Handling Crashes
Bugfender can automatically collect crash reports, but you can also manually send crash information:
Bugfender.sendCrash(withTitle: "Unexpected Crash", text: "The app crashed while processing user data")
Best Practices for Using Bugfender
Here are some general rules of thumb that our customers have found useful in the past.
- Use appropriate log levels (print, warning, error) to categorize your logs effectively.
- Leverage device-associated data for easier filtering and analysis.
- Implement user feedback to gather valuable insights directly from your users.
- Use custom log interceptors to control which logs are sent to Bugfender, especially in production environments.
- Regularly review your Bugfender dashboard to identify trends and issues.
Conclusions
Effective logging is a crucial skill for any Swift developer. Whether you’re using Apple’s Unified Logging System, a third-party framework like CocoaLumberjack, or a remote logging solution like Bugfender, understanding how to log effectively can significantly improve your development process.
By mastering logging techniques, you’ll be better equipped to debug issues, monitor your app’s performance, and perhaps most importantly, understand the people who are using your app. What they’re like, what they want, and where they’re encountering problems using your product.
As you continue to develop your Swift applications, remember that good logging practices are an investment in the quality and maintainability of your code. Logging isn’t just a tack-on; it’s part of the build process. And, when done properly, it can be one of the most rewarding parts, too.
Expect The Unexpected!
Debug Faster With Bugfender

Ashutosh Makwana
Six years in the game, crafting Android magic in high-flying consultancies and the coolest of startups. You can contact him on Linkedin