
13 Minutes
Using GraphQL with React: Efficient Data Fetching
Fix Bugs Faster! Log Collection Made Easy
Prerequisites
Before immersing yourself in this tutorial, it’s best to ensure you’ve got the following prerequisites:
- A foundational knowledge of JavaScript / Typescript and React.js.
- Basic knowledge of GraphQL.
- A GitHub personal access token with user permissions.
- Basic understanding of how the terminal works.
- A Package manager: npm, Yarn, or pnpm. For this article, I will be using Bun.
- Any IDE. I recommend Visual Studio Code with GraphQL extensions for syntax highlighting and auto-completion. You can also try to use an online editor for convenience.
Table of Contents
Why we need efficiency in data fetching
Imagine a user browsing your online store. Every click triggers a massive data dump, like downloading the entire product catalogue instead of just the specific item they clicked. Not only is this wasteful, but it also leads to laggy interfaces and frustrated users. This is where efficient data fetching comes in.
Key advantages of using GraphQL with React
GraphQL and React are a powerful combination for building modern web applications, and they offer loads of benefits when you use them in tandem.
- Efficient data retrieval: GraphQL’s declarative data retrieval approach provides significant performance and quality of life improvements over REST APIs. You describe the form of data you want to receive from the GraphQL server, and the server is responsible for combining and filtering the backend data to return exactly what you asked for. This results in smaller payload sizes, especially compared to REST endpoints that can return hundreds of unnecessary fields.
- Type safety: GraphQL provides a schema with strong typing, which allows you to generate specific types for your queries. This minimizes the risk of runtime errors and ensures consistent, reliable data handling.
- State management: Apollo Client, a widely used GraphQL client, can serve as a tool for managing local state. It simplifies state management and reduces the reliance on additional libraries like Redux.
- Schema stitching: With GraphQL, you can combine multiple data sources into a single unified schema. This streamlines data retrieval from different places in a cohesive manner.
- Real-time updates: GraphQL’s subscription feature enables real-time data updates, enhancing the user experience by providing smoother interactions. For instance, it’s useful for scenarios like dynamically adding items to a list on the same page.
This is summary of what GraphQL can offer, if you want to understand how it is different from a traditional RestAPI take a look at our GraphQL vs RestAPI article.
Setting Up a GraphQL Server
To demonstrate how to use GraphQL with React, you’ll need a GraphQL server that exposes data through a single GraphQL endpoint.
If you want to build your own GraphQL server from scratch, you can choose options like Apollo Server and GraphQL Yoga, or services like Hasura, Hygraph or AWS AppSync, which allows you to build a GraphQL API without manual coding.
There are much simpler tools you can use to mock GraphQL APIs, such as json2graphql, Blowson, and json-graphql-server. However, for simplicity, we will use the GitHub GraphQL API as the server. This is a public API that gives you access to GitHub repositories, users, issues, pull requests, and more.
API authentication
To fetch data from Github’s GraphQL API, you need to authenticate your GraphQL requests. You can do this by generating a Personal access token on your GitHub account.
If you have not done this before, here are the steps:
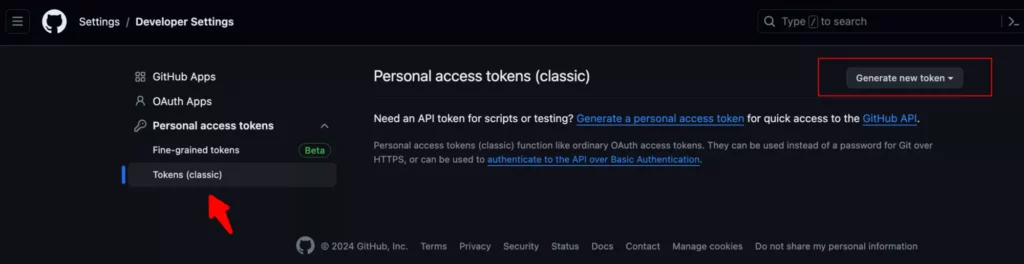
Head over to https://github.com/settings/tokens, navigate to Tokens and click on Generate new token.
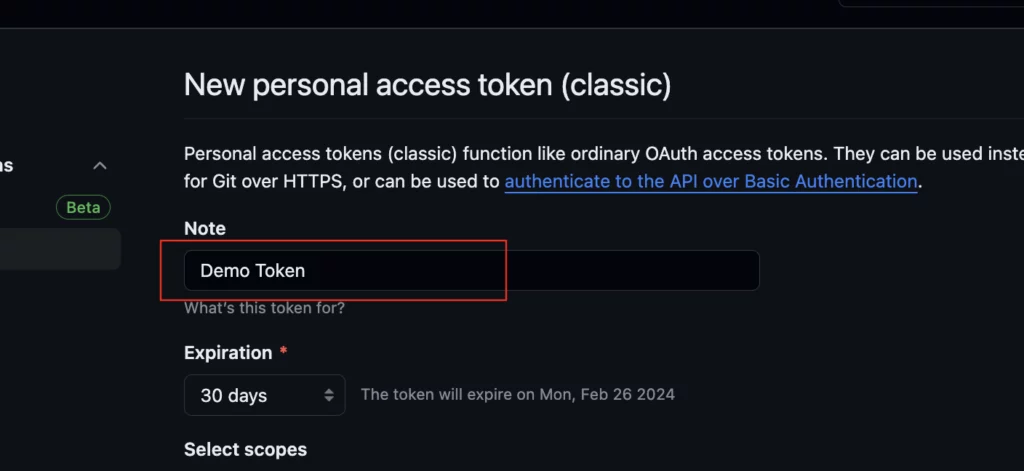
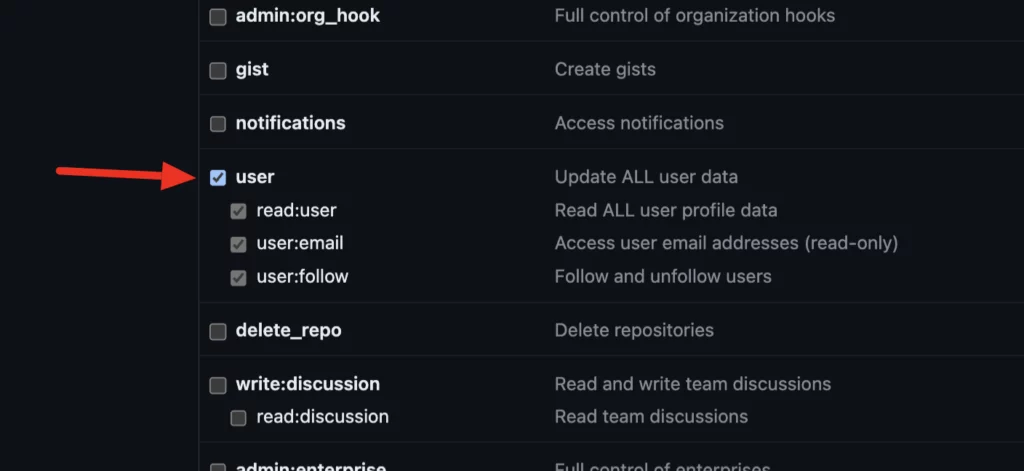
Give your token a name (I will be using ‘Demo Token’) and select the permissions you wish to grant. For this, we simply need the user scope, which enables access to user profile information.
Click on Generate token and copy the token to somewhere safe.
N/B: Do not share your token with anyone or commit it to your code.
How to fetch data with GraphQL in React
There are different ways to fetch data with GraphQL in React. In this section, we will look at three common methods:
- Using the
fetchAPI. - Using the
AxiosLibrary. - Using a GraphQL client library (such as Apollo Client).
Using the fetch API
The easiest way to retrieve data from a GraphQL server in React is to use the native fetch API, available in most modern browsers. This API will allow you to send HTTP requests and receive responses using Promise and async/await syntax.
For example, If you want to fetch the name and avatarUrl (image), the code will look like this:
const fetchData = async () => {
  const response = await fetch('<https://api.github.com/graphql>', {
    method: 'POST',
    headers: {
      'Content-Type': 'application/json',
       Authorization: "bearer <your-personal-access-token>",
    },
    body: JSON.stringify({ query: '{ viewer { name avatarUrl } }' }),
  });

  const data = await response.json();
  console.log(data);
};
For this example, we are just printing the data from the server to the console, as we want to demonstrate how you can use fetch to get data from a GraphQL server, in your application you will probably store these data to a proper structure or an array of avatars.
Using the Axios Library
For those who prefer a higher-level abstraction than the fetch API, libraries such as Axios offer additional features like interceptors and automatic transformations between different types of responses.
We can modify the prior example by replacing the original fetch call with an equivalent Axios invocation:
import axios from 'axios';

const fetchData = async () => {
  const response = await axios.post('<https://api.github.com/graphql>', { query: '{ viewer { name avatarUrl } }' }, {
    headers: {
      'Content-Type': 'application/json',
       Authorization: "bearer <your-personal-access-token>",
    },
  });
  console.log(response.data);
};
Using a GraphQL client library
While fetch API and the Axios library work fine, dedicated GraphQL client libraries provide additional functionality beyond sending HTTP requests. They often include advanced features like cache management, optimistic UI rendering, and powerful abstractions for managing state, being the best option to run any GraphQL request.
Choosing a GraphQL Client
When choosing a GraphQL client library, there are lots of options available, each offering its own unique features and tradeoffs. Some popular choices include Apollo Client, Relay, and Urql.
Let’s compare these libraries side-by-side.
Comparing Apollo Client, Relay and Urql
| Feature | Apollo Client | Relay | Urql |
|---|---|---|---|
| Caching | Yes | Built-in cache + normalization | Basic caching |
| Mutations | Yes | Yes | Yes |
| Pagination | Yes | Native pagination support | Pluggable pagination |
| Real-Time Updates | Subscription Support | Subscription Support | Subscription Support |
| Community Size | Large | Smaller but active | Growing rapidly |
For the purposes of this guide, We’ll focus on Apollo Client for its rich features and seamless integration with React.
Scaffold a React app with Vite and TypeScript
Type this:
bunx create-vite
Then follow the prompts:
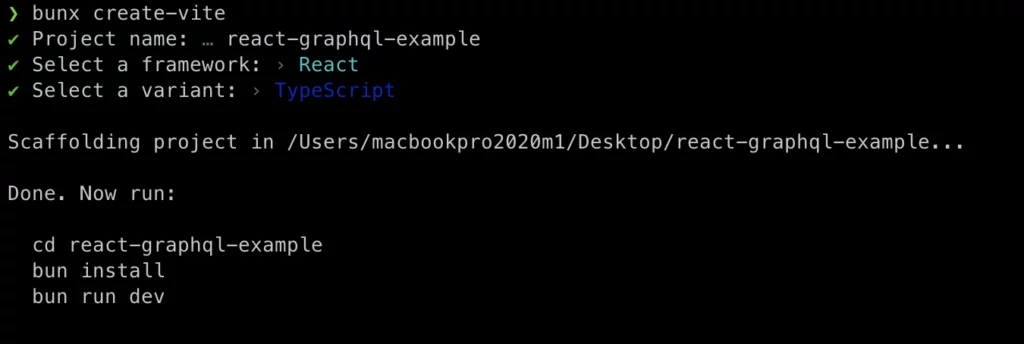
Next, let’s navigate into our project folder on the terminal:
cd react-graphql-example
We can run the code below:
bun install
bun run dev
Then create a .env file in the root of our project and add a GitHub access token:
// .env

VITE_APP_GITHUB_API_URL = "<https://api.github.com/graphql>"
VITE_APP_GITHUB_PERSONAL_ACCESS_TOKEN = "<YOUR GITHUB PERSONAL ACCESS TOKEN>"
Using the Apollo client
The ApolloClient manages the complexity of orchestrating all queries. It is responsible for scheduling, optimizing, caching and sending queries to a GraphQL endpoint.
What’s great about this program is that all the functionality is conveniently hidden behind its query method, which manages and sends queries.

Working with Apollo
bun add @apollo/client graphql @types/bun
Inside the src directory, create a new folder graphql with a apolloClient.ts file inside.
Then proceed to create a new ApolloClient instance inside the apolloClient.ts file by using the new ApolloClient command, like this:
import { ApolloClient, InMemoryCache } from '@apollo/client';

export const client = new ApolloClient({
  uri: `${import.meta.env.VITE_APP_GITHUB_API_URL}`,
  headers: {
    Authorization: `Bearer ${import.meta.env.VITE_APP_GITHUB_PERSONAL_ACCESS_TOKEN}`,
  },
  cache: new InMemoryCache(),
});
Setting up the Apollo Provider
To use Apollo Client with React, we need to set up an ApolloProvider. This is a component that wraps around our entire application at the topmost level, and provides the ApolloClient with all of our other components.
First, navigate to the src/main.tsx file and replace its content with the following code:
// src/main.tsx

import React from 'react';
import ReactDOM from 'react-dom/client';
import App from './App.tsx';
import './index.css';
import {ApolloProvider} from '@apollo/client';
import { client } from './graphql/apolloClient';

ReactDOM.createRoot(document.getElementById('root')!).render(
  <React.StrictMode>
    <ApolloProvider client={client}>
      <App />
    </ApolloProvider>
  </React.StrictMode>
);
Connect the provider to your React component
Here, you will use the useQuery hook to effortlessly fetch data and display it in your UI.
In your graphql folder, create a file called get-user.query.graphql and add the code below:
query GetUser {
  viewer {
    login
    name
    avatarUrl
    bio
  }
}
Then open src/App.tsx and modify it accordingly:
// src/App.tsx

import './App.css';
import { gql, useQuery } from '@apollo/client';
import { GetUser } from './graphql.query'

function App() {
  const { loading, error, data } = useQuery(GetUser);

  if (loading) return <p>Loading...</p>;
  if (error) return <p>Error :(</p>;

  const user = data.viewer;

  return (
    <div className='App'>
      <header className='App-header'>
        <img src={user.avatarUrl} alt='' />
        <h1>{user.name}</h1>
        <p>{user.bio ?? 'No Bio Available.'}</p>
      </header>
    </div>
  );
}

export default App;
This is what it will look like:

Everything seems like it’s good, right?

So what is wrong with this approach?
Even though our code seems to do what we want, it’s not truly reliable. There are a couple of mistakes we’ve made that we should address:
No GraphQL type validation
If you look closely, we did not add type validations in the Graphql calls. This means that if you request a field that doesn’t exist in the GitHub GraphQL Schema, you will get an error. Without explicit schema definition files, neither the frontend nor the backend validates incoming or outgoing GraphQL operations against the defined schema. As a result, subtle discrepancies might go undetected until runtime, which is obviously far too late.
To demonstrate an example, let’s add another random field to your query, in this case water.
query GetUser {
  viewer {
    login
    name
    avatarUrl
    bio
    water  // This is not present in the schema
  }
}
This will result in an error, but without any information about what the actual issue is, which can be very frustrating.
No response types
You may also have noticed that we did not include any type checking for responses, hence we can’t know for sure what is to be returned. We need to make sure that we validate the data we receive from our API call to make sure the data is correct.
So how do we fix this? Let’s look at Codegen
To fix these issues, we can use GraphQL Codegen.
GraphQL Codegen is a GraphQL code generator tool that creates code based on our GraphQL schema and queries. It automates the generation of secure code while reducing the likelihood of runtime errors and enhancing the overall developer experience. It can generate type definitions, resolvers, and client-side code for popular libraries like Apollo Client.
Now let’s look at how to install and configure Codegen.
Installing GraphQL Codegen
To use Codegen in your React application, you need to Install the required dependencies:
bun add -D @graphql-codegen/cli @graphql-codegen/typescript @graphql-codegen/typescript-graphql-request @graphql-codegen/typescript-operations @graphql-codegen/typescript-react-apollo
The Codegen CLI will scan all the .graphql files in the source directory to find all queries and mutations. GraphQL Codegen will use them to generate typesafe hooks, which take care of all backend calls. The resulting types and hooks will be created in ./src/graphql/graphql.ts.
Create a Codegen Configuration File
To automate this process, create a new file called graphql.config.yml in your root directory and add the code below.
# graphql.config.yml

schema:
  - <https://api.github.com/graphql:>
      headers:
        Authorization: Bearer <YOUR GITHUB PERSONAL ACCESS TOKEN>
				User-Agent: YOUR_USER_AGENT
documents:
  - "./src/**/*.graphql"
generates:
  ./src/graphql/graphql.ts:
    plugins:
      - typescript
      - typescript-operations
      - typescript-react-apollo
Modify the scripts section in your package.json to include a script called codegen, responsible for generating output files via GraphQL Codegen:
"scripts": {
	{...}
	"codegen": "graphql-codegen --config graphql.config.yml"
},
Now, to generate your types, run bun codegen.

This will create a graphql.ts file in your src/graphql folder containing all necessary TypeScript interfaces and helper functions.
Using GraphQL Codegen
You can import these files directly into your React components for enhanced type safety.
To modify your src/App.tsx, use the following code:
// src/App.tsx

import './App.css';
import { useQuery } from '@apollo/client';
import {
  GetUserQueryVariables,
  GetUserQuery,
  GetUserDocument,
} from './graphql/graphql';

function App() {
  const { loading, error, data } = useQuery<
    GetUserQuery,
    GetUserQueryVariables
  >(GetUserDocument);

  if (loading) return <p>Loading...</p>;
  if (error) return <p>Error :(</p>;

  const user = data.viewer;

  return (
    <div className='App'>
      <header className='App-header'>
        <img src={user.avatarUrl} alt='' />
        <h1>{user.name}</h1>
        <p>{user.bio ?? 'No Bio Available.'}</p>
      </header>
    </div>
  );
}

export default App;
The result of our query above is this:
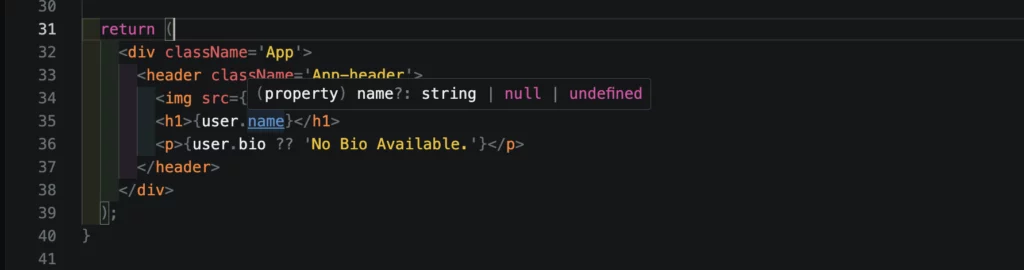
Reusable queries with fragments
GraphQL fragments allow for the creation of reusable queries, making it easier to use the same queries in different components without having to repeat the entire query every time.
Navigate to your get-user.query.graphql file and modify the code as follows;
fragment UserFields on User {
  login
  name
  avatarUrl
  bio
}

query GetUser {
  viewer {
    ...UserFields
  }
}
In this example, I created a new fragment called UserFields, which defines the fields that are common to both the query and any other queries or mutations that might need to access similar information about a user in the future. By doing so, we can avoid repeating ourselves and make our code more concise and maintainable.
Also, don’t forget to run bun codegen again to generate types for it.
Debugging with the Apollo Client Devtools
Using Apollo Client Devtools to debug a React application can be immensely helpful for diagnosing issues and understanding the behaviour of your GraphQL queries and cache.
The Apollo Client Devtools are available as an extension for Chrome and Firefox.
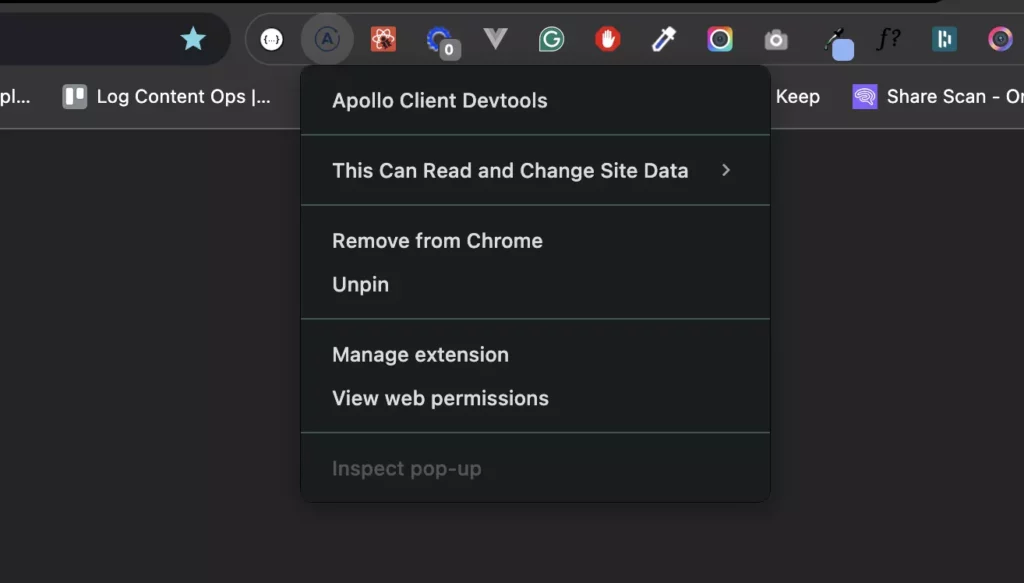
Once your application is running and the extension has been installed, open the Chrome browser and launch the Developer Tools (Cmd + Option + I on Mac or Ctrl + Shift + I on Windows/Linux).
In the Developer Tools window, you’ll see a tab named Apollo. Click on it to open the Apollo Client Devtools panel.
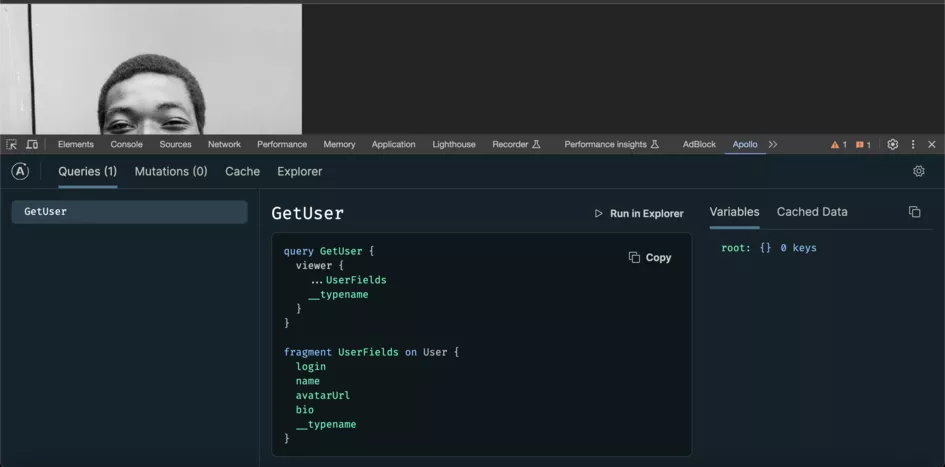
You can now explore the different tabs within the Apollo Client Devtools panel. Here are some of the main tabs you’ll find:
- Cache: Allows you to inspect the contents of the Apollo Client cache and see cached query results.
- Queries: Shows information about GraphQL queries being executed, including the query text, variables, and result data.
- Mutations: Similar to the Queries tab, but for GraphQL mutations.
That’s it! You should now be able to use the Apollo Client Devtools to debug your React application’s interactions with your GraphQL server and now you are ready to deploy your app!
To sum up
Is GraphQL the future?
Although GraphQL is not perfect, the pros far outweigh the cons in many cases.
The program provides flexibility, scalability and adaptability to the API layer that no other solution can match. Also, with Facebook’s support for GraphQL, it looks like further improvements and improvements are possible. So yes, GraphQL could indeed represent the future of API architecture and be one of the most used technologies to build iOS apps.
Now you’ve got the ideal foundation, because today we’ve learned how to use GraphQL with React to achieve efficient data fetching. Now you can go ahead and try out other exciting features of GraphQL, such as subscriptions and mutations.
Happy Coding!.
Expect The Unexpected!
Debug Faster With Bugfender