9 Minutes
How to Master Manual Testing
Fix Bugs Faster! Log Collection Made Easy
Since starting out in 2011, we at Mobile Jazz have been privileged to build some of the world’s most popular apps, accumulating a combined total of over 500 million downloads across all our products. When dealing with apps of this reach and popularity, testing is crucial: a slight glitch that sneaks through the QA process will result in a deluge of complaints.
We’re constantly sharpening our testing regime, honing our methods to ensure consistent quality across all our product streams. We spend hours figuring out when, and how, to automate our tests.
We have written about automated testing tools previously (you can check out our previous posts on iOS and Android automated testing tools), but we know from experience that machines aren’t the be-all-and-end-all. In testing, as in all areas of life, sometimes you need a human touch.
In this post we’ll take a deep dive into manual testing. We’ll discuss when it’s appropriate, and provide a series of hacks to help you refine your testing regime. We hope it’s useful for specialist testers as well as engineers who are molding their own testing programs.
The Key Bits
This article will focus on:
- The basic rules that govern when to automate
- How to build manual tests that work under pressure
- How to add value with reduced-version tests
- How remote logging can aid your testing regime
To Automate, Or Not to Automate?
Every developer will have their own rules of thumb about when to automate and when to stick with good old-fashioned manual. But these are some basic ground rules we’ve come up with, based on our own long (and occasionally bitter) experience.
- You can automate unit tests and certain integration tests, but UI tests should always be kept in human hands.
- It’s good practice to make a test plan, comprising a list of test cases and describing how to perform each one (it’s easier than it sounds, trust me).
- Make sure you run your test plan: perform the test and keep records.
- Keep it efficient and find strategies for easy regression testing.
The user interface test, also called the system test, should never be a candidate for automation unless you have a really good reason. Or, alternatively, you’ve got lots of money you don’t need!
Why is UI so unsuitable for automation, you ask? Well, two reasons. Firstly, because UI tests are usually quite brittle. They can snap easily on minor aesthetic details or other innocuous changes in the underlying implementation which do not actually change the functionality or appearance.
Also, it’s very difficult to describe to a machine how the UI should look. Whilst a human can very easily spot things that look off, like misalignments of elements, incorrect colors or inaccessible buttons, this isn’t so easy for an automated program to assess.
By automating UI tests, you’re leaving yourself open to problems. It can be a huge waste of time: you may find you spend a whole day (or two) writing the test, only to then find yourself back at the drawing board a few days later when it’s broken down. Brittle or unusable tests will also dynamite your team’s morale and they might end up tempted to quit testing altogether (believe me, I’ve seen this first hand!)
Building Your Own Test Template
Ok, so now we’ve discussed the ‘when’, let’s move on to the ‘how’. Specifically, how do you go about implementing manual tests?
To kick things off, it’s good to make a list of requirements, or use cases. If you do not have a written list ready, you can identify the cases by looking at the screens and the buttons your application comprises. Does the application do certain things automatically, like sending you notifications? If so, add them to the list too.
If you have not written the requirements down yet, it’s never too late! In fact, you can start right now. I like Google Sheets, which I will use in this post, but you can use any documentation tool you like.
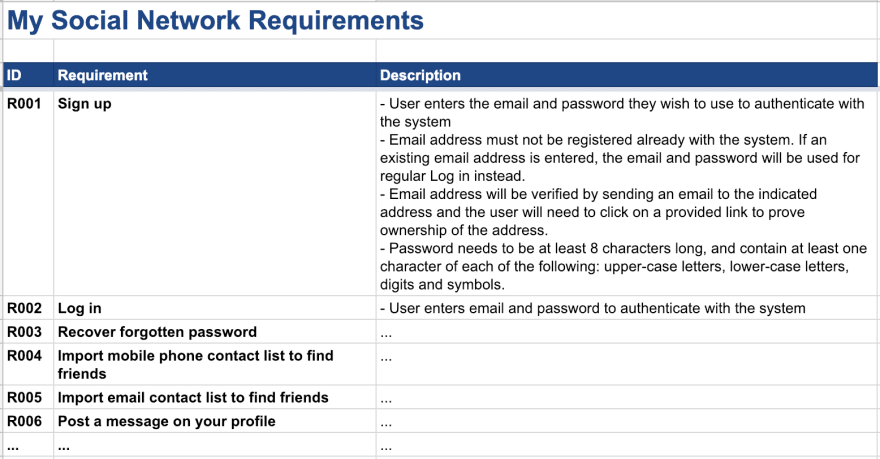
If, for example, you’re running a social media app, here’s an example list of requirements you could compile:
- Sign up
- Log in
- Recover forgotten password
- Import mobile phone contact list to find friends
- Import email contact list to find friends
- Post a message on your profile
- … and so on
The spreadsheet would look something like this:

Next, write down the list of things to test for each requirement. Consider the regular path the user would usually take, but also factor in the alternative cases that might cause glitches. For example, for a login screen, try things like pressing the login button without entering any details, then try with the wrong username, or the wrong password.
Once you have compiled the list of things you want to test, write a step-by-step guide to how you would do it. Explain each text field, button press, each dialog box that appears… it might seem a bit stupid in the beginning, but ideally it should be simple and self-explanatory enough to enable anyone to perform the test in your absence.
In fact, I recommend you don’t do the test yourself. If you don’t have a QA team on site, I recommend asking a colleague. The tester doesn’t have to be a developer: he or she can be a designer, a marketer, an accountant, anyone in the team really. Believe it or not, developers can be the worst people at finding bugs, simply because we’re so invested in the application and can struggle to step outside.
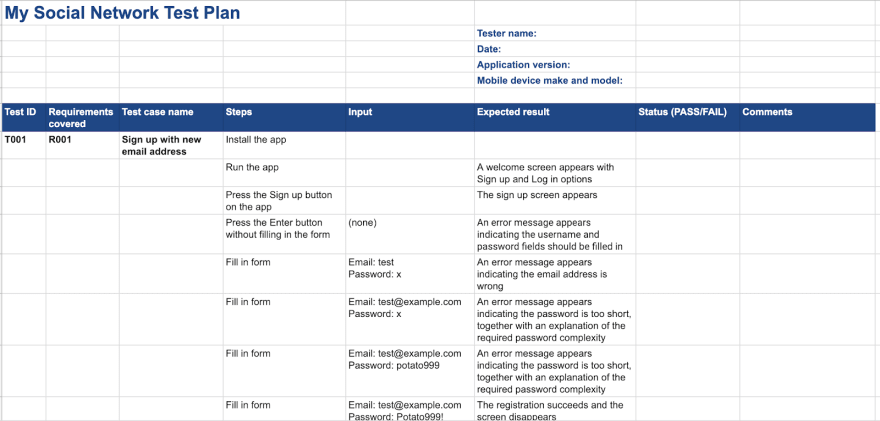
Following the previous example, a test for the sign-up requirement might look like this:
- Install the app and run it. A welcome screen appears with sign-up and log-in options.
- Press the sign-up button on the app. The sign-up screen should appear.
- Press the enter button without filling in any field. An error message should appear indicating the username and password fields should be filled in.
- Enter “test” as email address and “x” as password. An error message appears indicating the email address is wrong.
- Enter “[email protected]” as email address and “x” as password. An error message appears indicating the password is too short, together with an explanation of the required password complexity.
- Enter “[email protected]” as username and “potato” as password. The registration succeeds and the screen disappears.
I like building my test cases as a form. For this, again I like using a Google Sheet. It’s good practice to add a header with the tester name, date, application version name and the make/model of the mobile device you’re using to test. Leave an empty space for the tester to write PASS/FAIL and maybe also an extra column for observations.
It might look like this:

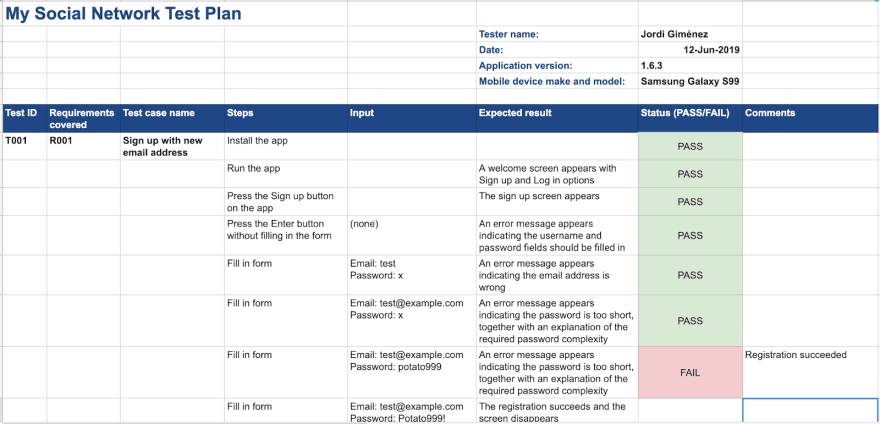
Keep this spreadsheet as a template. Once you are ready to test your app, duplicate it (or print it) and fill it in. Keep the filled form as a record; it might be useful in the future to track down an error. Also, depending on your project, it might be even necessary to keep some sort of log of the test to comply with your internal company rules, for regulatory purposes or as a record to show to your client if you’re a contractor.
Here is what a filled form might look like:

Using Remote Logging to Aid Your Testing Regime
Without wishing to brag, our product, Bugfender can be really useful here. if you need to keep a record you can use Bugfender to collect the logs from your whole testing session. Our product will fetch the logs regardless of whether you’re still testing, or already in production stage.
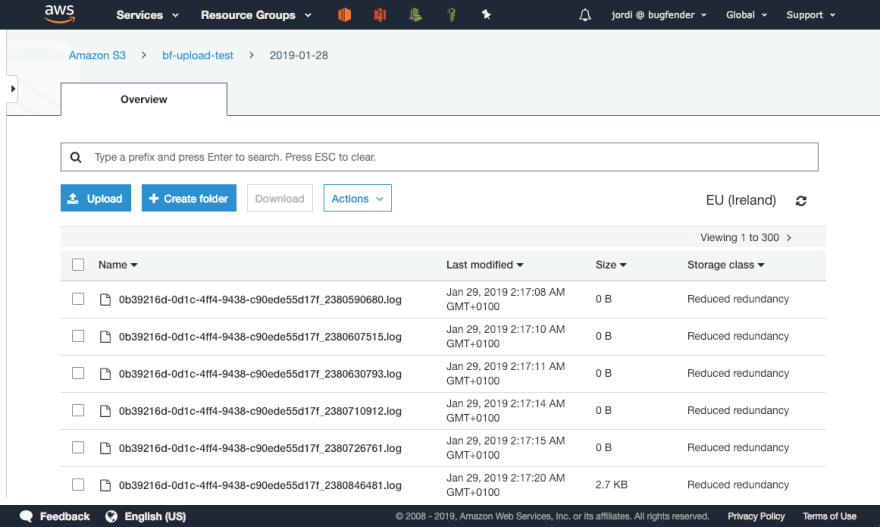
The logs will both provide a record of the testing and help you reproduce and solve bugs if one of the tests doesn’t work as expected. You can even use our Amazon S3 export functionality to keep an archived copy of the logs for a few years, so you can always go back in time and check exactly what happened during the test, even if it was several months ago.
If you’re interested in signing up, click here. We promise there’ll be no more self-promotion from now on!

Running Reduced Versions
Manual testing will take its time, and you might be concerned that going through updates and executing the full test suite for each new application version might be too much. You’re right to be concerned: if you’re releasing often and you’re testing on several mobile devices, the time for executing tests might start to drag.
Here’s a hack that’s served me well over the years: besides writing your requirements and test cases, you can also write a third table, cross-referencing which requirements are covered by which tests. This will help find the tests you need to update on your template if you change a requirement.
An added bonus of these tables is that you can also use them to produce truncated versions of the test suite when you only make minor changes in the app, and you only want to re-test the requirements that have been affected.
I recommend combining reduced tests for minor app changes, whilst still doing a full test when you change important parts of the application, or when testing compatibility with a new release of the operating system.
This “requirements vs. tests” table is usually called the Traceability Matrix. You can write it as a table but I like to de-normalize it, so write an extra column in the requirements and test tables, referring to the columns on the other table. Here is how it looks in our example:


Ready to Get Started?
If you would like to get into your testing right away you can access our template as a starting point. Check it out here. Do not feel constrained by our format – feel free to add or remove columns and adapt it as works best for you.
Remember, testing can be frustrating at times and it can certainly involve a lot of work, but it’s worth it. By going the extra mile, refining your testing regime and documenting it properly, you can catch crucial errors and ensure quality across releases. No matter how big or small your company is, it’s definitely a shrewd investment.
Expect The Unexpected!
Debug Faster With Bugfender


