17 Minutes
Using GraphQL API in Android
Fix Bugs Faster! Log Collection Made Easy
Since it was created by Facebook in 2012 and made publicly available in 2015, GarphQL has changed everything about how we fetch data from servers for our front-end apps. Most front-end clients typically use REST APIs to retrieve data from the server, this includes mobile apps for platforms like Android, iOS, and Flutter, as well as JavaScript frameworks like React, Angular, Vue, and Next.
A huge advantage of GraphQL is that it enables front-end clients to request only the API they require. Front-end clients use the GraphQL query language to specify the data they need from an API, then a GraphQL server processes these queries over HTTP returning only the data requested by the client.
In this tutorial, we we’re going to consider some of the key features and benefits offered by GraphQL before demonstrating by building two example projects – first we’ll create a Node.js app which will give us a GraphQL server/endpoint, then we’ll build an Android app that consumes that endpoint.
Table of Contents
Features and benefits of GraphQL
Let’s start by taking a look at some of the key features and benefits of GraphQL:
Efficient data fetching
Unlike REST APIs (where multiple endpoints may need to be called to fetch related data), GraphQL allows clients to request only the specific data they need in a single query, reducing over-fetching and under-fetching of data.
Declarative data fetching
GraphQL clients can specify the shape and structure of the data they need using a declarative query language. This empowers clients to define their data requirements without having to make changes on the server side.
Strongly typed schema
A strongly typed schema, which serves as a contract between the client and server, is what powers GraphQL APIs, defining the types of data available and the operations that can be performed to provide clarity and validation during development.
Real-time updates
GraphQL supports real-time data updates through subscriptions, meaning clients can subscribe to specific data events and receive updates from the server when relevant data changes, enabling features like live notifications and chat.
Versioning and evolution
With GraphQL, as clients can specify exactly the fields they require, there’s no need for versioning endpoints. This allows for seamless evolution of APIs without breaking changes, as new fields can be added to the schema without impacting existing clients.
Batching and caching
GraphQL queries can be batched together, reducing the number of HTTP requests and improving network efficiency. Additionally, GraphQL responses can be cached at various levels (e.g. client, server, and CDN) for further optimization.
Tooling and ecosystem
GraphQL has a rich ecosystem of tools and libraries for various platforms and languages, including client frameworks, server implementations, IDE plugins, and developer tools. These tools enhance developer productivity and provide support for features like linting, code generation and debugging.
Cross-platform compatibility
As it’s transport agnostic GraphQL can be used with any programming language or platform and can be integrated over HTTP, WebSockets, or any other network protocol. This flexibility makes it ideal for building APIs for web, mobile, IoT, and other platforms.
Developer experience
GraphQL provides a more intuitive and developer-friendly experience compared to traditional REST APIs. Its self-documenting nature, interactive tooling (like GraphiQL), and introspection capabilities make it easier to explore and understand the API schema.
Fantastic. Now we’ve covered the key features and benefits we can get started on our demo projects.
Using Node.js to Create a GraphQL API
Let’s begin our tutorial by creating the GraphQL API using the Node.js framework and Express library. This combination will allow us to build a quick server to later construct our Android GraphQL app, which will consume this API.
To create a GraphQL server in Node.js with Express, we will need to follow these steps:
Setup project:
Firstly, if you haven’t installed Node.js go ahead and install it.
Now we’ll need to create a new directory for our project and initialize a Node.js project using npm or yarn, like this:
mkdir graphql-server

cd graphql-server

npm init -y
Install dependencies and configure Nodemon:
Next we can install the necessary dependencies, including Express, Express-GraphQL for handling GraphQL requests, and GraphQL for creating the schema, as below:
npm install express express-graphql graphql --save
We’ll also require the nodemon, as follows:
npm install --save-dev nodemon
Now we can update our package.json and add nodemon so we can run the server by npm run dev, like this:
"scripts": {
	"dev": "nodemon server.js"
},
Finally, our package.json looks like the below:
{
    "name": "bug",
        "version": "1.0.0",
            "description": "",
                "main": "server.js",
                    "scripts": {
        "dev": "nodemon server.js"
    },
    "author": "",
        "license": "ISC",
            "dependencies": {
        "express": "^4.18.2",
            "express-graphql": "^0.12.0",
                "graphql": "^15.8.0"
    },
    "devDependencies": {
        "nodemon": "^3.0.1"
    }
}
Make an app with Express
For this example our data can be hardcoded for simplicity, although in the real world we’d probably need to query the data from a database.
It’s also worth remembering that the GraphQL API created through this tutorial only has a method to query all items at once, where more advanced projects will have multiple methods.
The following code shows how to create the Node.js app:
const express = require('express')
const expressGraphQL = require('express-graphql').graphqlHTTP
const {
    GraphQLSchema,
    GraphQLObjectType,
    GraphQLString,
    GraphQLList,
    GraphQLInt,
    GraphQLNonNull
} = require('graphql')

const app = express()
const movies = [
    { id: 1, name: 'Matrix', thumb: "<https://upload.wikimedia.org/wikipedia/en/thumb/c/c1/The_Matrix_Poster.jpg/220px-The_Matrix_Poster.jpg>" },
    { id: 2, name: 'Jason Bourne', thumb: "<https://upload.wikimedia.org/wikipedia/en/b/b2/Jason_Bourne_%28film%29.jpg>" },
    { id: 3, name: 'Interstellar', thumb: "<https://upload.wikimedia.org/wikipedia/en/b/bc/Interstellar_film_poster.jpg>" },
    { id: 4, name: 'The International', thumb: "<https://upload.wikimedia.org/wikipedia/en/thumb/4/4c/The_International_poster.jpg/220px-The_International_poster.jpg>" },
    { id: 5, name: 'Star Trek Into Darkness', thumb: "<https://upload.wikimedia.org/wikipedia/en/thumb/5/50/StarTrekIntoDarkness_FinalUSPoster.jpg/220px-StarTrekIntoDarkness_FinalUSPoster.jpg>" },
]

const MovieType = new GraphQLObjectType({
    name: 'Movie',
    description: 'This represents a movie',
    fields: () => ({
        id: { type: GraphQLNonNull(GraphQLInt) },
        name: { type: GraphQLNonNull(GraphQLString) },
        thumb: { type: GraphQLNonNull(GraphQLString) },
    })
})

const RootQueryType = new GraphQLObjectType({
    name: 'Query',
    description: 'Root Query',
    fields: () => ({
        movies: {
            type: new GraphQLList(MovieType),
            description: 'List of All Movies',
            resolve: () => movies
        },
    })
})

const schema = new GraphQLSchema({
    query: RootQueryType
})

app.use('/movie', expressGraphQL({
    schema: schema,
    graphiql: true
}))

app.listen(5000, () => console.log('Server Running'))
Great stuff! Now let’s test it.
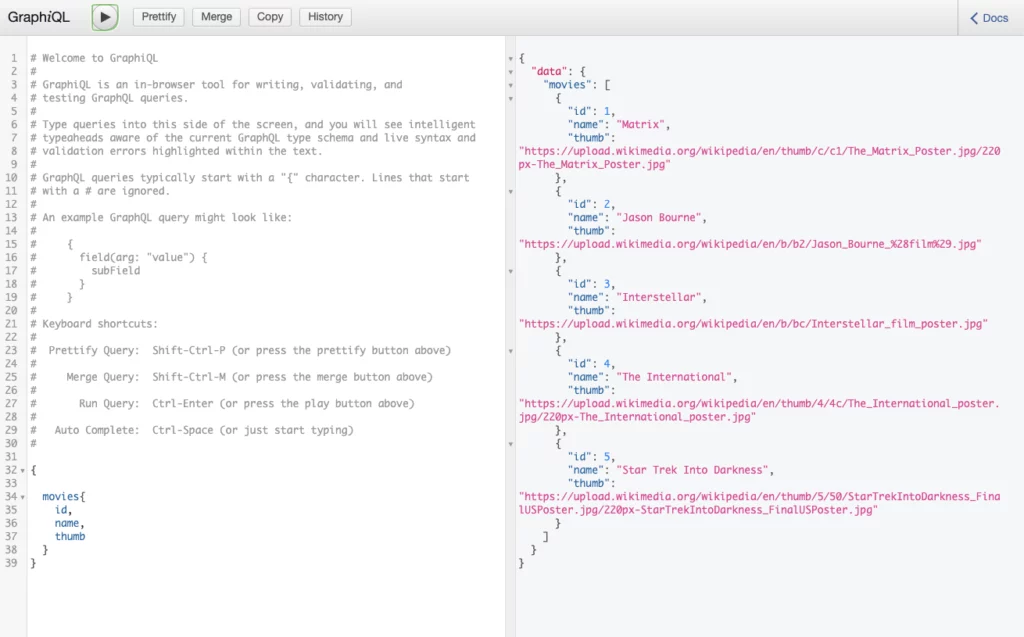
Test in a browser
Launch a web browser and navigate to http://localhost:5000/movie to access the GraphQL interface, you can see GraphQL queries, and results are available now.
Here’s an example query in the GraphiQL query schema:
{

  movies{
    id,
    name,
    thumb
  }
}
And the response should look like this:
{
  "data": {
    "movies": [
      {
        "id": 1,
        "name": "Matrix",
        "thumb": "<https://upload.wikimedia.org/wikipedia/en/thumb/c/c1/The_Matrix_Poster.jpg/220px-The_Matrix_Poster.jpg>"
      },
      {
        "id": 2,
        "name": "Jason Bourne",
        "thumb": "<https://upload.wikimedia.org/wikipedia/en/b/b2/Jason_Bourne_%28film%29.jpg>"
      },
      {
        "id": 3,
        "name": "Interstellar",
        "thumb": "<https://upload.wikimedia.org/wikipedia/en/b/bc/Interstellar_film_poster.jpg>"
      },
      {
        "id": 4,
        "name": "The International",
        "thumb": "<https://upload.wikimedia.org/wikipedia/en/thumb/4/4c/The_International_poster.jpg/220px-The_International_poster.jpg>"
      },
      {
        "id": 5,
        "name": "Star Trek Into Darkness",
        "thumb": "<https://upload.wikimedia.org/wikipedia/en/thumb/5/50/StarTrekIntoDarkness_FinalUSPoster.jpg/220px-StarTrekIntoDarkness_FinalUSPoster.jpg>"
      }
    ]
  }
}
That’s it!
Using Node.js and Express we have successfully built a simple GraphQL server. This is the starting point for extending our GraphQL schema with additional types, mutations, database or external API integrations.
If you’re looking for more advanced information, make sure to read the Express-GraphQL and GraphQL official documentation.
Now let’s look at building an Android app to utilize our GraphQL server.
Building an Android app using the Apollo Kotlin client
Android doesn’t have any official libraries for GraphQL so we’re going to use the Apollo Android Kotlin library for our project, which is a simple native Android project using the Kotlin language.
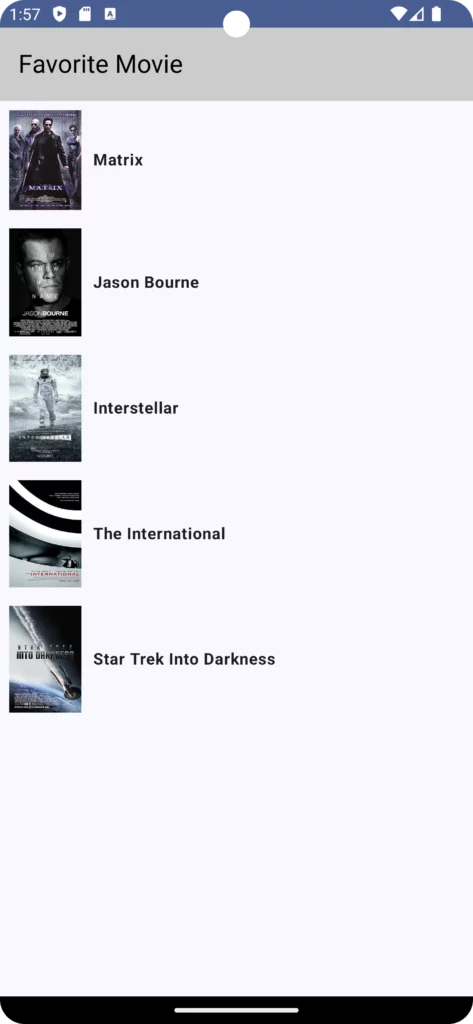
When we’re finished, our app will look like this:
Project setup
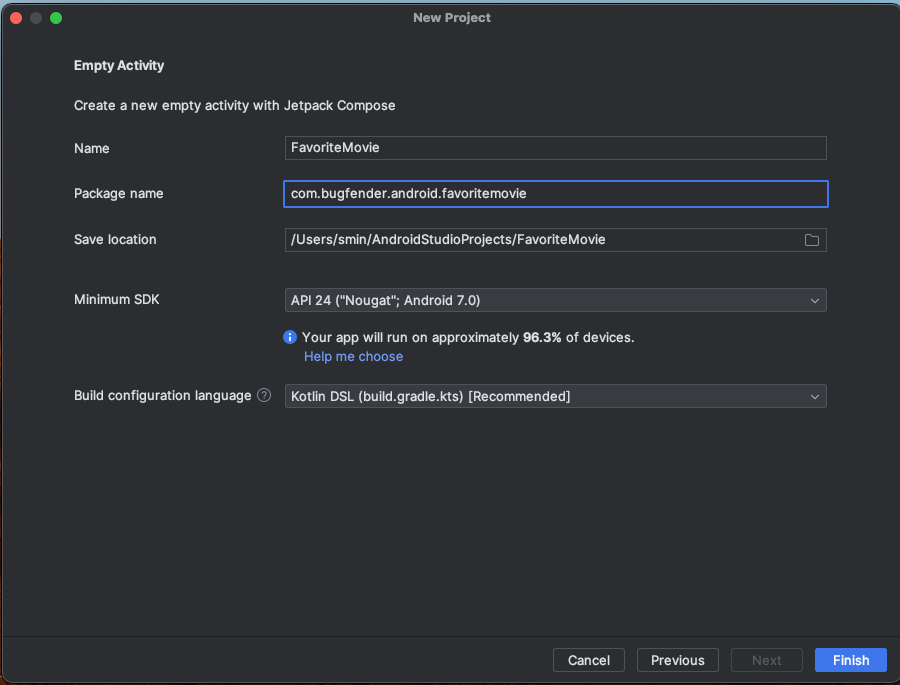
Let’s start by opening Android Studio and creating a new project called FavoriteMovie using Kotlin as the language and Jetpack for building the native UI.
Next, we can configure and install the Apollo Kotlin libraries as shown below:
Before moving on to the next section, we need to add permission to our AndroidManifest.xml to access the internet and network security configurations to access our GraphQL API, which uses the HTTP protocol, like this:
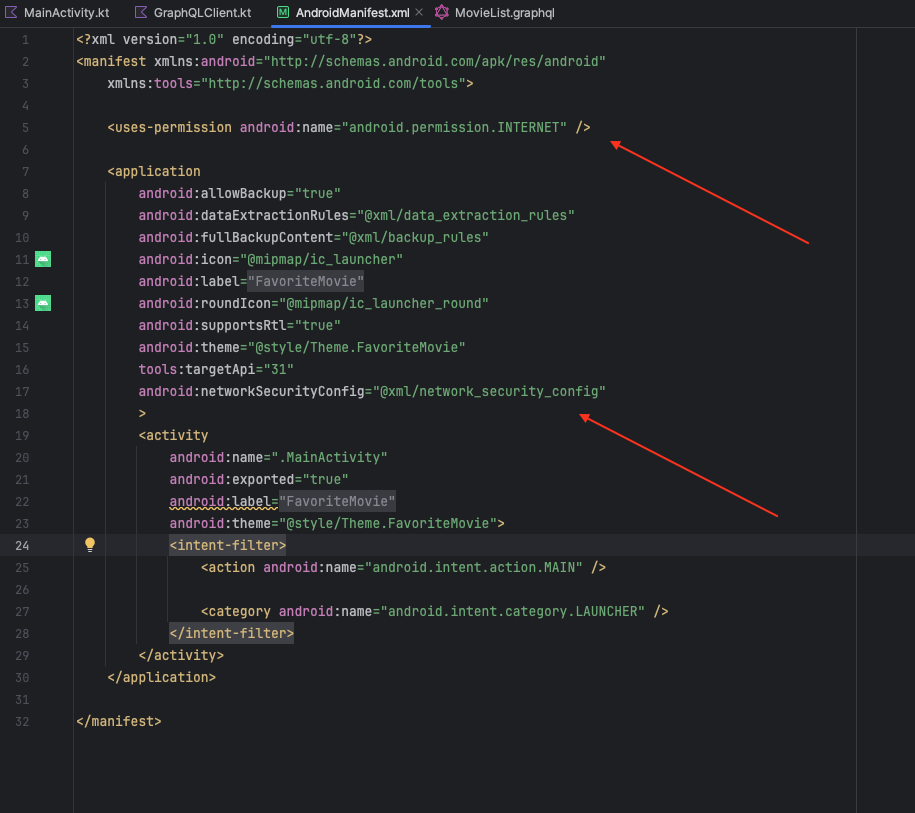
Now we’ll create a new XML file called network_security_config in res/xml/ directory in our Android project, declaring that we want to use IP 10.0.2.2 with HTTP as below:
<?xml version="1.0" encoding="utf-8"?>
<network-security-config>
    <domain-config cleartextTrafficPermitted="true">
        <domain includeSubdomains="true">10.0.2.2</domain>
    </domain-config>
</network-security-config>
It’s important to remember that this is the IP the Android emulator uses to access our http://localhost:5000 endpoint so we’ll need to specify this IP in our network security configuration file for proper access.
Our Node.js is accessible from our computer’s browser using localhost, but we must use 10.0.2.2 from the Android emulator.
Apollo Kotlin Installation
We’re now ready to start installing the Apollo Kotlin library to access our GraphQL APIs.
To apply the plugin, open the app/build.gradle.kts (one that has a dependencies { } block) file and add the following lines at the beginning:
plugins {
    alias(libs.plugins.androidApplication)
    alias(libs.plugins.jetbrainsKotlinAndroid)

    // Apollo GraphQL
    id("com.apollographql.apollo3") version "4.0.0-beta.5"
}

// Apollo GraphQL
apollo {
    service("movie-service") {
        packageName.set("com.bugfender.movieserver")
    }
}
Now we’re ready to add our Apollo Kotlin library to our project and start using it to interact with our GraphQL API.
Scroll to the bottom, and under the dependencies block, add this:
implementation("com.apollographql.apollo3:apollo-runtime:4.0.0-beta.5")
We will need another library called Coil to cache our movie’s image. Add Coil to our implementation section as well, like this:
implementation("io.coil-kt:coil-compose:2.6.0")
Sync the build file now.
Next, in order for Apollo Kotlin to produce type-safe models and code based on our queries, we’ll create a GraphQL schema. We can create a schema in a variety of ways but in this tutorial we’re using the downloadApolloSchema Gradle task that our plugin automatically created for us.
From the root of the project, run the following in Android Studio’s Terminal tab:
./gradlew :app:downloadApolloSchema --endpoint='<http://localhost:5000/movie>' --schema=app/src/main/graphql/schema.graphqls
If everything goes fine, we will see a BUILD SUCCESSFUL result, like this:
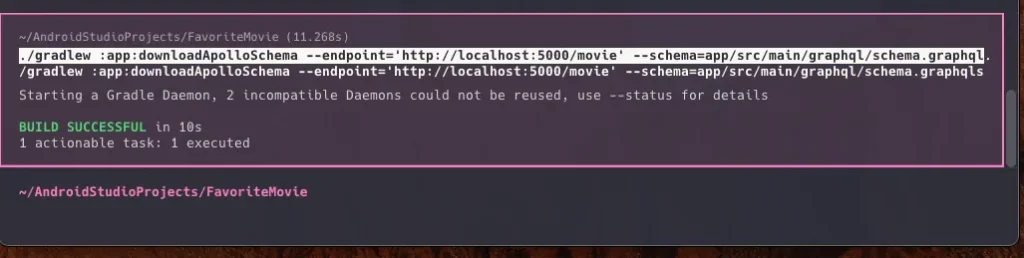
In the above command, we use the downloadApolloScheme tool and specify the endpoint of our GraphQL server and the location of the schema file to be saved.
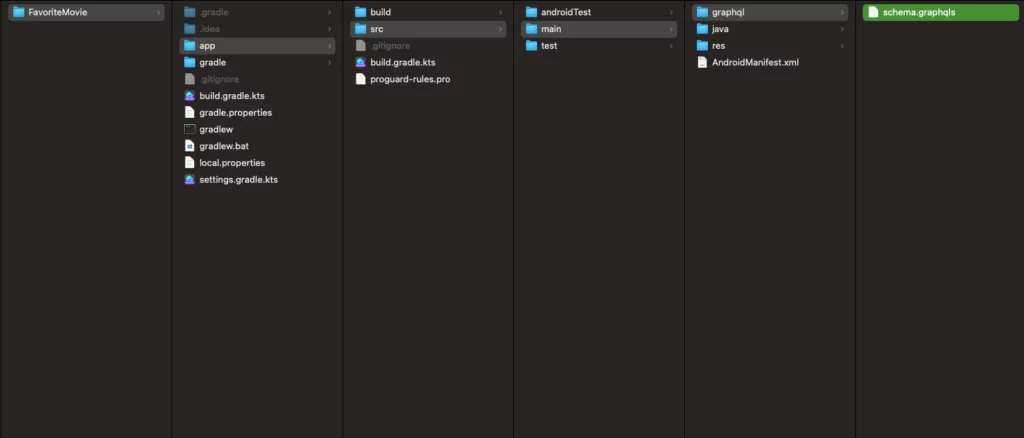
This will download a schema.graphqls file from our endpoint to app/src/main/graphql/schema.graphqls file, as shown below:
Excellent work! Now let’s look at the final few steps to get our app up and running.
Add the query to our project
Right click on the src/main/graphql/ folder and create a new file named MovieList.graphql, this folder should contain our schema.graphqlsand it’s crucial to make sure it’s saved at the same level as our schema.graphqls file.
Next we need to copy our final query from GraphQL Explorer (http://localhost:5000/movie) and paste it into MovieList.graphql, like this:
query MovieList {
  movies{
    id,
    name,
    thumb
  }
}
Generate the model
When we build our project, the Apollo Kotlin tool will make our first model. To make the models the tool sets up a task called generateApolloSources – it’s not necessary to run this as It will run automatically when we build our project.
It’s also worth remembering that autocomplete won’t work until we build our project.
Create an ApolloClient
Next we’ll create a new file called GraphQLClient and add the following code:
package com.bugfender.android.favoritemovie

import com.apollographql.apollo3.ApolloClient

val GraphQLClient = ApolloClient.Builder()
    .serverUrl("<http://10.0.2.2:5000/movie>")
    .build()
This will use ApolloClient to make the network request to our GraphQL server.
Now, we have the option to either use Jetpack Compose or stick with the traditional Android method of app development. Since Jetpack Compose is the most up-to-date and effective method for creating native Android apps, we decided to use it for our demo.
In Jetpack Compose, we can use ViewModel to make the business logic or maintain the UI state level.
Next we’ll create a new file called MovieViewModel, which we’ll use to call the GraphQLClient to get the data from the GraphQL server – we’ll call the function getMovieList() from the UI.
This function gets data from the GraphQL client and adds all the movies to our movieList variable, as you can see below:
package com.bugfender.android.favoritemovie.viewmodel

import androidx.compose.runtime.mutableStateListOf
import androidx.lifecycle.ViewModel
import androidx.lifecycle.viewModelScope
import com.bugfender.android.favoritemovie.GraphQLClient
import com.bugfender.movieserver.MovieListQuery
import kotlinx.coroutines.launch

class MovieViewModel : ViewModel() {
    private val _movieList = mutableStateListOf<MovieListQuery.Movie>()
    val movieList: List<MovieListQuery.Movie> = _movieList

    fun getMovieList() {
        viewModelScope.launch {
            val response = GraphQLClient.query(MovieListQuery()).execute()
            val tempList = response.data?.movies as List<MovieListQuery.Movie>
            for (movie in tempList) {
                _movieList.add(movie)
            }
        }
    }
}
Now we’ll open MainActivity.kt and build a simple UI that has a list of movies; each movie item has a name and image.
At the beginning of the function MovieView, we use LaunchedEffect to call our ViewModel in the background, which doesn’t block the UI, LaunchedEffect is the easiest way to handle asynchronous tasks.
As soon as the data arrives, we loop through the movie item and generate the list item, We also use AsyncImage from the Coil library to cache the image.
fun MovieView(vm: MovieViewModel) {
    LaunchedEffect(Unit, block = {
        vm.getMovieList()
    })

    Scaffold(
        topBar = {
            TopAppBar(
                title = {
                    Text(text = "Favorite Movie")
                }, colors = TopAppBarDefaults.topAppBarColors(
                    titleContentColor = Color.Black,
                    containerColor = Color.LightGray
                )
            )
        },
        content = { paddingValues ->
            Box(modifier = Modifier
                .fillMaxSize()
                .padding(paddingValues)) {
                LazyColumn {
                    items(vm.movieList) { item ->
                        Row(
                            Modifier.padding(8.dp),
                            verticalAlignment = Alignment.CenterVertically
                        ) {
                            AsyncImage(
                                model = item.thumb,
                                contentDescription = null
                            )
                            Spacer(modifier = Modifier.size(10.0.dp))
                            Text(text = item.name, fontWeight = FontWeight.Bold, fontSize = 14.0.sp)
                        }
                    }
                }
            }

        },
    )
}
Finally, we can now run the app on Android Studio and see our FavoriteMovie app, which shows all our favorite movies from the GraphQL server.
To sum up
In this article we looked at how GraphQL APIs can simplify Android app client-server communication, starting with a simple Node.js and Express project to set up a GraphQL server, define a schema, and resolve queries that met our client’s demands.
In the second half, we built an Android app that uses GraphQL, using Jetpack and the Apollo Kotlin library to smoothly retrieve and show data in GraphQL way.
GraphQL is ideal for modern app development due to its single endpoint architecture, ability to query precisely what is needed, real-time data changes, introspection, and batching and caching.
Expect The Unexpected!
Debug Faster With Bugfender

Ibrahim Nafiz
Nafiz is a dynamic professional at the intersection of technology and communication. With a solid foundation in computer science, Nafiz leverages a diverse skill set to excel as both a Full Stack Engineer and a Tech Writer. Follow him on Twitter @sminrana