
14 Minutes
Deploying Microfrontends on AWS: A Guide for Developers
Fix Bugs Faster! Log Collection Made Easy
If you are new to Microfrontends architecture, it’s a modern approach for splitting the frontend of your application into multiple components, so it’s easier to code and manage.
We’ve actually got a separate article, introducing the concept, which you can read here. Or, if you’ve already read that introduction and now want to go a step further, just read on.
Because today, we’re going to show you how to deploy a Microfrontend application to Amazon Web Services (AWS), so it can be stored in the Cloud. To keep things really simple, we’re going to use the same app we created in that introduction today.
Along the way, we’re going to cover:
- Getting started with AWS.
- How to set up webpack production config files.
For the deployment, we will use the Microfrotend application we created in our previous post where we explain how to build a Microfrontend app using React.
But first – why is it important to host our apps in AWS?
Well, with AWS you’re essentially tapping into one giant server, which is more cost-effective than storing your apps locally. Plus you get:
- Incredible ease of use via the AWS Management Console.
- A versatile range of services that also encompasses networking, analytics and database management.
- Managed IT services if you need them.
If you’re running a tight-knit development shop and want to keep things as lean as possible, AWS is very much your friend.
Are there any requirements to note when deploying Microfrontends?
Well we would deploy each microfrontend independently (including the host). The location of the child app remoteEntry.js must be known at Build Time.
Now, in a company scenario, we know that many teams will be working on various sub-projects in an overall project. Each of these different teams may want to add new features at different rates and times. As this happens, they might want to deploy their applications without worrying about another team finishing up their feature. So we need to make sure that when changes are made to these projects, we can deploy each one independently.
There are many different ways we can deploy our apps, using services like heroku, now.sh and vercel, but there is a common problem: they assume that we are merely deploying a single project.
However, for this to work, we need a service that will allow us to use the output of different Webpack build processes, and deploy each of them separately.
So first, we should push to Github. Before we do that, however, we need to create a .gitignore file at the root of our project to hide files we don’t need to push.

.gitignore:
node_modules
dist
.DS_Store
First, let’s set up the webpack production config files for Host
Navigate to our host MFe, and add the code below to the webpack.prod.js file.
// host/config/webpack.prod.js

const { merge } = require('webpack-merge');
const ModuleFederationPlugin = require('webpack/lib/container/ModuleFederationPlugin');
const commonConfig = require('./webpack.common');

const domain = process.env.PRODUCTION_DOMAIN;
const prodConfig = {
  mode: 'production',
  output: {
    filename: '[name].[contenthash].js',
    publicPath: '/host/latest/',
  },
  plugins: [
    new ModuleFederationPlugin({
      name: 'host',
      remotes: {
        cart: `cart@${domain}/cart/latest/remoteEntry.js`,
        store: `store@${domain}/store/latest/remoteEntry.js`,
      },
    }),
  ],
};
module.exports = merge(commonConfig, prodConfig);
This configuration is quite similar to the webpack.dev.js file, but with a few subtle differences to note.
mode: This is set toproduction, indicating that the application should be built for a production environment.output: This property specifies the output of the bundled files. It includes the following options:filename:This sets the output file name format as[name].[contenthash].js. Here,[name]represents the name of the chunk and[contenthash]generates a unique hash based on the content of the file.publicPath: This sets the public path for the bundled files, which is/host/latest/in this case. This is useful for serving static assets in production environments. Also, this public path will be used by the client to request the different microfrontends.
- The
remotesproperty specifies the different microfrontends (cart and store) that are exposed to the host application.
Another important thing to flag here is that we need another index.html for when we run in production. To create this, we just go to the the webpack.dev.js file and move the htmlwebpackplugin to the webpack.common.js file.
// host/config/webpack.common.js

const HtmlWebpackPlugin = require('html-webpack-plugin');

module.exports = {
  module: {
    rules: [
      {
        test: /\\.m?js$/,
        exclude: /node_modules/,
        use: {
          loader: 'babel-loader',
          options: {
            presets: ['@babel/preset-react', '@babel/preset-env'],
            plugins: ['@babel/plugin-transform-runtime'],
          },
        },
      },
    ],
  },
  plugins: [
    new HtmlWebpackPlugin({
      template: './public/index.html',
    }),
  ]
};
This will ensure that there is an index.html file outputted when we run our production build.
Once this is done, we then need to add our webpack build script in the package.json.
"build": "webpack --config config/webpack.prod.js"
Awesome, we’re racing ahead! Now we add the production Webpack configs to our Store and Cart MFEs, which should like this for the two files.
For the Cart MFE:
// cart/config/webpack.prod.js

const { merge } = require('webpack-merge');
const ModuleFederationPlugin = require('webpack/lib/container/ModuleFederationPlugin');
const commonConfig = require('./webpack.common');

const prodConfig = {
  mode: 'production',
  output: {
    filename: '[name].[contenthash].js',
    publicPath: '/cart/latest/',
  },
  plugins: [
    new ModuleFederationPlugin({
      name: 'cart',
      filename: 'remoteEntry.js',
      exposes: {
        './CartApp': './src/bootstrap',
      },
    }),
  ],
};
module.exports = merge(commonConfig, prodConfig);
For the Store MFE:
// store/config/webpack.prod.js

const { merge } = require('webpack-merge');
const ModuleFederationPlugin = require('webpack/lib/container/ModuleFederationPlugin');
const commonConfig = require('./webpack.common');

const prodConfig = {
  mode: 'production',
  output: {
    filename: '[name].[contenthash].js',
    publicPath: '/store/latest/',
  },
  plugins: [
    new ModuleFederationPlugin({
      name: 'store',
      filename: 'remoteEntry.js',
      exposes: {
        './StoreApp': './src/bootstrap',
      },
    }),
  ],
};
module.exports = merge(commonConfig, prodConfig);
Then we add the build scripts to both the cart and store package.json files. Finally, we run all our builds to check for errors.
Implementing a CI/CD Pipeline Workflow
Before we move on to AWS, we have to set up a CI/CD workflow for all our applications using GitHub Actions. To do this, we navigate to our root folder, create a .github folder then create a subfolder called workflows.
Now, let’s start with the host. We need to create a file called host.yml and add the code below.
name: deploy-host
on:
  push:
    branches:
      - main
    paths:
      - 'packages/host/**'
defaults:
  run:
    working-directory: packages/host
jobs:
  build:
    runs-on: ubuntu-latest
    steps:
      - uses: actions/checkout@v2
      - run: npm install
      - run: npm run build
        env:
          PRODUCTION_DOMAIN: ${{ secrets.PRODUCTION_DOMAIN }}
      - uses: shinyinc/[email protected]
      - run: aws s3 sync dist s3://${{ secrets.AWS_S3_BUCKET_NAME }}/host/latest
        env:
          AWS_ACCESS_KEY_ID: ${{ secrets.AWS_ACCESS_KEY_ID }}
          AWS_SECRET_ACCESS_KEY: ${{ secrets.AWS_SECRET_ACCESS_KEY }}
          AWS_DEFAULT_REGION: ${{ secrets.AWS_DEFAULT_REGION }}
So, to circle back real quick: we’ve defined the path to our host app, and created jobs that can be executed whenever a change is made to the host application.
Now let’s push this to GitHub and check that our actions are running:
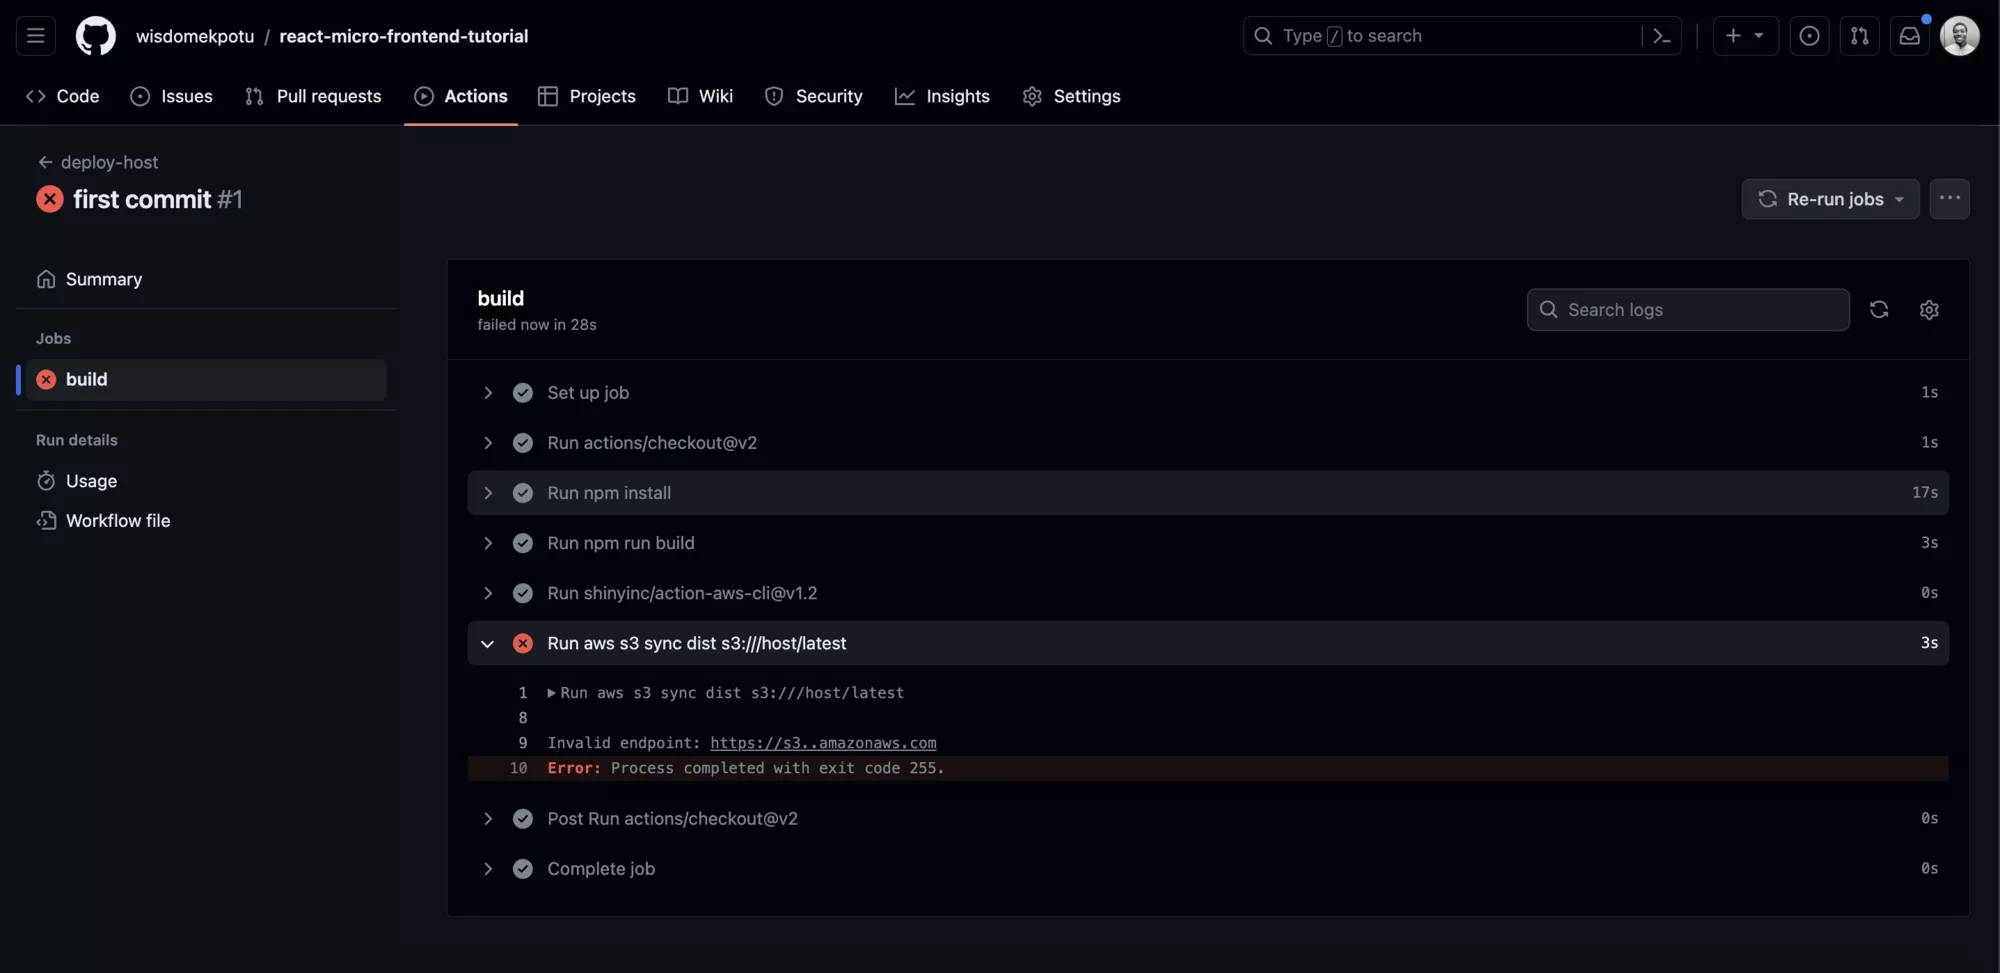
Great! So far the jobs are running as expected. However there was a failure at some point because we are yet to set up our AWS infrastructure. Let’s do that now.
Setting up AWS S3 Bucket
We’re assuming you already have an AWS account set up (and if you don’t, it’s super-easy. Just click here).
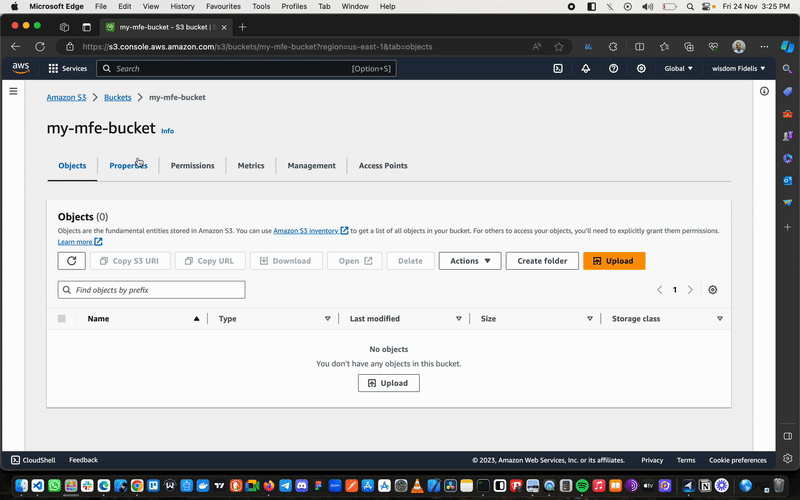
Now, all you need to do is sign in and navigate to S3, then create a bucket.

Note that AWS S3 is secure by default, meaning that none of the files you upload here will be available online. In our case, however, we want to allow public access to them. To fix this, we are going to update two settings.
Select your just-created s3 bucket, then navigate to Properties, scroll down to Static Website Hosting and click Edit.
- Select
Enable. - Scroll to
Index Documentand type inIndex.html. - Save the changes.
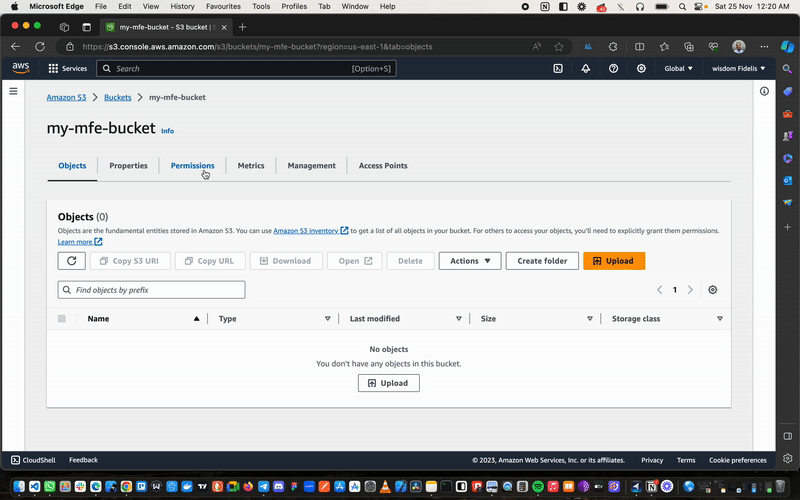
Once we’ve done this, we hop over to the Permissions tab.
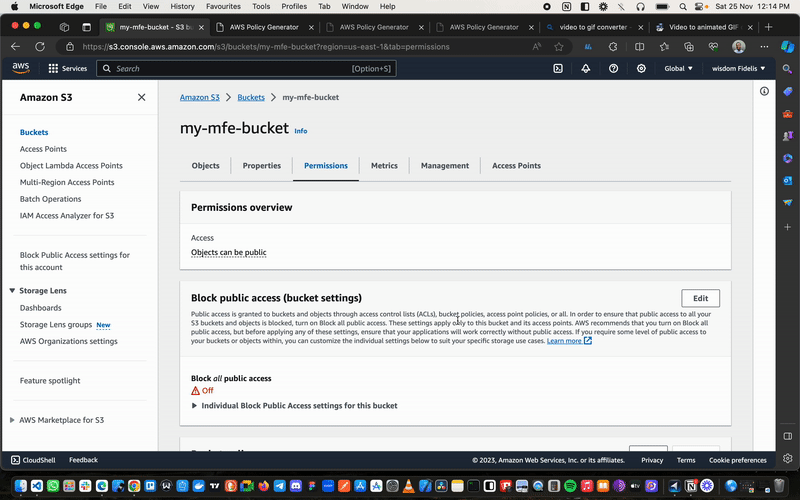
- Navigate to
Block Public Access (bucket settings). - Click
Edit. - Uncheck the
Block Public Accessbox to allow full public access to our bucket. - Save your changes.
Next, navigate to Permissions again, but this time scroll down to Bucket Policy and click on Edit Policy Generator.
We will now create a policy to help different AWS services communicate with one another. So in our case, we are creating a policy that will allow our Cloudfront distribution to access all the different files we will load up to the bucket.
Now click on Policy Generator. This will take you to another window where we will write our policy.
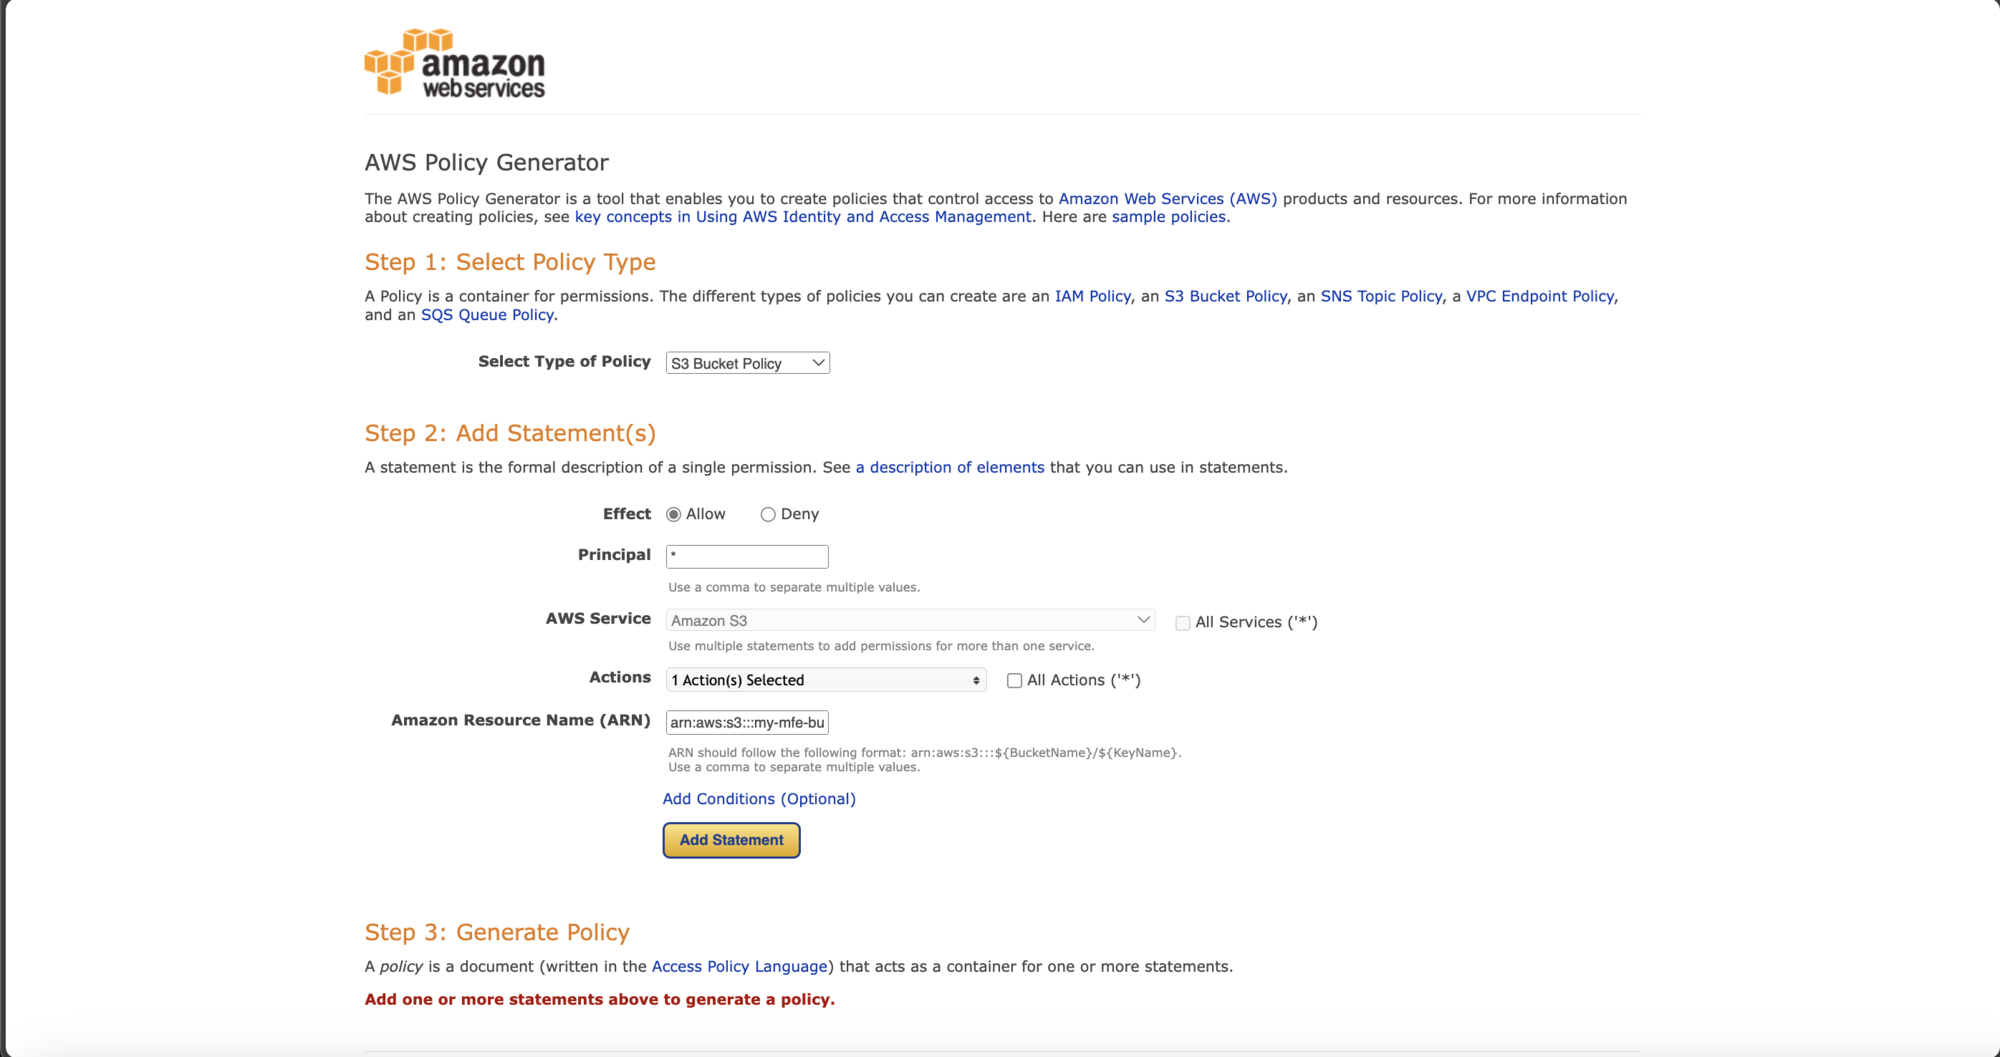
Here we select S3 Bucket Policy for the Type of Policy, Allow for effect, * for principal, and GetObject for actions.
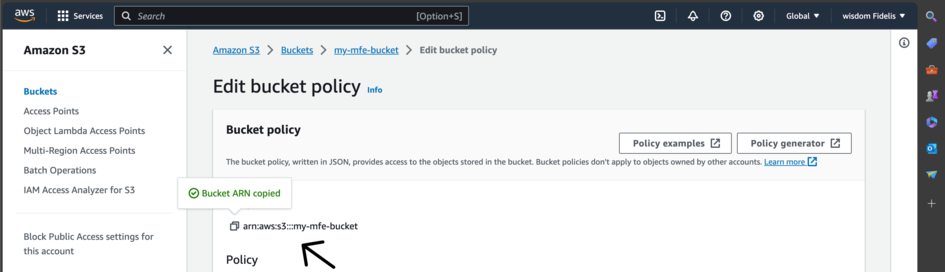
Then, to get to the resource name, go back to the previous page and copy the Bucket ARN.
Input the resource name **/*** at the end of the string.
Then click on Add Statement and then the Generate Policy button. A modal with code will be displayed.

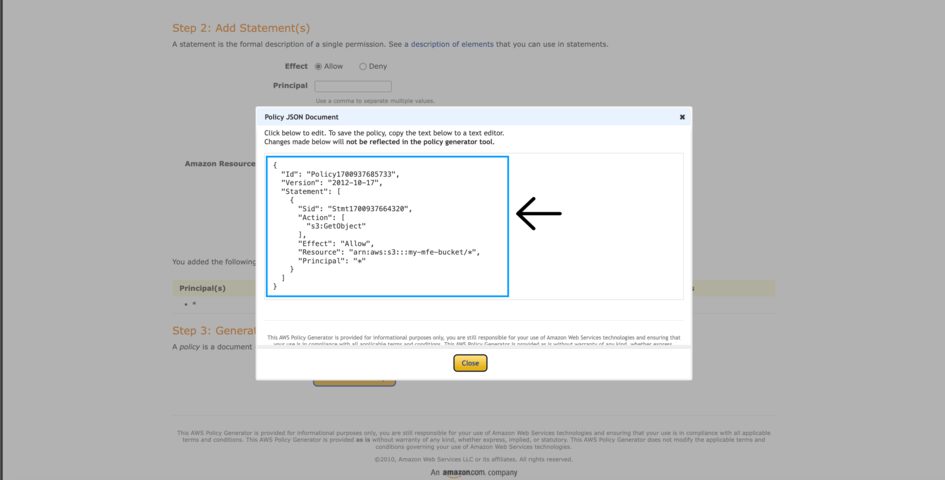
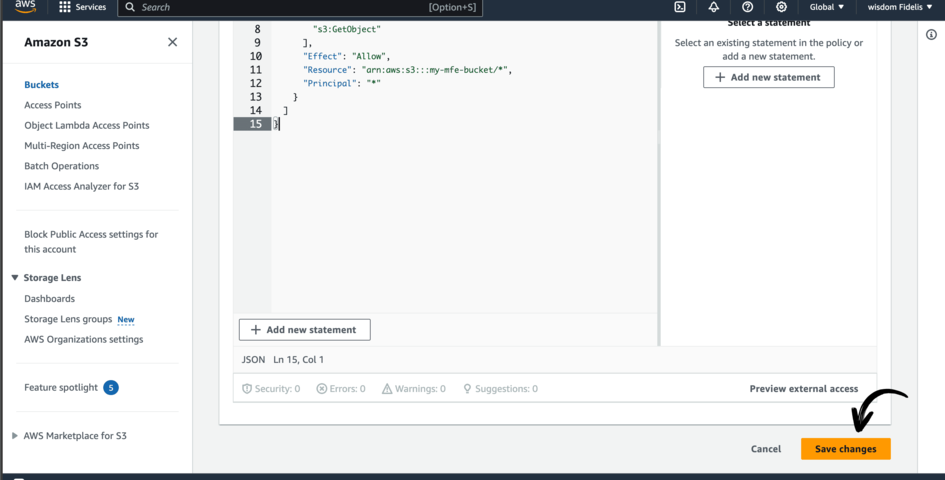
Copy the code from the model into the code editor present on the previous page and save it.

Note that we will not directly serve the stored files from S3 Bucket. Instead we will make use of another AWS service called AWS CloudFront. This will be responsible for taking files from our s3 bucket and serving it to the browser.
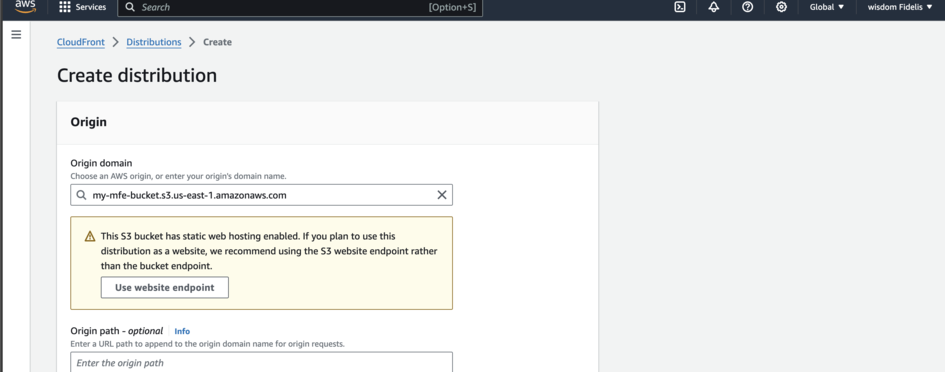
Open up the AWS console on another tab, navigate to CloudFront and click Create Distribution.

Select your Origin Domain.
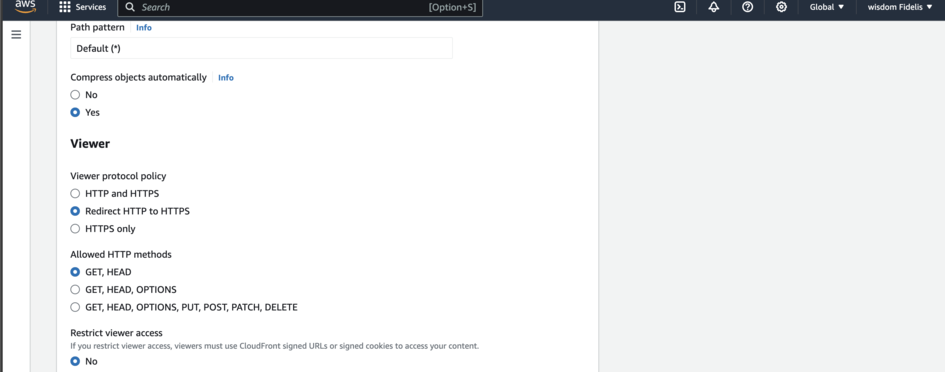
Scroll down to Viewer and change it to Redirect HTTP to HTTPS.
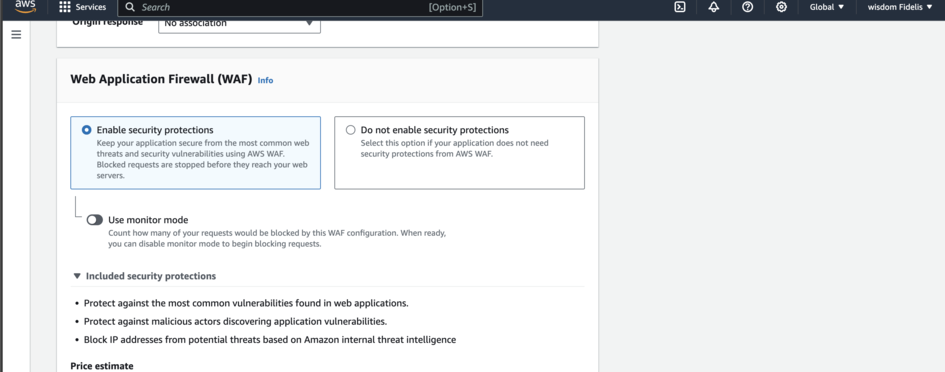
Scroll down again to the Web Application Firewall (WAF) and Select Enable Security protections.
Then click Create Distribution.
While we wait for it to load up, we can make a number of essential changes in settings.
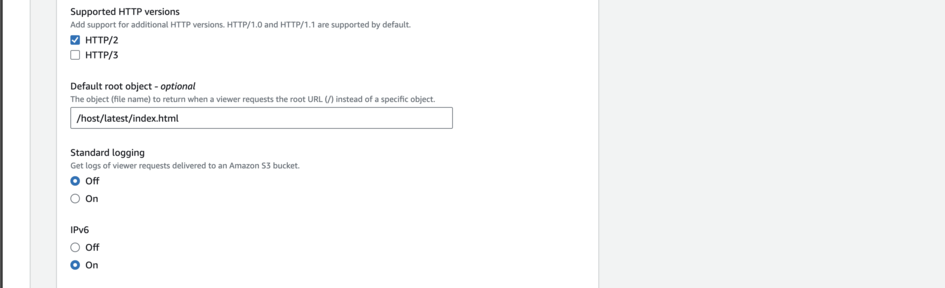
First, navigate to the General tab, scroll to Settings and click on Edit.
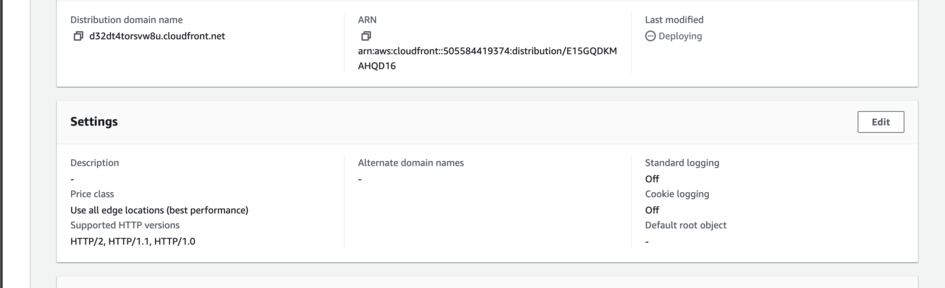
Scroll until you see Default Root Object. We can change this to /host/latest/index.html and then save it.
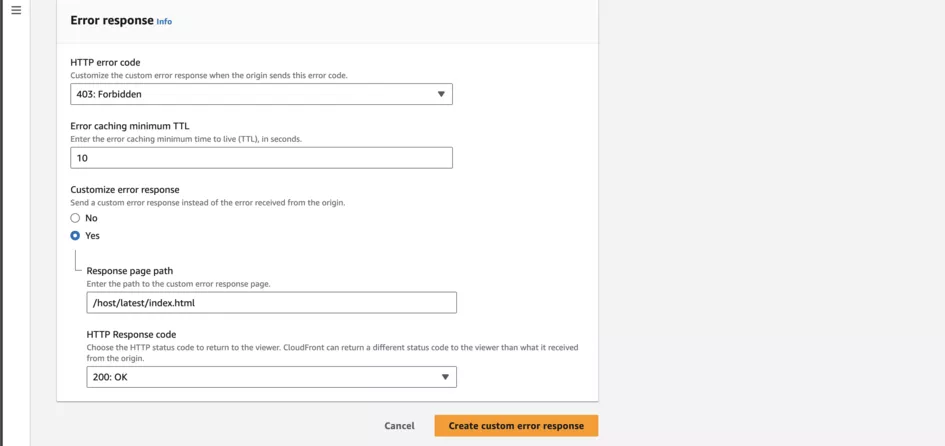
Next, go to the Error pages tab and click Create Custom Error Response.
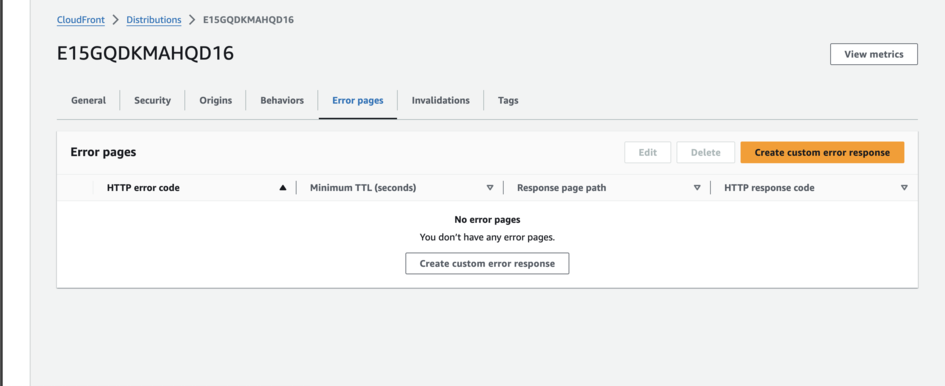
You can modify this as follows, before clicking the yellow button at the bottom.
Configure actions to push all files to the s3 bucket
To do this, we have to get the AWS environment variables to connect to our GitHub actions.
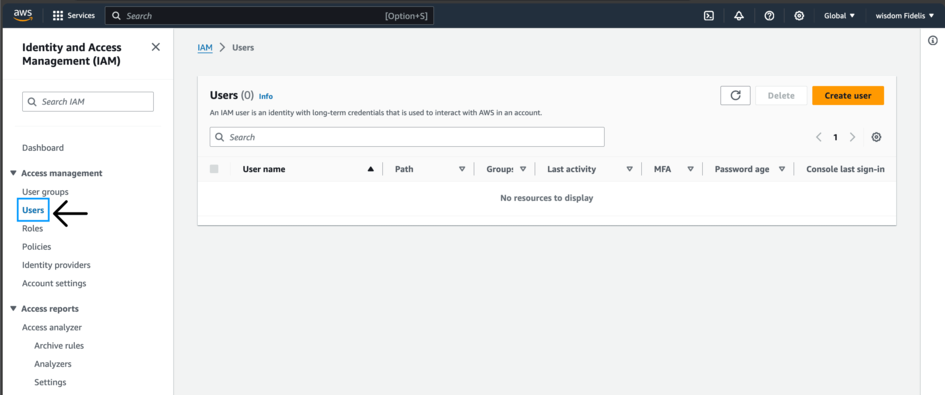
So in the AWS console, let’s search for a service called IAM. This is what we would use to generate an access key and secret.
Navigate to the sidebar and click on Users then on Create user.
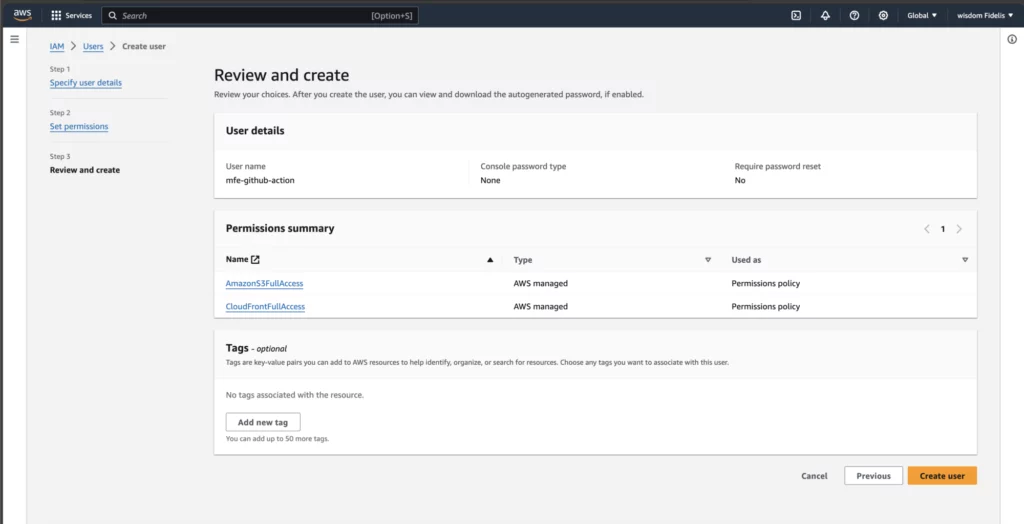
Enter any name you like in the User Name field. I will be using mfe-github-action (catchy, right??)
Now click Next.
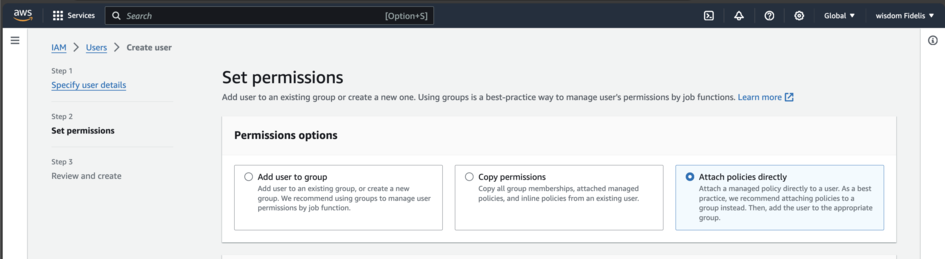
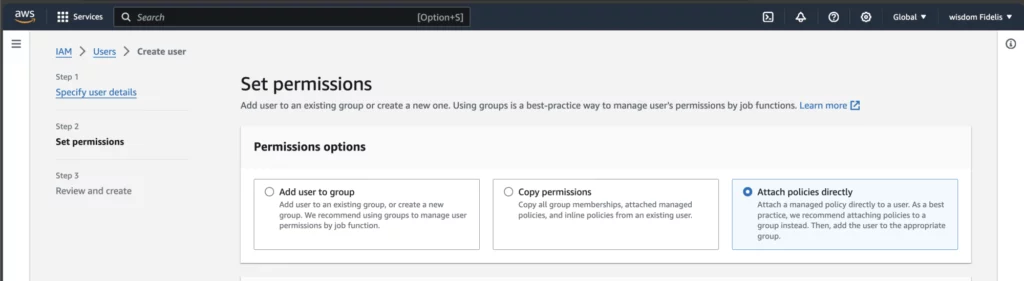
In the Set Permissions field, select Attach Policies Directly.
Then use the search bar to find and tick AmazonS3FullAccess and CloudFrontFullAccess.
Click Create User.
Select the IAM user that you just created from the list of users.
Click on Create Access Key.

Select Command Line Interface (CLI).
Scroll down and tick the “I understand…” check box and click Next.
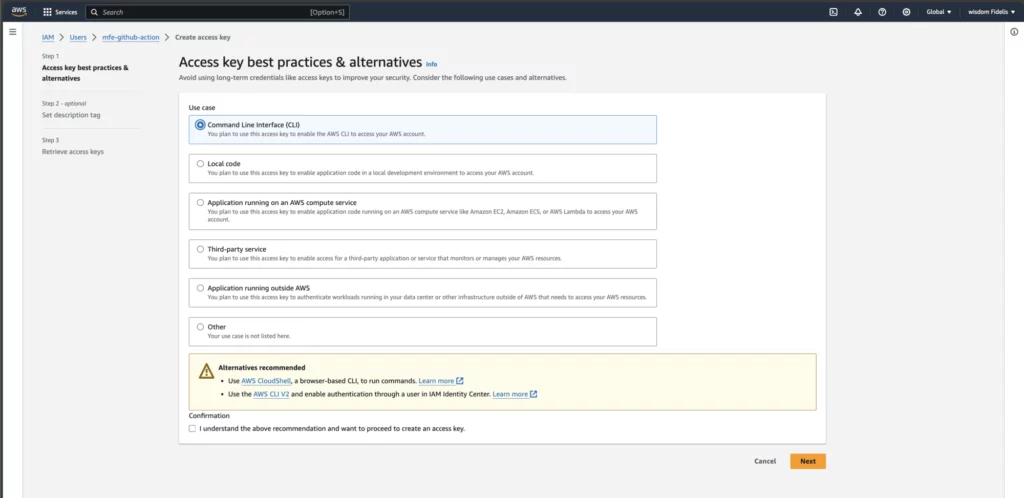
Copy and/or download the Access Key ID and Secret Access Key to use for deployment.
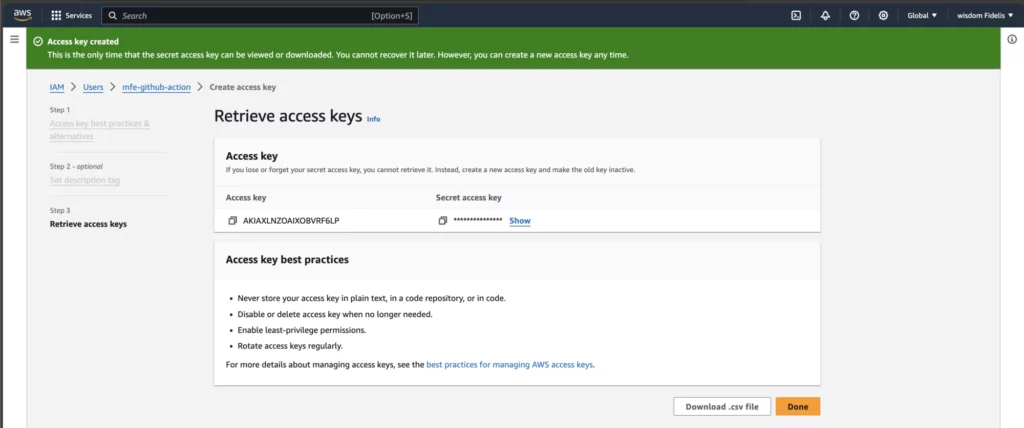
Now copy them and add them to the secrets (as an environment variable) of your GitHub settings.
You should have the following secrets:
AWS_DEFAULT_REGION , AWS_ACCESS_KEY_ID , AWS_SECRET_ACCESS_KEY , PRODUCTION_DOMAIN ,
AWS_S3_BUCKET_NAME , AWS_DISTRIBUTION_ID .
The Production domain and Distribution ID can be found in your CloudFront instance.
For the default region, we are using us-east-1.

Great. Now let’s rerun our GitHub action and you will see that it has moved our files to the S3 bucket.
But when we try accessing it using the domain from the Cloudfront we see a blank page.
Well so far this is good news, because it shows that everything is working. But we need to make some tweaks to get our apps showing.
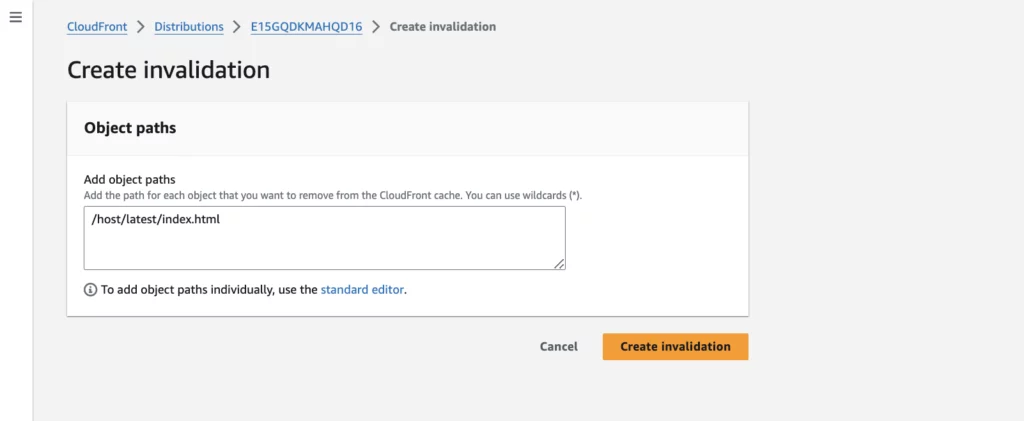
We then have to set up invalidations to solve this. So navigate to your Cloudfront distribution and click on Invalidations.
Now add /host/latest/index.html.
Click Create Invalidation.
Then we automate it using our GitHub actions.
At this point, we can add this code to the end of our host.yml file.
...
- run: aws cloudfront create-invalidation --distribution-id ${{ secrets.AWS_DISTRIBUTION_ID }} --paths "/host/latest/index.html"
  env:
    AWS_ACCESS_KEY_ID: ${{ secrets.AWS_ACCESS_KEY_ID }}
    AWS_SECRET_ACCESS_KEY: ${{ secrets.AWS_SECRET_ACCESS_KEY }}
    AWS_DEFAULT_REGION: ${{ secrets.AWS_DEFAULT_REGION }}
Now, rerun the actions.
We are done with the hosting bit. It’s time to quickly create yml files for cart and store MFEs, which will be very similar to those of the host.
for store.yml :
name: deploy-store
on:
  push:
    branches:
      - main
    paths:
      - 'packages/store/**'
defaults:
  run:
    working-directory: packages/store
jobs:
  build:
    runs-on: ubuntu-latest
    steps:
      - uses: actions/checkout@v2
      - run: npm install
      - run: npm run build
      - uses: shinyinc/[email protected]
      - run: aws s3 sync dist s3://${{ secrets.AWS_S3_BUCKET_NAME }}/store/latest
        env:
          AWS_ACCESS_KEY_ID: ${{ secrets.AWS_ACCESS_KEY_ID }}
          AWS_SECRET_ACCESS_KEY: ${{ secrets.AWS_SECRET_ACCESS_KEY }}
          AWS_DEFAULT_REGION: ${{ secrets.AWS_DEFAULT_REGION }}
      - run: aws cloudfront create-invalidation --distribution-id ${{ secrets.AWS_DISTRIBUTION_ID }} --paths "/store/latest/remoteEntry.js"
        env:
          AWS_ACCESS_KEY_ID: ${{ secrets.AWS_ACCESS_KEY_ID }}
          AWS_SECRET_ACCESS_KEY: ${{ secrets.AWS_SECRET_ACCESS_KEY }}
          AWS_DEFAULT_REGION: ${{ secrets.AWS_DEFAULT_REGION }}
For cart.yml :
name: deploy-cart
on:
  push:
    branches:
      - main
    paths:
      - 'packages/cart/**'
defaults:
  run:
    working-directory: packages/cart
jobs:
  build:
    runs-on: ubuntu-latest
    steps:
      - uses: actions/checkout@v2
      - run: npm install
      - run: npm run build
      - uses: shinyinc/[email protected]
      - run: aws s3 sync dist s3://${{ secrets.AWS_S3_BUCKET_NAME }}/cart/latest
        env:
          AWS_ACCESS_KEY_ID: ${{ secrets.AWS_ACCESS_KEY_ID }}
          AWS_SECRET_ACCESS_KEY: ${{ secrets.AWS_SECRET_ACCESS_KEY }}
          AWS_DEFAULT_REGION: ${{ secrets.AWS_DEFAULT_REGION }}
      - run: aws cloudfront create-invalidation --distribution-id ${{ secrets.AWS_DISTRIBUTION_ID }} --paths "/cart/latest/remoteEntry.js"
        env:
          AWS_ACCESS_KEY_ID: ${{ secrets.AWS_ACCESS_KEY_ID }}
          AWS_SECRET_ACCESS_KEY: ${{ secrets.AWS_SECRET_ACCESS_KEY }}
          AWS_DEFAULT_REGION: ${{ secrets.AWS_DEFAULT_REGION }}
Make sure your indentation for yml files is correct, else the GitHub actions will fail.
Now just make some changes to the cart, store and finally, the host application so that it will redeploy the apps.
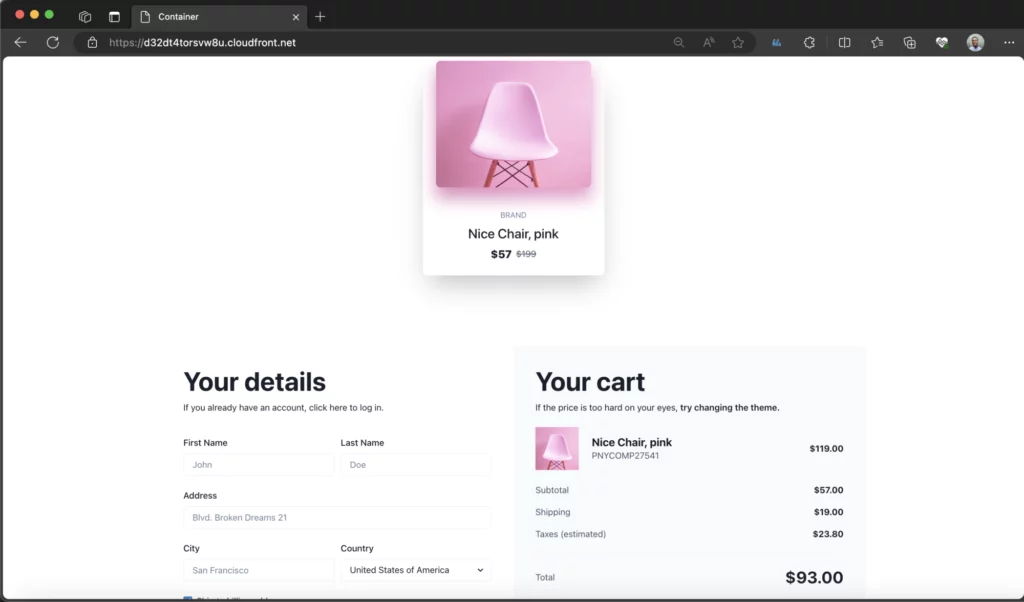
And finally, the fruits of our labor: reload the Cloudfront domain URL to see that our final app has been deployed successfully.
Conclusion
In this article, and our previous introduction to Microfrontends, we have covered the whole process of creating applications with this modern approach. What’s more, we have seen how to mould a React-based Microfrontend application from start to deployment.
Armed with this knowledge, you’re ready to use this architecture for your next React Microfrontend application.
Happy Building!
Expect The Unexpected!
Debug Faster With Bugfender