
26 Minutes
Demystifying Microfrontends: A Practical Approach with React and Module Federation
Fix Bugs Faster! Log Collection Made Easy
Microfrontends is a modern front-end architectural approach, by which web applications are segmented (or decomposed) into smaller self-contained units, allowing for easier management and scalability. You can our introduction article to Microfrontends to understand better this architecture approach.
Today we’re going to provide a step-by-step guide to the process of building a real-world application using React and Module Federation.
Our goal is to demonstrate the practical application of microfrontends, equipping you with the knowledge to implement them in your projects.
Ready to unlock the dynamic capabilities of microfrontends? First…
Table of Contents
Before we begin…
To get the most from this tutorial, you‘ll need the following:
- Familiarity with JavaScript and React.
- Basic knowledge of Chakra UI – a React component library.
- Working knowledge of YAML and GitHub Actions.
- Any IDE (we recommend Visual Studio Code).
- NodeJS LTS installed on your local machine (visit the Official NodeJs Page for instructions).
- An active AWS account. Follow the official documentation to create one.
- NPM, YARN or PNPM installed (we’ll be using Yarn throughout this article).
- A modern terminal shell such as zsh, iTerm2 with oh-my-zsh for Mac or Hyper for Windows.
- A browser such as Chrome, Microsoft Edge, Brave, or Firefox (we use Chrome).
You can find the code files for this tutorial on Github.
Great, now let’s get to it.
Building an e-commerce store using microfrontends with React and Module Federation
Today, we’ll be building a fictional e-commerce app to demonstrate a simple implementation of Module Federation to build a microfrontend (MFE).
In our example we will explore the Micro App pattern.
Note: This is a proof-of-concept application. There is no server or API used and no actual interaction. We are more interested in how to connect and work with React and Module Federation.
Project structure
Our project will have the below structure:
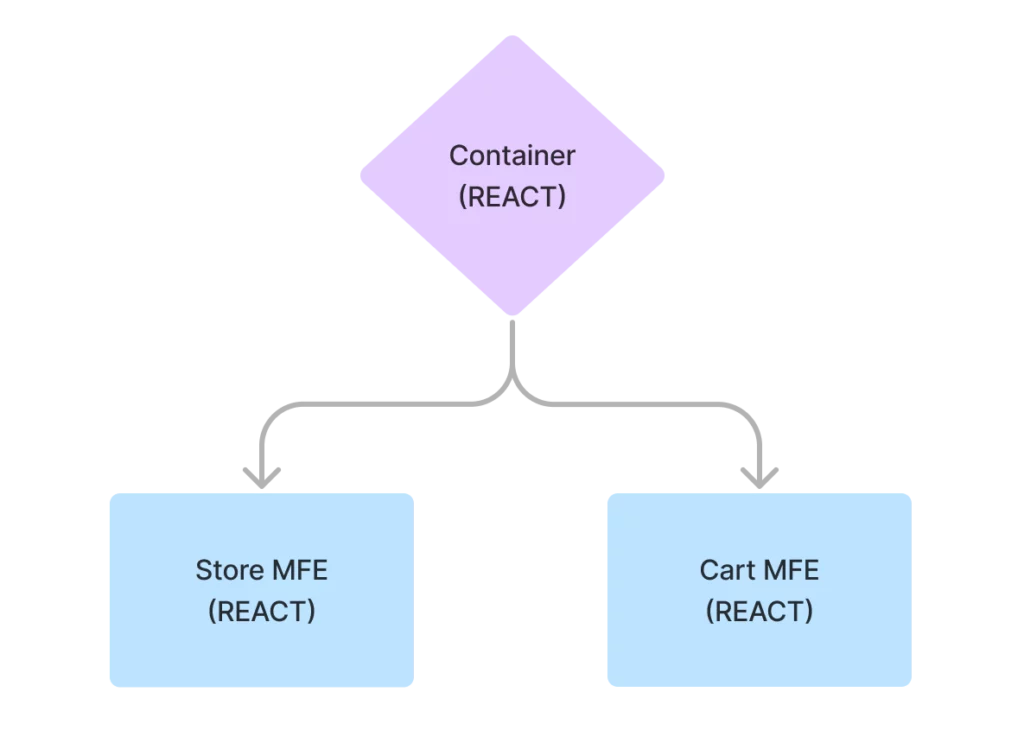
Before we jump into building our application, there are some architecture principles we’re going to be following and these are listed below:
- Zero coupling between sub-MFEs: This means that we cannot do any importing of classes/functions/objects. Also, we cannot use a shared state with state managers like Redux or using the Context API. The only exception to this rule is sharing libraries using Module Federation. This is because, in the future, we might decide to completely rebuild our Store MFE with new technology and we do not want to break the other MFEs in the process. So the more isolated our individual MFEs are, the better.
- Almost zero coupling between the host (container) and sub-MFEs: The container should not assume that the child is using any particular framework. All important communication between them should be done using simple event structures or callbacks.
- CSS styling from one project should not affect another: This means we need to ensure that all styling is tightly scoped and consistent.
- Version control (monorepo or seperate repo): Should not have any impact on the overall project. Our Container should be able to decide to use either the latest version (or a specific version) of a microfrontend .
Scaffolding the project
Note: We should be set up our project from scratch without using any build tools such as CRA or Vite, as this way we can extensively configure our webpack files.
Our first step is to create a folder called packages to host all our MFEs and we do this by running the code below:
mkdir packages
cd packages
Next, in the same folder we’ll create three sub-folders, called host, cart, and store :
mkdir host cart store
Now we’ll navigate to each folder and create a package.json file using:
yarn init
Finally, let’s install some dependencies we’ll need to set up our MFEs. To do this, run the following commands in each folder (i.e. host, cart and store):
React and Chakra UI dependencies:
yarn add react react-dom react-router-dom @chakra-ui/react @emotion/react @emotion/styled framer-motion react-icons
Babel dependencies:
yarn add -D @babel/core @babel/plugin-transform-runtime @babel/preset- env @babel/preset-react babel-loader
Webpack-specific dependencies:
yarn add -D clean-webpack-plugin css-loader html-webpack-plugin style-loader webpack webpack-cli webpack-dev-server webpack-merge
Great work! Now we’re ready to set up our webpack configurations and we’ll begin with the Store MFE.
Building the Store MFE
We’ll be running webpack in two different modes, Production and Development.
Start with the following steps:
- Navigate to the
storefolder - Create a folder called
config - In that folder, create three essential webpack files:
webpack.dev.jswebpack.prod.jswebpack.common.js
The webpack.common.js file will contain configurations that are common to both the Production and Development modes.
OK! Now let’s write a brief configuration in our webpack.common.js, as below:
// webpack.common.js
module.exports = {
  module: {
    rules: [
      {
        test: /\.m?js$/,
        exclude: /node_modules/,
        use: {
          loader: "babel-loader",
          options: {
            presets: ["@babel/preset-react", "@babel/preset-env"],
            plugins: ["@babel/plugin-transform-runtime"],
          },
        },
      },
    ],
  },
};
In this code block we’ve set up the webpack module bundler to manage JavaScript files using Babel for transpilation (a portmanteau of transformation and compilation).
This sounds like a lot, so we’ll break it down step-by-step:
module.exports: This structure is used in Node.js to export a module. In this context, it’s used to export the Webpack configuration settings.module: this object serves as a configuration container insidemodule.exports. Its role is to outline how different module types should be handled.rules: Within themoduleobject is arulesarray. This is where the rules for how specific file types should be processed are defined.test: This property specifies a regular expression that matches files the rule should apply to. In this case, the regular expression is/\.m?js$/, which matches files with a.js,.mjs, or.jsxextension.exclude: /node_modules/: This line excludes thenode_modulesdirectory from the rule, indicating that files inside thenode_modulesdirectory shouldn’t be processed by Babel.use*This object specifies that when a file matches the defined test (.jsor.mjs) and is not withinnode_modules, it should be processed by thebabel-loader. It also provides Babel with options to transpile the code:loader:This defines the loader that will process the files. In this casebabel-loader.options: {...}: These are the options for the Babel transpiler:@babel/preset-react: This preset enables the transformation of JSX code into valid JavaScript code.@babel/preset-env: This preset allows us to use modern JavaScript features, as it automatically converts our code to be compatible with the targeted browsers or environments.@babel/plugin-transform-runtime: This plugin allows us to use the Babel runtime to avoid repeating polyfills in every file.
Fantastic! Let’s move on to the webpack.dev.js file:
//webpack.dev.js
const { merge } = require('webpack-merge');
const HtmlWebpackPlugin = require('html-webpack-plugin');
const commonConfig = require('./webpack.common');

const devConfig = {
  mode: 'development',
  devServer: {
    port: 8081,
    historyApiFallback: {
      index: 'index.html',
    },
  },
  plugins: [
    new HtmlWebpackPlugin({
      template: './public/index.html',
    }),
  ],
};

module.exports = merge(commonConfig, devConfig);
The purpose of this file is to bundle and serve our React application for development purposes.
Again, let’s break it down step-by-step:
- In the code, we bring in the:
mergefunction from thewebpack-mergepackageHtmlWebpackPluginclass from thehtml-webpack-pluginpackagecommonConfigobject from the./webpack.commonmodule
- Next, we define the
devConfigobject to include development-specific settings, such as the port number, server mode (i.e. development } and thehistoryApiFallbackoption. - The
historyApiFallbackoption instructs the development server to use theindex.htmlfile when a request is made for a route that doesn’t exist. - We then use the
HtmlWebpackPluginplugin to generate an HTML file for the web application. Thetemplateoption is configured to point to the./public/index.htmlfile, assumed to be the main HTML file for the application. - Lastly, we use the
mergefunction to combine thecommonConfiganddevConfigobjects. This results in a new object that contains all the configuration for the development environment. The merged configuration is then exported as the module’s default export.
Note: When we list
devConfigsecond, it will override any other similar options we might have assigned tocommonConfig.
Running Store MFE in isolation
To do this, we’ll need to create two folders inside the store folder:
- A folder called
publicwith anindex.htmlfile inside it - A folder called
srcwithindex.jsandApp.jsinside it
In index.html:
<!DOCTYPE html>
<html lang="en">
<head>
  <meta charset="UTF-8">
  <meta name="viewport" content="width=device-width, initial-scale=1.0">
  <title>Store MFE</title>
</head>

<body>
  <div id="_store-dev-root"></div>
</body>

</html>
In App.js :
import React from 'react';
import { ChakraProvider } from '@chakra-ui/react';

export default function App() {
  return (
    <ChakraProvider>

    </ChakraProvider>
  );
}
Next, before we run our MFE, we need to bootstrap it. Bootstrapping means that our main entry point should be to a file whose job is to asynchronously load the main application.
We’ll go back to our src folder and create a file boostrap.js and import it into the index.js file.
Now add the code below:
// index.js

import("./bootstrap")
This bootstrapping allows webpack to process the rest of the imports before executing the app, and will avoid potential race conditions on importing all the code.
In a non-bootstrapped version of this application, since index.js is the main entry point (which is the default for webpack), this code will execute immediately and not give webpack any time to load the required remotes before execution.
Now we add the following to the bootstrap.js file:
// bootstrap.js

import React from 'react';
import { createRoot } from 'react-dom/client';
import App from './App';

// Mount function to start up the app
const mount = (el) => {
  const root = createRoot(el);
  root.render(<App />);
};
// If we are in development and in isolation,
// call mount immediately
if (process.env.NODE_ENV === 'development') {
  const devRoot = document.querySelector('#_store-dev-root');

  if (devRoot) {
    mount(devRoot);
  }
}

export { mount };
Here we have defined a mount function, which takes an HTML element (el) as its argument. Inside the function, it first creates a root element using the createRoot function from react-dom/client and this will serve as the starting point for rendering the MFE’s components.
The mount function then calls the render method on the root element. This method takes a single argument, a React element (in this case, <App />). When the render method is called, it tells React to start rendering the specified element and its children, building the DOM tree.
After defining the mount function, the code checks whether the current environment is in development mode. If it is, the code proceeds to search for an HTML element with the id _store-dev-root.
If the _store-dev-root element is found, the mount function is called with this element as its argument, starting up the MFE.
Now we can navigate to the package.json and add a dev start script.
"scripts": {
"start": "webpack serve --config config/webpack.dev.js"
},
Here we’re making use of the —-config flag to tell webpack which of our configuration files to use. In this case, we would like to run our project in development mode.
Run yarn start. It should compile successfully and be running on localhost:8081 (we will see a black page which is fine).
Great! Now we can look at building the UI for our Store MFE.
Building the Store MFE UI
To build the UI, we’ll go to the src folder and create another folder called Page, then in there create a file called StorePage and add the code below:
//StorePage.js
import React from 'react';
import { Box, Center, useColorModeValue, Heading, Text, Stack, Image } from '@chakra-ui/react';

const IMAGE =
  '<https://images.unsplash.com/photo-1518051870910-a46e30d9db16?ixlib=rb-1.2.1&ixid=MXwxMjA3fDB8MHxwaG90by1wYWdlfHx8fGVufDB8fHw%3D&auto=format&fit=crop&w=1350&q=80>';

export default function StorePage() {
  return (
    <Center py={12}>
      <Box role={'group'} p={6} maxW={'330px'} w={'full'} bg={useColorModeValue('white', 'gray.800')} boxShadow={'2xl'} rounded={'lg'} pos={'relative'} zIndex={1}>
        <Box
          rounded={'lg'} mt={-12} pos={'relative'} height={'230px'}
          _after={{ transition: 'all .3s ease', content: '""', w: 'full', h: 'full', pos: 'absolute', top: 5, left: 0, backgroundImage: `url(${IMAGE})`, filter: 'blur(15px)', zIndex: -1, }}
          _groupHover={{
            _after: {
              filter: 'blur(20px)',
            },
          }}
        >
          <Image rounded={'lg'} height={230} width={282} objectFit={'cover'} src={IMAGE}
          />
        </Box>
        <Stack pt={10} align={'center'}>
          <Text color={'gray.500'} fontSize={'sm'} textTransform={'uppercase'}>
            Brand
          </Text>
          <Heading fontSize={'2xl'} fontFamily={'body'} fontWeight={500}>
            Nice Chair, pink
          </Heading>
          <Stack direction={'row'} align={'center'}>
            <Text fontWeight={800} fontSize={'xl'}>
              $57
            </Text>
            <Text textDecoration={'line-through'} color={'gray.600'}>
              $199
            </Text>
          </Stack>
        </Stack>
      </Box>
    </Center>
  );
}
Next we’ll import the component into App.js file and update the file with the code below:
import React from 'react';
import { ChakraProvider } from '@chakra-ui/react';
import StorePage from './Page/StorePage';

export default function App() {
  // Wrap ChakraProvider at the root of your app
  return (
    <ChakraProvider>
      <StorePage />
    </ChakraProvider>
  );
}
Now we can run the Store MFE.
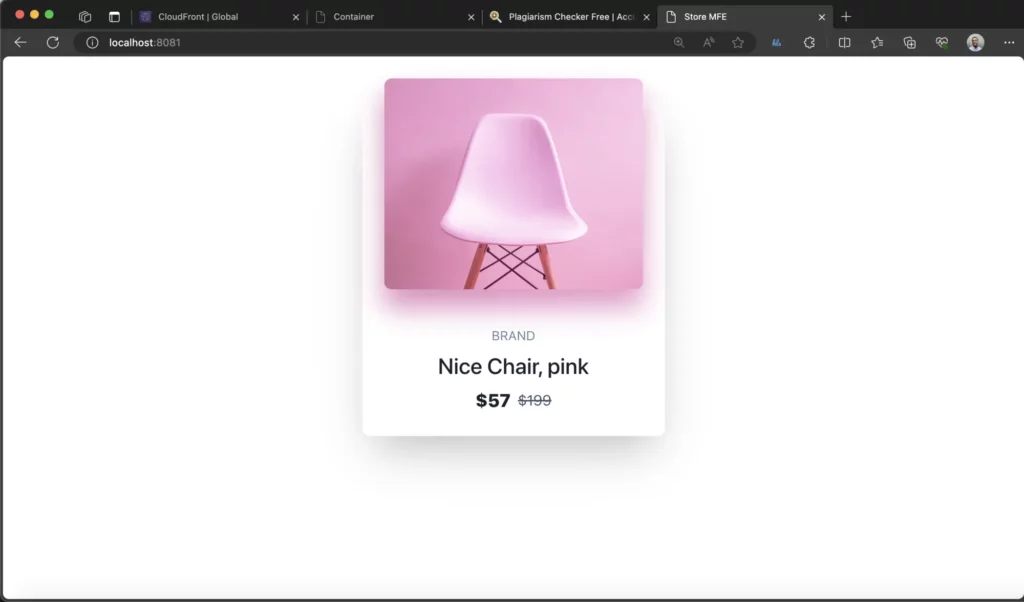
Nice job! That’s it for the Store MFE and we can look at our second MFE, Cart.
Building the Cart MFE
One of the key benefits of microfrontends is reusability and this comes into play here. As the file structure for the Cart MFE will be the same as the Store MFE, we can duplicate the Store MFE then build out the Cart page, saving time.
We’ll start by duplicating the Store MFE then we’ll need to:
- Modify the
StorePage.jsfile name toCartPage.js - In the
bootstrap.jsandindex.htmlfiles modify the ids to_cart-dev-root - Navigate to the
webpack.dev.jsfile and modify the port number to8082 - Modify the contents of
CartPage.jswith the code below:
// Page/Cartpage.js
import React from "react";
import { Container, Flex, Heading, HStack, VStack, Image, AspectRatio, Text, Divider, Stack, Button, FormControl, FormLabel, Input, SimpleGrid, GridItem, Select, Checkbox, useBreakpointValue, useColorMode, useColorModeValue, } from "@chakra-ui/react";

const CartPage = () => {
  const { toggleColorMode } = useColorMode();
  const bgColor = useColorModeValue("gray.50", "whiteAlpha.50");
  const secondaryTextColor = useColorModeValue("gray.600", "gray.400");
  const colSpan = useBreakpointValue({ base: 2, md: 1 });

  return (
    <Container maxW="container.xl" p={0}>
      <Flex h={{ base: "auto", md: "100vh" }} py={[0, 10, 20]} direction={{ base: "column-reverse", md: "row" }}>
        <VStack w="full" h="full" p={10} spacing={10} alignItems="flex-start">
          <VStack spacing={3} alignItems="flex-start">
            <Heading size="2xl">Your details</Heading>
            <Text>If you already have an account, click here to log in.</Text>
          </VStack>
          <SimpleGrid columns={2} columnGap={3} rowGap={6} w="full">
            <GridItem colSpan={colSpan}>
              <FormControl>
                <FormLabel>First Name</FormLabel>
                <Input placeholder="John" />
              </FormControl>
            </GridItem>
            <GridItem colSpan={colSpan}>
              <FormControl>
                <FormLabel>Last Name</FormLabel>
                <Input placeholder="Doe" />
              </FormControl>
            </GridItem>
            <GridItem colSpan={2}>
              <FormControl>
                <FormLabel>Address</FormLabel>
                <Input placeholder="Blvd. Broken Dreams 21" />
              </FormControl>
            </GridItem>
            <GridItem colSpan={colSpan}>
              <FormControl>
                <FormLabel>City</FormLabel>
                <Input placeholder="San Francisco" />
              </FormControl>
            </GridItem>
            <GridItem colSpan={colSpan}>
              <FormControl>
                <FormLabel>Country</FormLabel>
                <Select>
                  <option value="usa">United States of America</option>
                  <option value="uae">United Arab Emirates</option>
                  <option value="pak"> Pakistan </option>
                  <option value="nmk">North Macedonia</option>
                  <option value="de">Germany</option>
                </Select>
              </FormControl>
            </GridItem>
            <GridItem colSpan={2}>
              <Checkbox defaultChecked>Ship to billing address.</Checkbox>
            </GridItem>
            <GridItem colSpan={2}>
              <Button variant="primary" size="lg" w="full">
                Place order
              </Button>
            </GridItem>
          </SimpleGrid>
        </VStack>

        <VStack w="full" h="full" p={10} spacing={6} align="flex-start" bg={bgColor}>
          <VStack alignItems="flex-start" spacing={3}>
            <Heading size="2xl">Your cart</Heading>
            <Text>
              If the price is too hard on your eyes,{" "}
              <Button onClick={toggleColorMode} variant="link" colorScheme="black">
                try changing the theme.
              </Button>
            </Text>
          </VStack>
          <HStack spacing={{ base: 3, md: 6 }} alignItems={{ base: "flex-start", md: "center" }} w="full">
            <AspectRatio ratio={1} w={24}>
              <Image
                src="<https://images.unsplash.com/photo-1518051870910-a46e30d9db16?ixlib=rb-1.2.1&ixid=MXwxMjA3fDB8MHxwaG90by1wYWdlfHx8fGVufDB8fHw%3D&auto=format&fit=crop&w=1350&q=80>"
                alt="Skateboard"
              />
            </AspectRatio>
            <Stack spacing={0} w="full" direction="row" justifyContent="space-between" alignItems="center">
              <VStack w="full" spacing={0} alignItems="flex-start">
                <Heading size="md">Nice Chair, pink</Heading>
                <Text color={secondaryTextColor}>PNYCOMP27541</Text>
              </VStack>
              <Heading size="sm" textAlign="end">
                $119.00
              </Heading>
            </Stack>
          </HStack>
          <VStack spacing={4} alignItems="stretch" w="full">
            <HStack justifyContent="space-between">
              <Text color={secondaryTextColor}>Subtotal</Text>
              <Heading size="sm">$57.00</Heading>
            </HStack>
            <HStack justifyContent="space-between">
              <Text color={secondaryTextColor}>Shipping</Text>
              <Heading size="sm">$19.00</Heading>
            </HStack>
            <HStack justifyContent="space-between">
              <Text color={secondaryTextColor}>Taxes (estimated)</Text>
              <Heading size="sm">$23.80</Heading>
            </HStack>
          </VStack>
          <Divider />
          <HStack justifyContent="space-between" w="full">
            <Text color={secondaryTextColor}>Total</Text>
            <Heading size="lg">$93.00</Heading>
          </HStack>
        </VStack>
      </Flex>
    </Container>
  );
};

export default CartPage;
Next, head over to App.js and modify it as follows:
import React from 'react';
import { ChakraProvider } from '@chakra-ui/react';
import CartPage from './Page/CartPage';

export default function App() {
  // Wrap ChakraProvider at the root of your app
  return (
    <ChakraProvider>
      <CartPage />
    </ChakraProvider>
  );
}
Finally, add the dev start script to the package.json file:
"scripts": {
    "start": "webpack serve --config config/webpack.dev.js"
  },
Now run yarn start and our Cart React app should be running on localhost:8082.
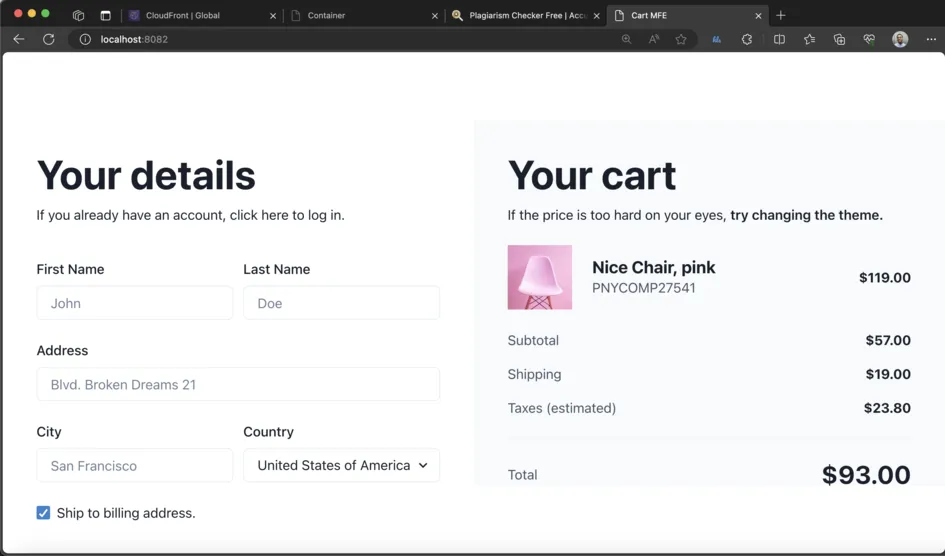
That’s it. Now see how we connect our Store and Cart MFEs to load from our overall container (host app).
Assembling the container
We’ll assemble our container by following the steps below:
Setting up the Host
First, copy and paste the folder files from the previous cart code as they’re mostly similar.
Next, go to the package.json and add the start script
Then, navigate to the webpack.dev.js and change the host to run on a different port. In our example it will be 8080
Now we can navigate to the index.html and modify the id to root:
<!DOCTYPE html>
<html lang="en">

<head>
  <meta charset="UTF-8">
  <meta http-equiv="X-UA-Compatible" content="IE=edge">
  <meta name="viewport" content="width=device-width, initial-scale=1.0">
  <title>Container</title>
</head>

<body>
  <div id="root"></div>
</body>

</html>
Then in the App.js:
import React from 'react'

export default () => {
  return (
    <div>
      <h1>Container</h1>
    </div>
  )
}
Next make changes to bootstrap.js:
// bootstrap.js

import React from 'react';
import { createRoot } from 'react-dom/client';
import App from './App';

const container = document.getElementById('root');
const root = createRoot(container); // createRoot(container!) if you use TypeScript
root.render(<App />);
Note: The
bootstrap.jsfile here is different from that of Store and Cart. There is no Mount function as we do not need to check for development, as in every scenario we want our container to show itself immediately.
Finally, add the dev start script to the package.json file.
Now we can run the container (it should now be running on localhost:8080).
Brilliant! Now it’s time to bring it all together.
Integrating Store and Cart MFEs into the Host
We’ll use the Module Federation plugin to join all applications together.
Let’s start by modifying the webpack.dev.js files of all our MFEs.
For the Store MFE
const { merge } = require('webpack-merge');
const HtmlWebpackPlugin = require('html-webpack-plugin');
const ModuleFederationPlugin = require('webpack/lib/container/ModuleFederationPlugin');
const commonConfig = require('./webpack.common');

const devConfig = {
  mode: 'development',
  devServer: {
    port: 8081,
    historyApiFallback: {
      index: 'index.html',
    },
  },
  plugins: [
    new ModuleFederationPlugin({
      name: 'store',
      filename: 'remoteEntry.js',
      exposes: {
        './StoreApp': './src/bootstrap',
      },
    }),
    new HtmlWebpackPlugin({
      template: './public/index.html',
    }),
  ],
};
module.exports = merge(commonConfig, devConfig);
For the Cart MFE
const { merge } = require('webpack-merge');
const HtmlWebpackPlugin = require('html-webpack-plugin');
const ModuleFederationPlugin = require('webpack/lib/container/ModuleFederationPlugin');
const commonConfig = require('./webpack.common');

const devConfig = {
  mode: 'development',
  devServer: {
    port: 8082,
    historyApiFallback: {
      index: 'index.html',
    },
  },
  plugins: [
    new ModuleFederationPlugin({
      name: 'cart',
      filename: 'remoteEntry.js',
      exposes: {
        './CartApp': './src/bootstrap',
      },
    }),
    new HtmlWebpackPlugin({
      template: './public/index.html',
    }),
  ],
};

module.exports = merge(commonConfig, devConfig);
Exposes is crucial as it specifies which file we need to make available to the host (container).
Now, in the host’s webpack.dev.js file we can accept the exposed MFEs to be loaded from the host’s index.html.
const { merge } = require('webpack-merge');
const HtmlWebpackPlugin = require('html-webpack-plugin');
const ModuleFederationPlugin = require('webpack/lib/container/ModuleFederationPlugin');
const commonConfig = require('./webpack.common');

const devConfig = {
  mode: 'development',
  devServer: {
    port: 8080,
    historyApiFallback: {
      index: 'index.html',
    },
  },
  plugins: [
    new ModuleFederationPlugin({
      name: 'host',
      remotes: {
        store: 'store@<http://localhost:8081/remoteEntry.js>',
        cart: 'cart@<http://localhost:8082/remoteEntry.js>'
      },
    }),
    new HtmlWebpackPlugin({
      template: './public/index.html',
    }),
  ],
};
module.exports = merge(commonConfig, devConfig);
Now we can display the two MFEs on the host (container) application (i.e. implementing the Microapp pattern).
To do this:
- Navigate to the Host folder.
- Inside the
srcfolder create a new folder calledComponents****and inside this create two further folders:
- Store_App
- Cart_App.
Then modify as below:
Store_App.js
import { mount } from 'store/StoreApp';
import React, { useRef, useEffect } from 'react';

export default () => {
  const ref = useRef(null);

  useEffect(() => {
    mount(ref.current);
  }, []);

  return <div ref={ref} />;
};
Cart_App.js
import { mount } from 'cart/CartApp';
import React, { useRef, useEffect } from 'react';

export default () => {
  const ref = useRef(null);

  useEffect(() => {
    mount(ref.current);
  }, []);

  return <div ref={ref} />;
};
Now import them into the App.js :
import React, { Component } from 'react';
import Store_App from './Components/Store_App';
import Cart_App from './Components/Cart_App';

export default () => {
  return (
    <div>
      <Store_App />
      <Cart_App />
    </div>
  );
};
Note: After making these changes restart all the MFEs to avoid getting errors.
Okay, that’s it, run the app and it should be run fine on localhost:8080.
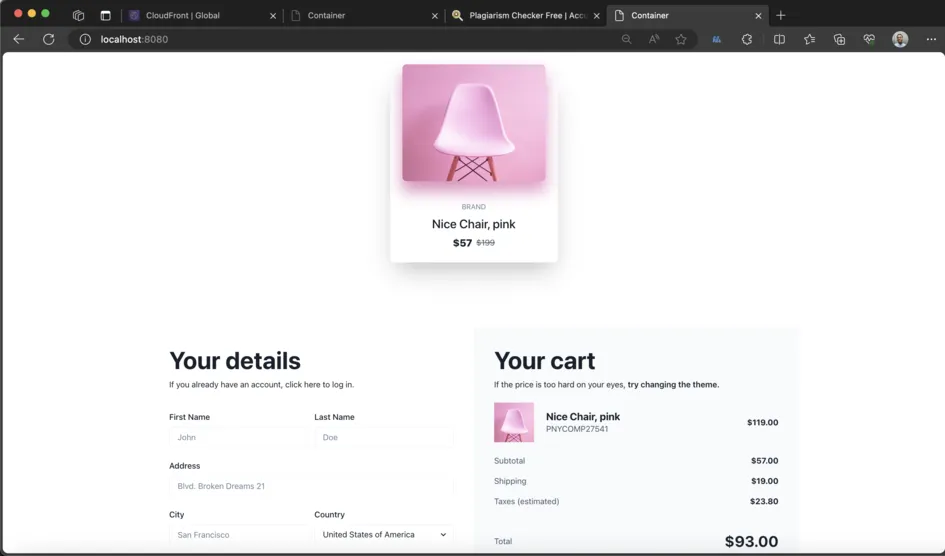
Great job!
Before we finish, although it’s not essential, let’s take a quick look at how we would share dependencies between MFEs.
We can use Module Federation to share dependencies between MFEs, especially those that are the same.
This is done by using shared and declaring the dependencies, simply navigate to host MFE and modify accordingly:
plugins: [
    new ModuleFederationPlugin({
    ...
      shared: ['react', 'react-dom']
    }),
To sum up
In this article, we worked through a practical example of how to build a microfrontend (MFE) application from scratch using React and Module Federation.
- We looked at the project structure and the associated architecture principles including coupling, CSS styling and version control
- We looked at scaffolding the project without using build tools allowing for extensive configuration of webpack files
- We built two MFEs, configured webpacks in two modes (Production and Development) and used Babel to manage JavaScript files
- We assembled a container by setting up the Host and adding the dev start script
We also looked at the process of creating separate autonomous React applications and assembling them using the Module Federation webpack plugin.
Happy building!
Expect The Unexpected!
Debug Faster With Bugfender