13 Minutes
How to Debug a Kotlin Multiplatform Mobile App From Scratch
Fix Bugs Faster! Log Collection Made Easy
tldr;
Kotlin Multiplatform apps are a great option for big projects. They allow us to unify the business logic under a Kotlin module while using the latest perks of each platform’s individual UI, significantly reducing development costs.
Debugging in Kotlin Multiplatform is easy, as you can use typical tools like adding breakpoints and printing logs in the console – and in Bugfender.
Continue reading for a full tutorial.
What is KMM?
KMM stands for Kotlin Multiplatform Mobile. It is a relatively new platform from Jetbrains that allows the creation of native applications for iOS and Android using the same Kotlin code.
About cross platform development

Cross-platform applications have always generated impassioned discussions between developers. Almost every month, you hear a big company reveal that its developers dramatically reduced their costs by moving from native to cross.
The funny thing is that you can find equally passionate posts from other teams who’ve realized that going against the platform was a bad idea and full native was more efficient in the end.
Bugfender’s mission is to help developers achieve the best possible debugging results from whichever platform they want to work with. However, we find KMM especially powerful because it is free of the snags that hold many other technologies back (low performance, difficulty to use native features from the launch, complex development environment…)
How is Kotlin Multiplatform different from other cross platforms?
Kotlin Multiplatform presents a curious approach to cross-platform development. While most previous cross-platform tools have focused on easing UI development and keeping the hard work and the native components in the native platforms, KM does the opposite. All the hard work and business logic can be done in shared Kotlin code, while the UI – which is usually tighter to the platform – is done in the native API.
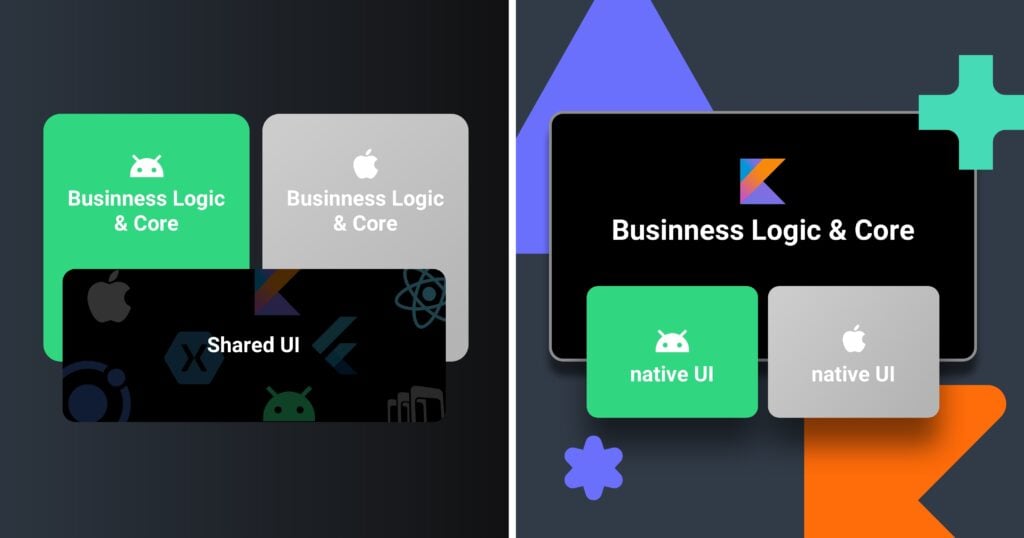
This makes a lot of sense, because you can use the UI frameworks of the platform (SwiftUI, Jet Pack, UIKit…) with all the perks they bring, like navigations, dark modes and automatic fit, to different devices, while at the same time keeping the core business logic unified in a Kotlin module.
The output of Kotlin Native is a native-compiled library. This is not javascript code running in a webview (like Ionic), nor is it a set of React components rendered with JavaScriptCore (React Native). Kotlin Native outputs a framework compiled with LLVM and the performance is great. In fact, it is indistinguishable from a fully native app.
What is the structure of a Kotlin multiplatform project like?
A Kotlin Multiplatform project will usually have an Android project, an iOS project and a common module where the multiplatform code lives. The multiplatform code is written in Kotlin so you need to use Android Studio or IntelliJ. When the project is compiled, a framework (in the case of iOS) or a module (in the case of Android) is created, and all the classes defined in the Kotlin code are as accessible as any other library. No bridges are needed.
How to create a Kotlin Multiplatform Project for iOS and Android from scratch
The easiest way to learn something is by doing it, and that’s why we have created this comprehensive tutorial. For this example we are going to focus on an iOS/Android project, because these are probably the most commonly used architectures, but bear in mind that Kotlin Native modules can be exported for other platforms (even Javascript!) .
Creating a multiplatform project
Starting a new project is very easy. The official docs are clear and easy to follow.
First of all, we need to prepare the environment. For that, we can follow the official docs by downloading Android Studio and the necessary KMM plugin.
Once that’s done, we are going to create a new multiplatform application using the KMM plugin.
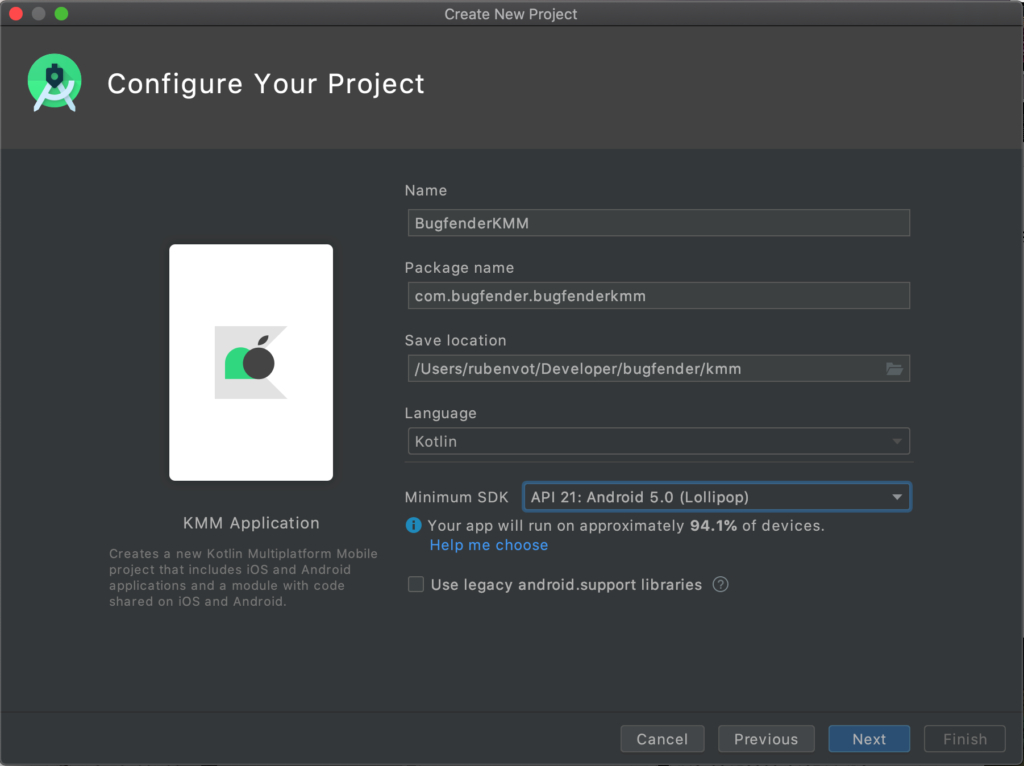
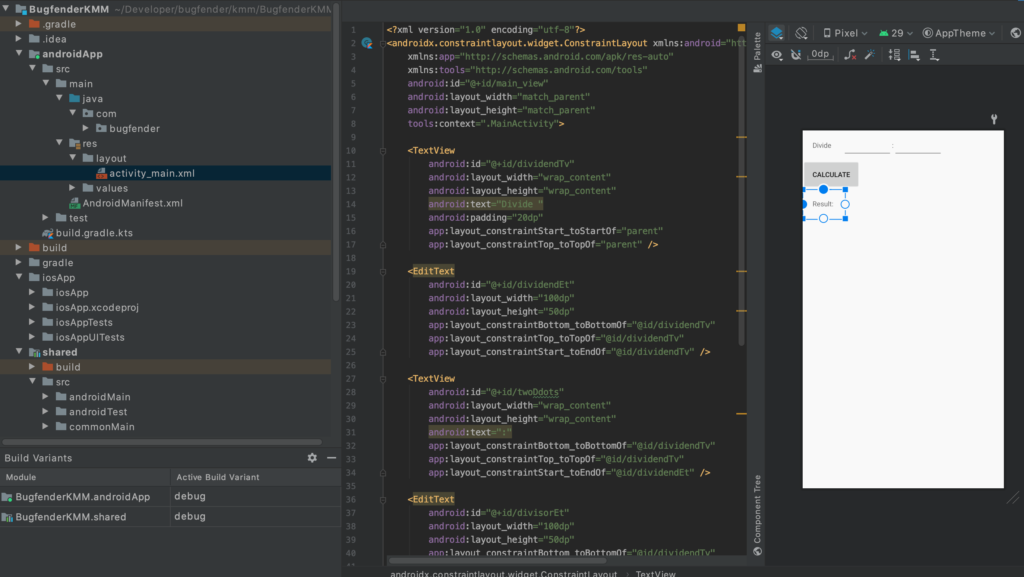
At this point, if you switch the Android studio view to project you should have a file structure like this one:
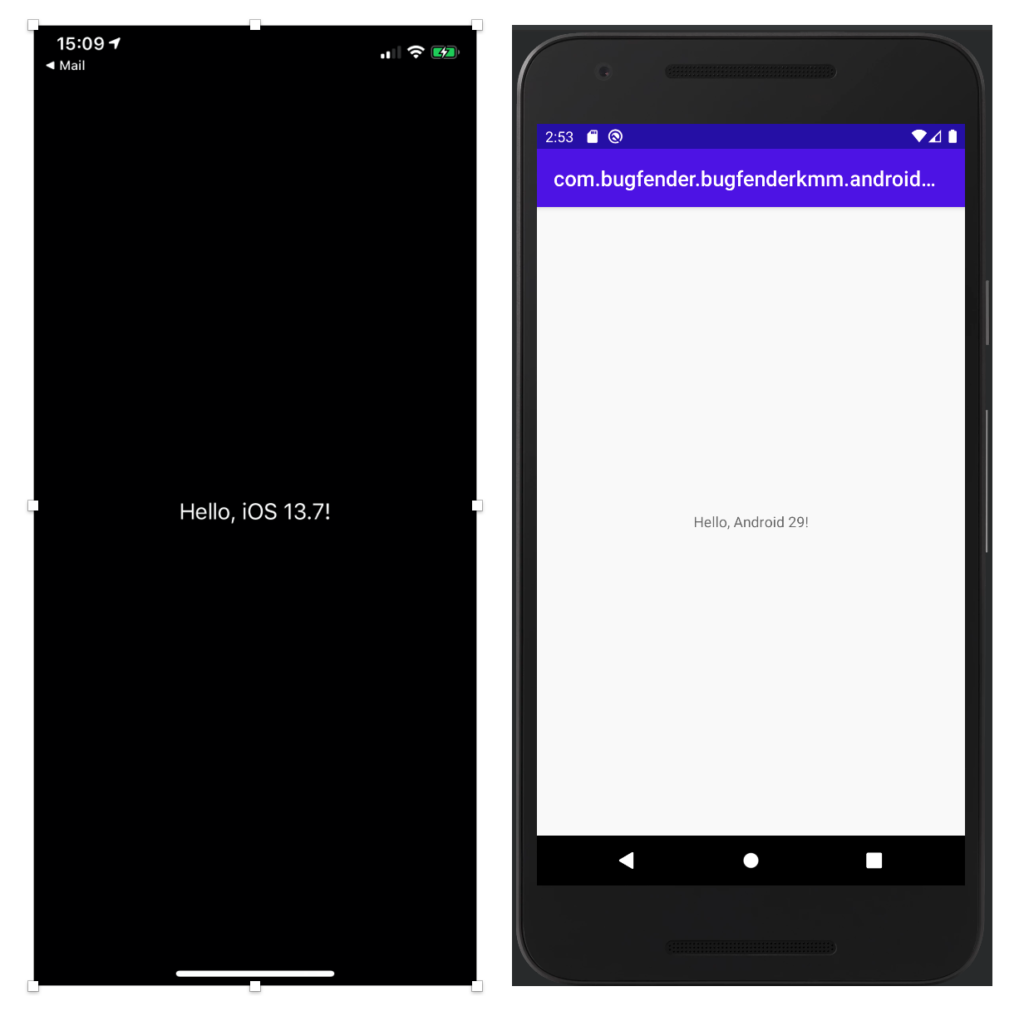
The shared module is where we will write our multiplatform code. And here we come to another magical thing: you can also choose to run the app on Android or on iOS (yes, you launch an iOS app from Android Studio. I was as surprised as you are).
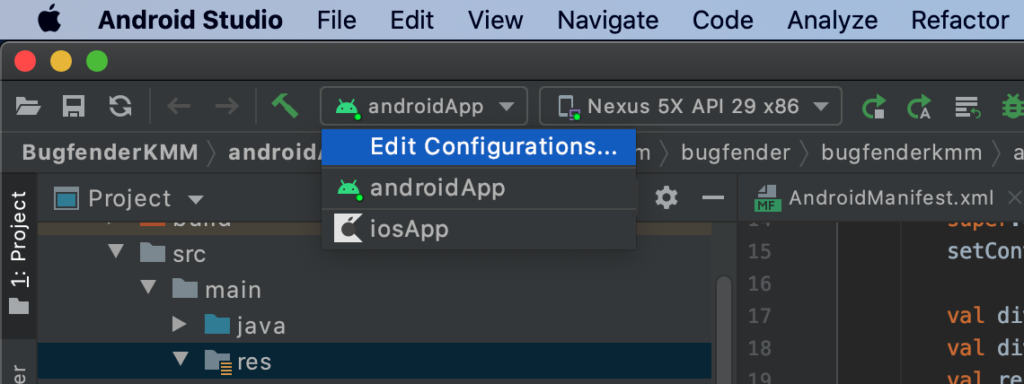
You can now try launching the app for both platforms:
At the moment of writing this tutorial, there is a known issue when switching between device and simulator on iOS. Jetbrains has compiled a workaround.
// If you get this
Building for iOS Simulator, but the linked and embedded framework 'shared.framework' was built for iOS.

// Type this in the Android Studio Terminal
./gradlew clean
Writing your first Kotlin Native function
Now that you have your KMM app running, it’s time to start coding.
We are going to write a function that, when given two numbers, returns the division between them. We are going to need two textfields to insert the numbers and one button to calculate the result.
Building the UI
In Android we are free to use the full power of the Android Styles and include as many fragments as we like. Because you know, fragments are great.
To keep things easy we will add the above mentioned elements to the Activity, which was automatically included in the sample.
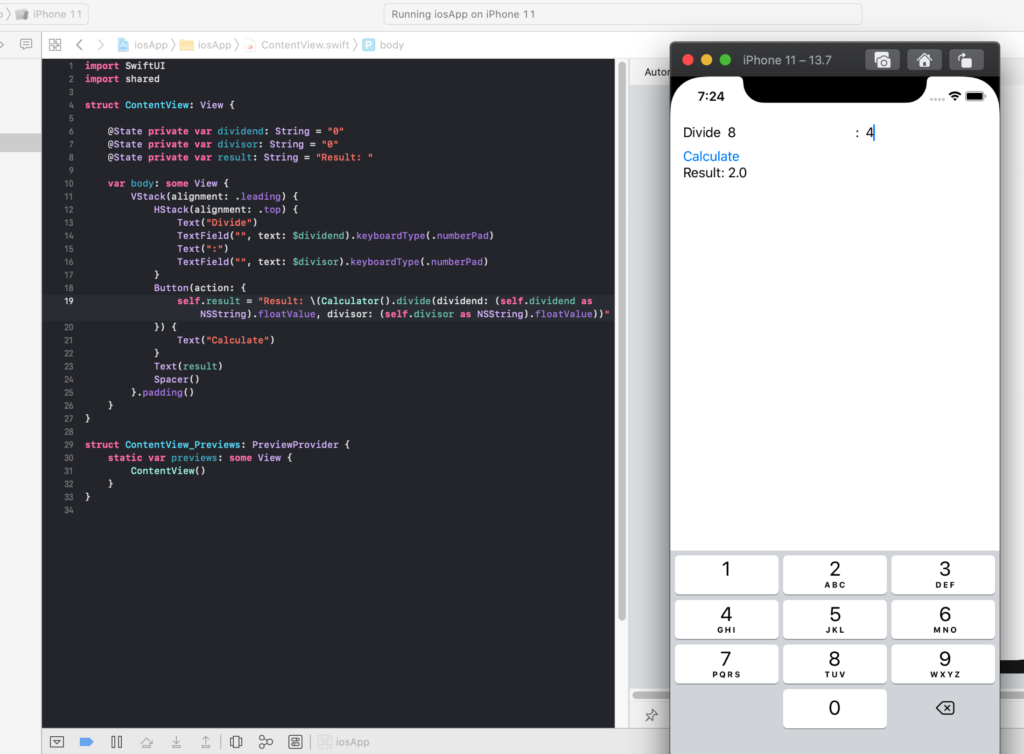
For iOS we can use SwiftUI or the vintage UIKit and build more or less the same UI. Go to Xcode and open the project in the iosApp folder. In general, when you are developing on KMM, Xcode should be in the background:
In Android you will need to inflate the views from MainActivity.kt or install the synthetic plugin. In the case of iOS there is no second step.
Creating our shared code
Now is the moment when things get interesting. We are going to write our Calculator function only once, in Kotlin, and then we are going to call it from iOS and Android.
Go to the shared code module and create a Calculator class:
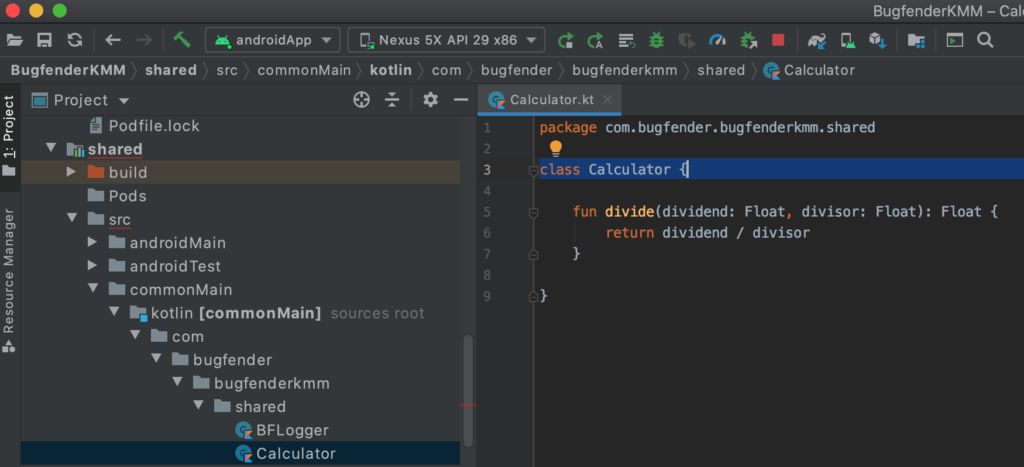
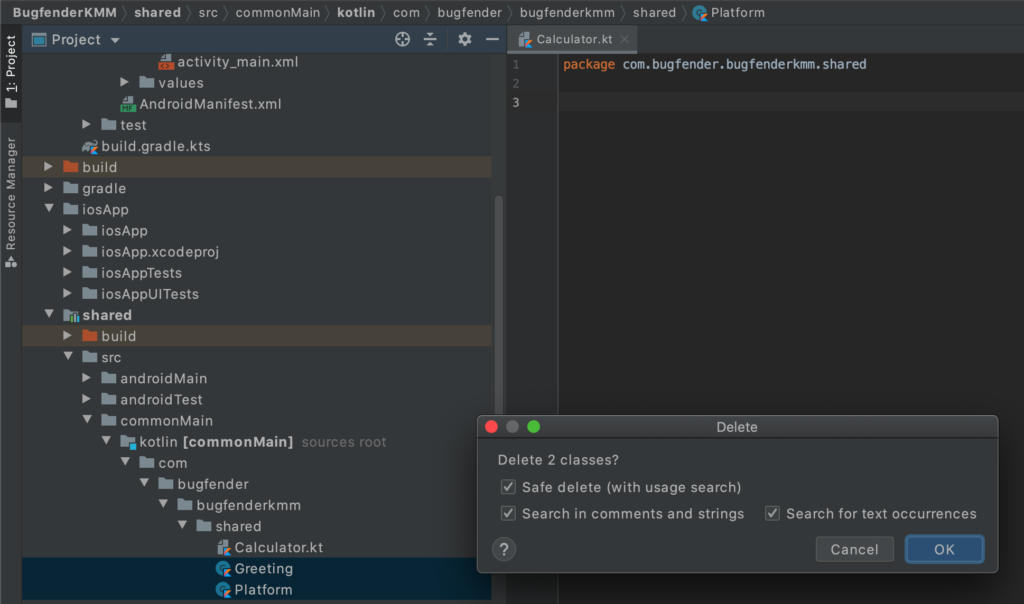
Feel free to delete the two sample classes that had been automatically generated.
Running the apps
The last step consists of connecting everything.
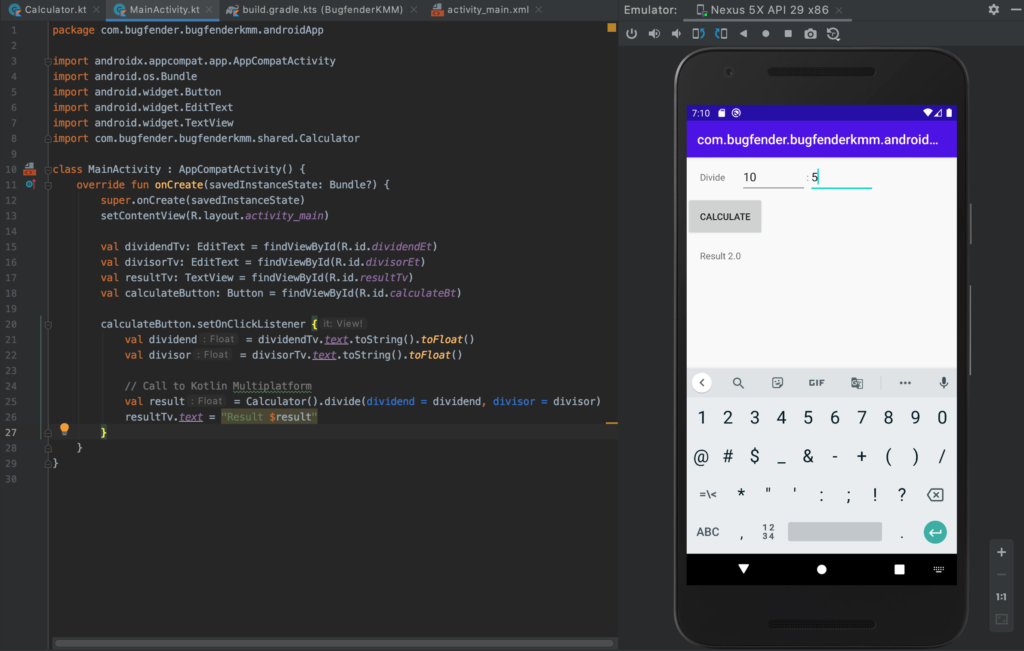
In the MainActivity class, after inflating our views, we can now call the Kotlin function and if we execute the app, we should be able to make divisions:
And we can do the same for iOS:
And here you have your first KMM app 🎉.
Now that you know how to build a multiplatform app in Kotlin, it’s time to start experimenting and breaking things on your side, which is the best way to learn.
Once you have finished breaking things, come back to this article — because we are now going to focus on fixing things.
How to debug a Kotlin Multiplatform app
As with every other development environment, we will be using breakpoints and logs. We are going to assume that you already have some knowledge but, if this is not the case, you can check our specific breakpoint articles for iOS and Android (basic and advanced) and come back once you are ready.
Breakpoints
During the development you can just use the debugger as you would normally do.
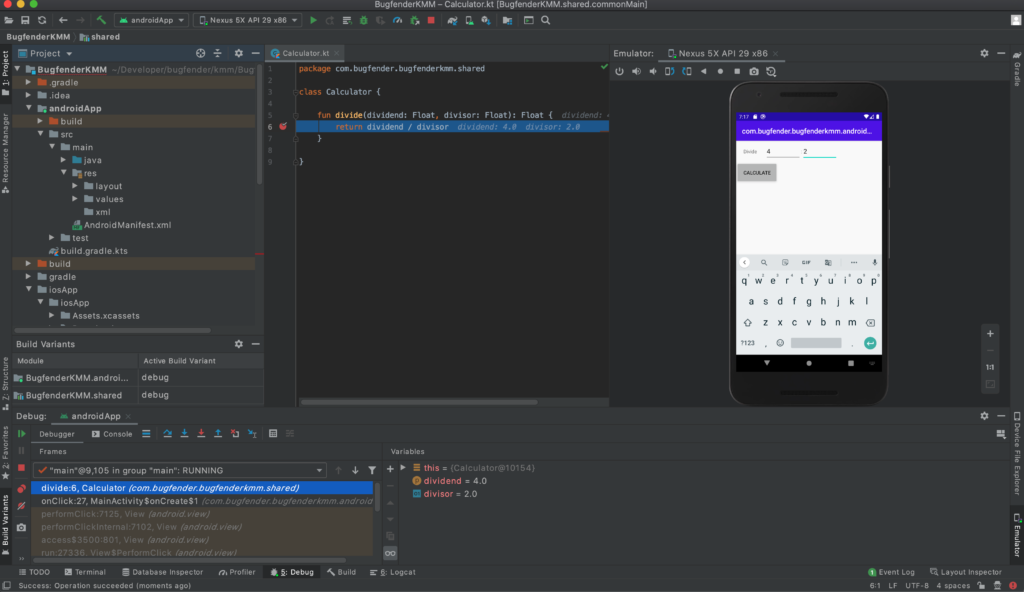
For Android you can just set breakpoints in the native Android code or in the shared module and check that everything works as expected:
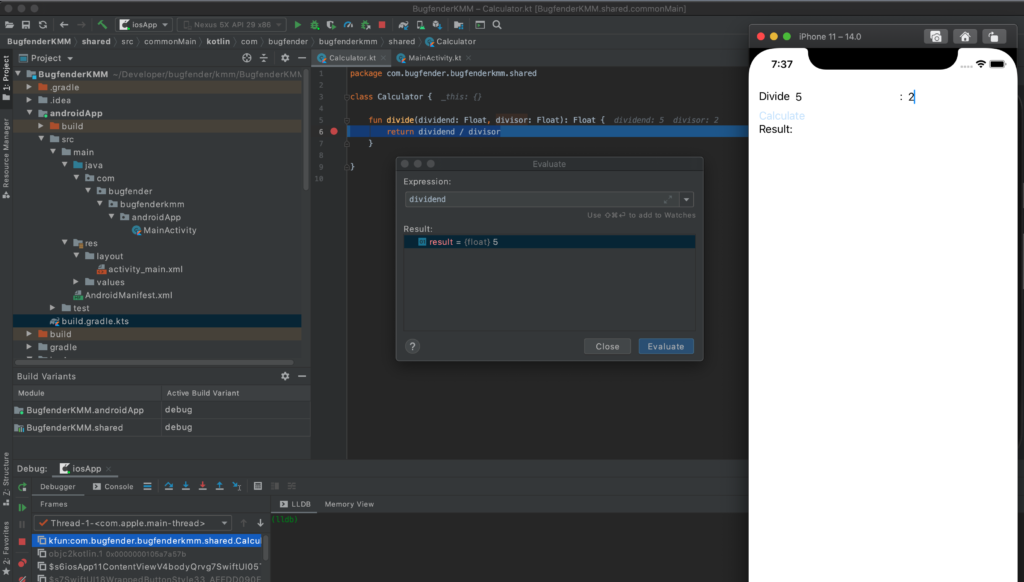
Now, in iOS, you can use Xcode for Swift and Objective-C code, but for Kotlin – you might want to sit down before reading this – you can set breakpoints too. In Android Studio!
Run the app selecting the iOS target in Android Studio and set the breakpoint at the desired place.
Logs
For logging we propose that you use the Bugfender SDK, because in just a few more steps you will be able to access local and remote logging for iOS and Android.
First, you will need a Bugfender App Key. If you don’t have one you can create an account for free by following this link.
Now, we are going to add Bugfender to the project.
Add Bugfender to Android
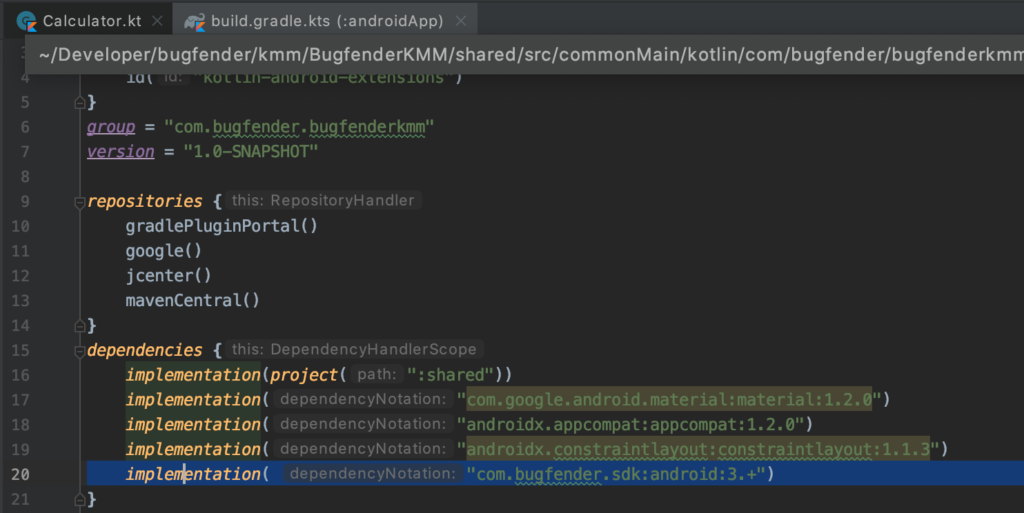
Add Bugfender to the dependencies of the build.gradle of the android app
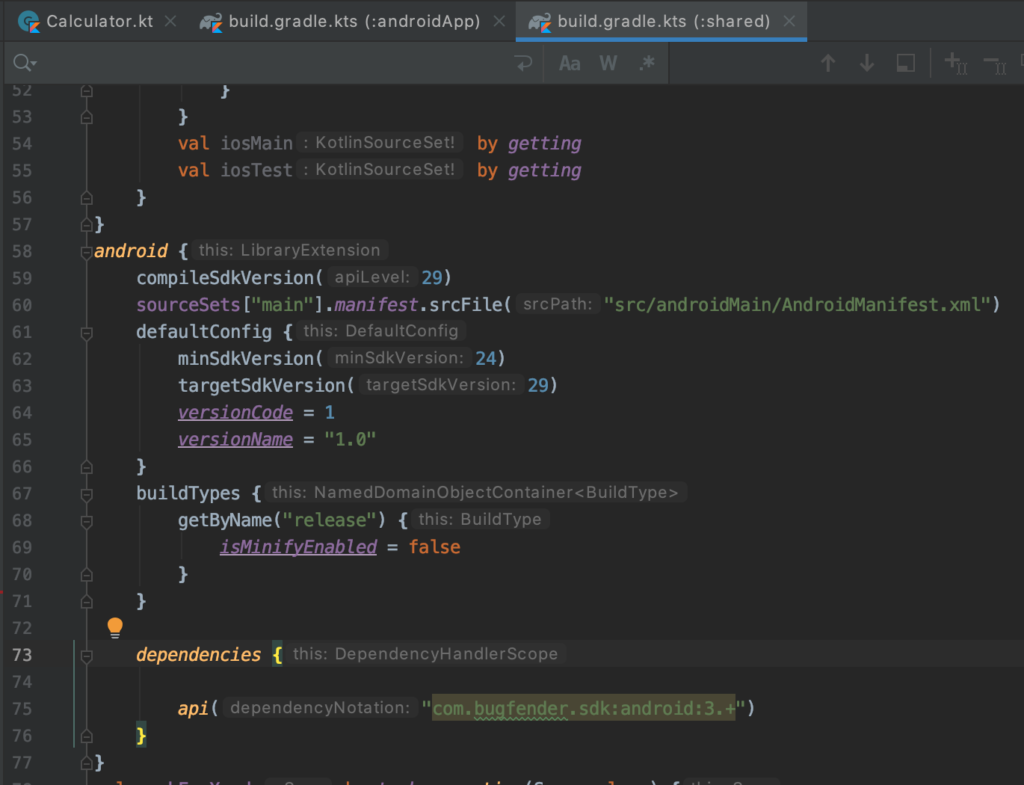
and again in the build.gradle of the shared module
Refresh Gradle.
Add Bugfender to iOS
To add Bugfender to iOS, we are going to use CocoaPods. First, add the Kotlin plugin for CocoaPods to the build.gradle of the shared module.

Now we are going to change the way our project is building and linking the iOS framework. You can find this code in the build.gradle that specifies how to generate the binary framework…
ios {
        binaries {
            framework {
                baseName = "shared"
            }
        }
    }
… and replace it with this.
ios()
cocoapods {
    podfile = project.file("../iosApp/Podfile")

    // Summary and Homepage are required by Cocoapods frameworkName avoids conflicts
    summary = "Shared module"
    homepage = "https://my.website"
    frameworkName = "shared"
    ios.deploymentTarget = "10"
}
Now, add the pod dependency.
cocoapods {
podfile = project.file("../iosApp/Podfile")
// Summary and Homepage are required by Cocoapods frameworkName avoids conflicts
summary = "Shared module"
homepage = "https://my.website"
frameworkName = "shared"
ios.deploymentTarget = "10"
// Calling cocoapods from gradle 🙉
pod("BugfenderSDK", "1.8")
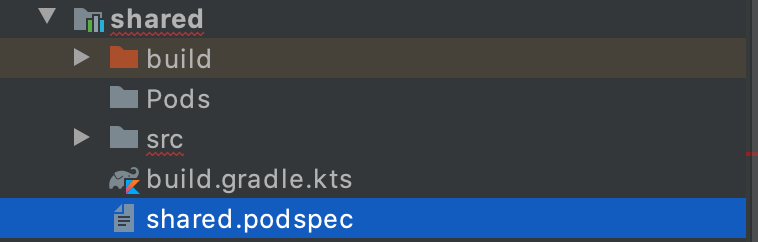
}Synchronize Gradle again and now a spec file should be created in the shared module, which should be added to the Xcode project as a Pod.
Troubleshooting. At the moment of writing this tutorial there is a known bug with the framework searchpaths and Cocoapods and an additional step needs to be taken. If your app doesn’t find the Bugfender symbols, follow the JetBrains-recommended workaround in this comment.
Get Bugfender working from Kotlin Multiplatform
For this example we are going to implement only two methods, one to activate Bugfender with our app key and the other to send a log.
// Initialize SDK
activateLogger(appKey: String)

// Send a log
fun log(msg: String)
We want to be able to call logs from any part of the multiplatform code or in the apps. In order to mix android, iOS and shared code, Kotlin Native provides us with the mechanism expect / actual.
You can define an interface in the shared code, which will be available from everywhere (expect), and then add different implementations for each needed platform (actual).
Add our shared interface. Expect
Go to the shared module commonMain package and create a new BFLogger file with these two methods. We are using object instead of class because this is the singleton-like Kotlin solution.
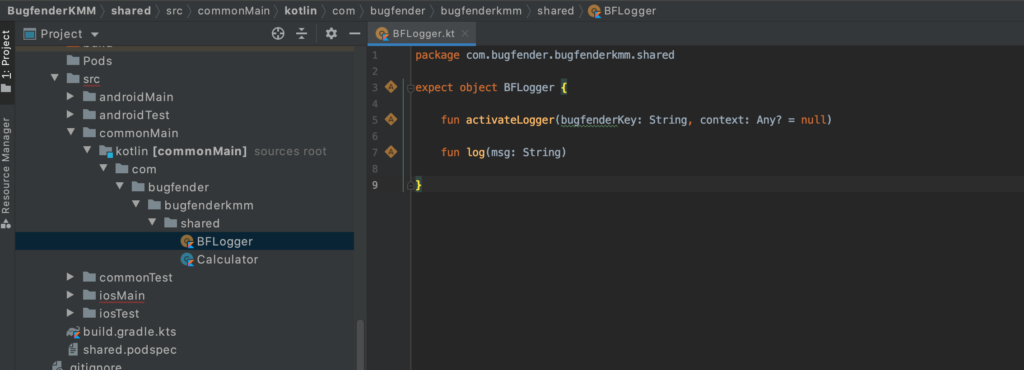
Notice that Bugfender for Android needs a context to initialize Bugfender SDK while the iOS sdk does not. As a quick and easy solution, we are using a nullable parameter in the activateLogger method.
Add the iOS implementation. Actual.
Go to the shared module iosMain and now implement the expect part of the BFLogger class. Be aware that this class needs to have exactly the same package as the one in the commonMain.
Don’t worry too much if you see a few words underlined in red; Android Studio still has a few issues understanding multiplatform code. If you have access to Intellij, that should work a little bit better.
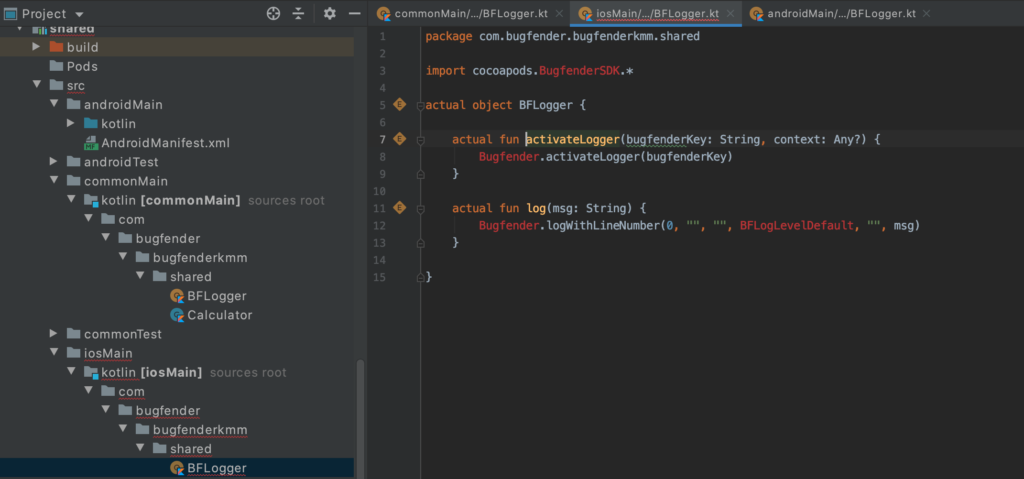
Take a minute to reflect and analyze what we are doing here. We are importing a native pod from iOS using Gradle and we are calling it from Kotlin code. Bugfender.activateLogger is an Objective-C method from the Bugfender iOS framework!
Add the Android implementation. Actual.
And now, we need to add the actual implementation for Android. Go to the androidMain part and add a new BFLogger class. Again, be aware of the packages.
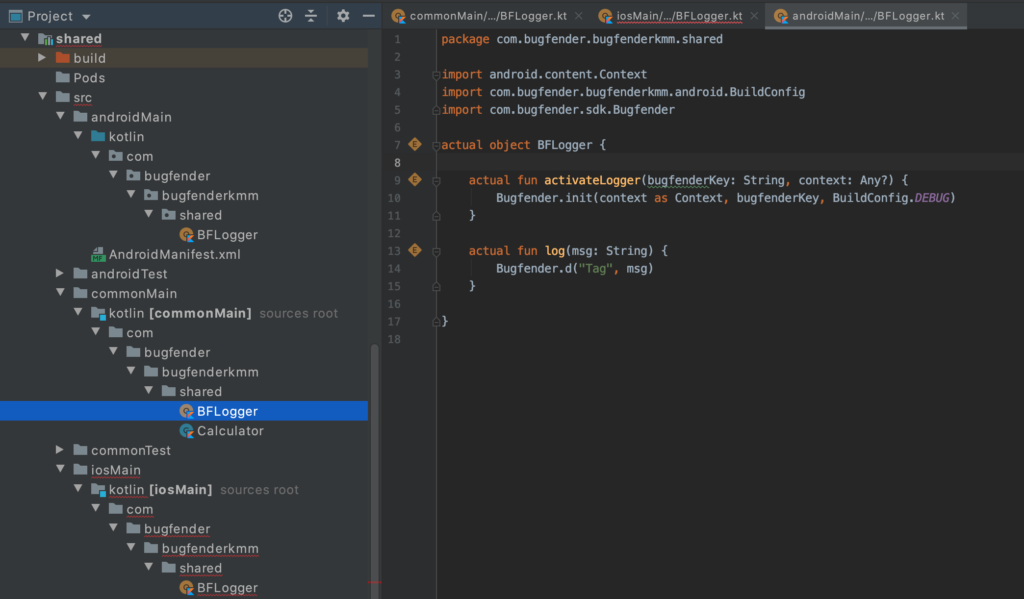
The Android SDK of Bugfender needs to be initialized with a Context. However “Context” is an Android type that doesn’t exist in Kotlin Native nor in iOS. That’s why we added a nullable Any that we can recover and cast in the Android implementation.
Use it from the apps
If you’ve got this far, you are my hero. We are almost done!
First, initialize the BugfenderSDK in the App Delegate adding your Bugfender app key. This will create a new session in Bugfender.
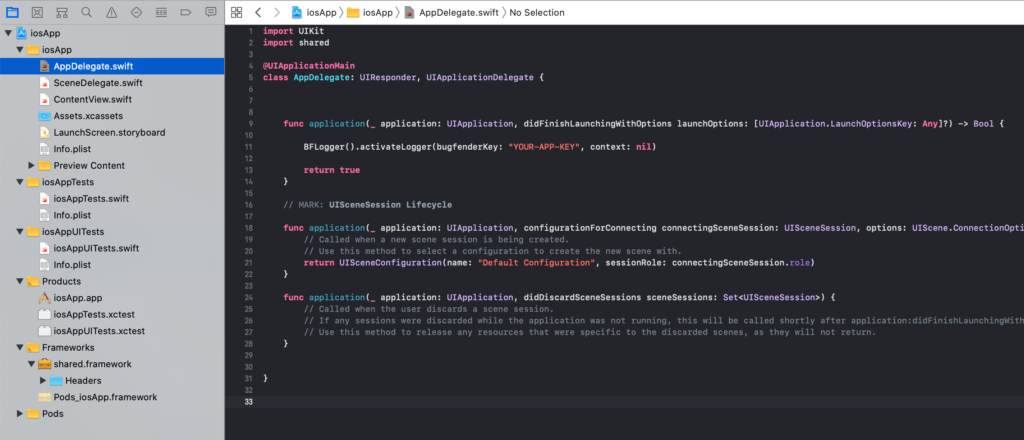
Notice: Objects in Kotlin are singleton-like classes. In Android you can type BFLogger.activateLogger while the equivalent in Swift is BFLogger().activateLogger and in ObjC this same method should be invoked with [BFLogger bFLogger].
While the ObjC notation is clear, in SwiftBFLogger()will always return the same instance. This looks weird and long discussions have taken place in the Jetbrains forum. However, this is a topic for another post. The only important thing here is to remember that BFLogger() will always return the same instance as a singleton.
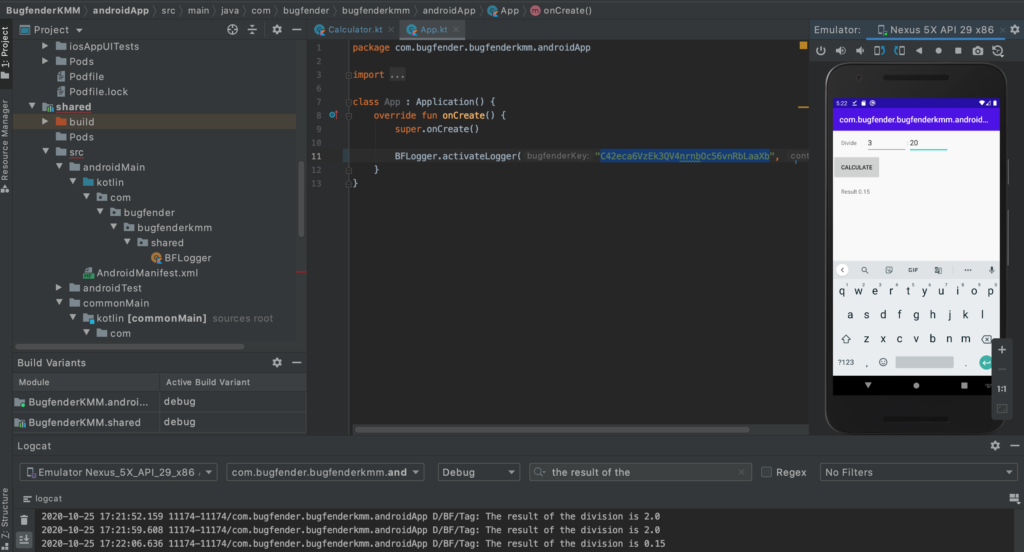
And now head back to the Calculator class in our shared module and add a log there with the result:
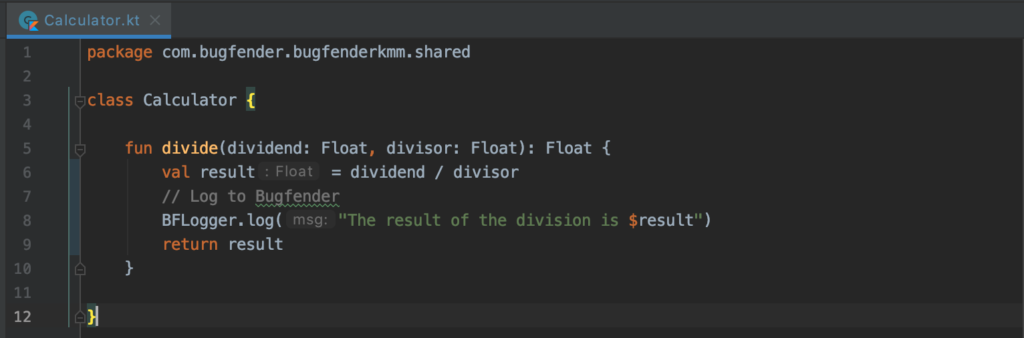
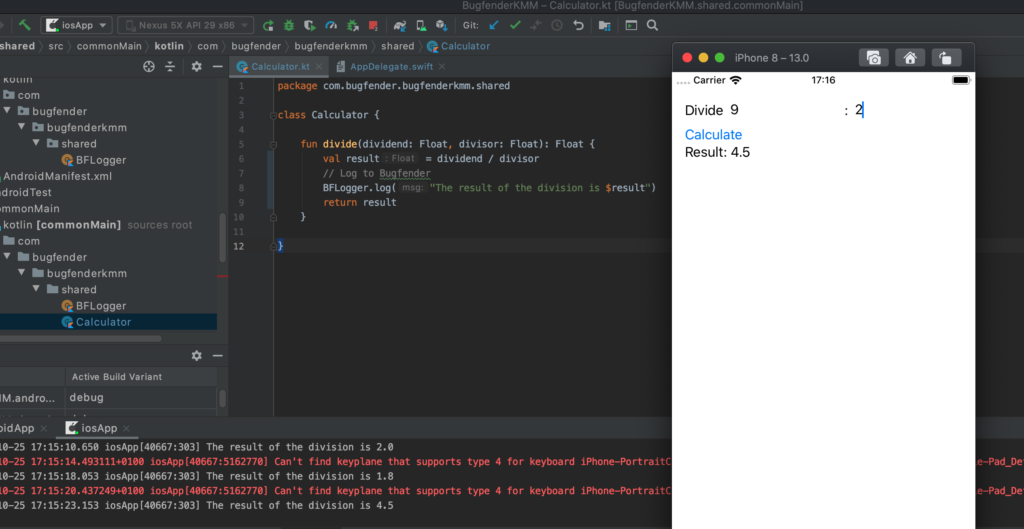
Run the app, press the button and you will see your new logs appearing every time you perform a new calculation.
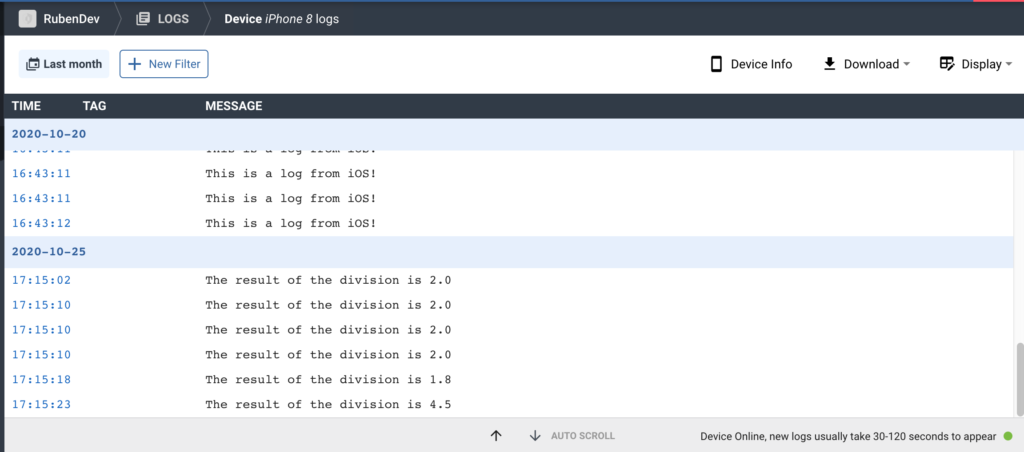
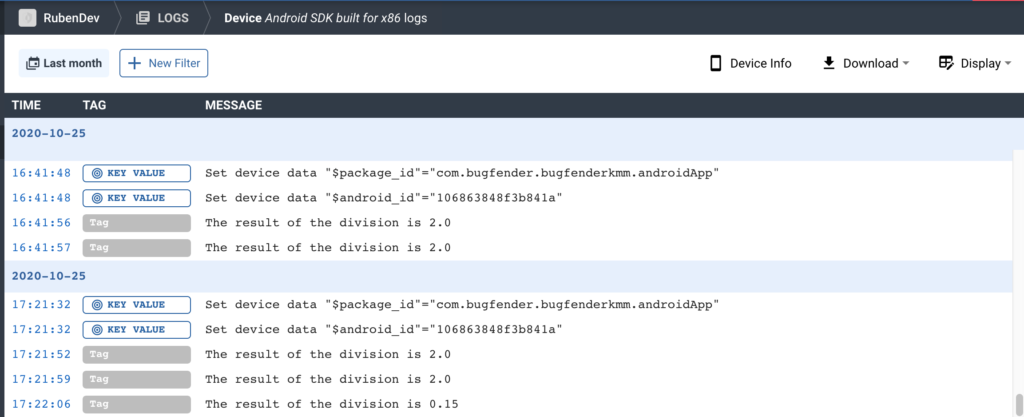
As you connect your app to Bugfender, log in to the Bugfender console and you should find an active device, with the same logs inside:
In the case of Android, we need to create the App class by subclassing Application…
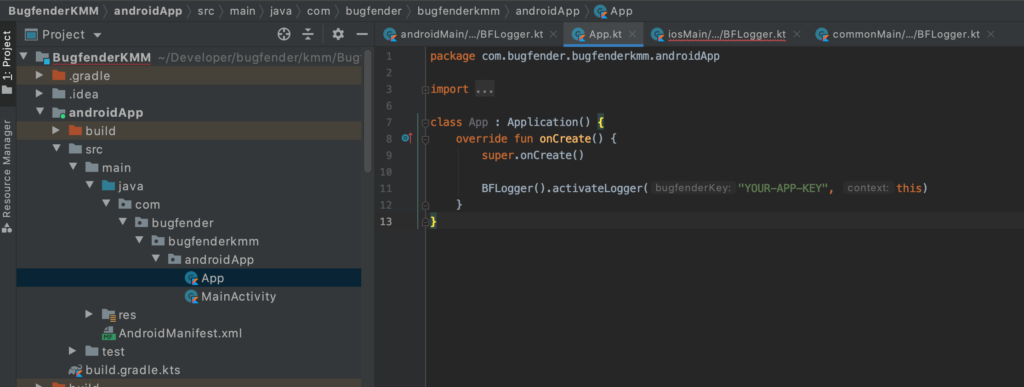
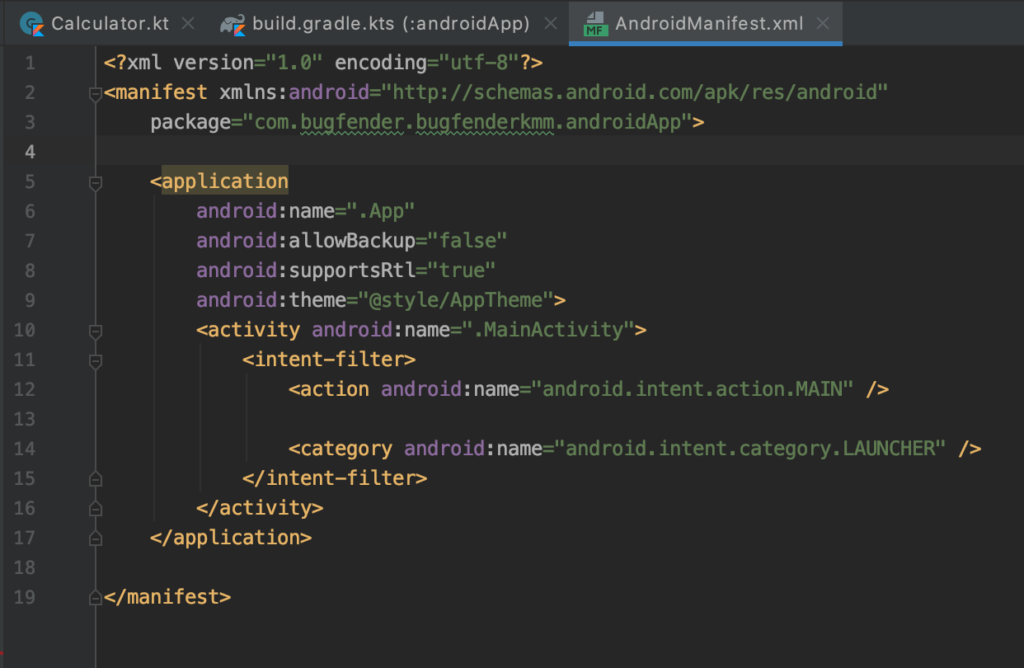
…and link it with the manifest.
Finally, we are ready to run. The same log that we added to the Calculator class should be printed by Android:
Again, you will find a new device in the Bugfender Console for your Android emulator.
Troubleshooting. If you get a network-related error and Bugfender doesn’t appear to work, uninstall the app from the simulator, run it again and it will be fixed. The Bugfender manifest includes the internet permissions and Android needs to uninstall and install again in order to apply permissions to a newly created app.
And that’s how you can log to two different platforms with the same call. Remember that you can create different app keys for each platform, whichever your account plan is. You just need to initialize the apps in Bugfender’s Dashboard and later, in the activateLogger call, send a different one for Android and iOS.
Separating platforms can become handy when you are trying to debug crashes or getting user feedback. Having them separated should make things easier.
And now, go and get some pizza! You deserve it

We would like to congratulate you on completing this tutorial. Kotlin Multiplatform is still a relatively new technology and it requires a little bit of experience and experimentation to set up a new project properly. However, our team is already using Kotlin Multiplatform in production apps with excellent results; in our opinion, a bright future lies ahead for KMM.
Summary
In this tutorial we have:
- Created a Kotlin Multiplatform app
- Connected cocoapods to Android Studio
- Installed Bugfender for both platforms using shared code
- Learnt the basics of actual/expected pattern
- Used a third-party binary framework from a multiplatform app.
The code used in this tutorial is available on our github. If you have problems getting the sample working, you can always open an issue in Github and we will do our best to help. Also, the Jetbrains engineers are very active in the Jetbrains forums and most of the common issues are solved there.
Happy debugging!
Expect The Unexpected!
Debug Faster With Bugfender

Rubén Vázquez