16 Minutes
iOS In-App Purchases: A Comprehensive Guide for Swift Developers
Fix Bugs Faster! Log Collection Made Easy
iOS in-app purchases, or IAPs, allow developers to offer content, services, and features within their iOS apps for users to purchase. This can provide a significant revenue stream for developers, while enabling users to enhance their experience or access premium content and services. An iOS in app purchase can be a good alternative to paid applications, as an iO app developer can offer the app for free and monetize it via app purchasing options.
Table of Contents
- What are in-app purchases?
- Types of in-app purchase
- In-app purchase components and workflow
- Testing in-app purchases
- App monetization strategies
- Products to manage your app purchases
- iOS in-app purchases FAQ
- What are iOS In-App Purchases?
- What types of in-app purchases are available for iOS apps?
- How do developers integrate in-app purchases in Swift applications?
- Why is receipt validation important for in-app purchases?
- Can developers test in-app purchases before releasing the app?
- How do I handle subscription management and renewal in iOS apps?
- Are there specific guidelines for offering In-App Purchases within iOS apps?
- To sum up
What are in-app purchases?
IAPs refers to the transactions made within a mobile app to subscribe to particular content and services. These purchases are a common monetization strategy for developers who want to generate revenue beyond the initial app download.
Types of in-app purchase
There are three principal types of IAPs:
Consumable IAPs
In a consumable in app purchase items that can be used once and are usually bought in small quantities (e.g. virtual currency, extra lives). Consumables can be purchased multiple times.
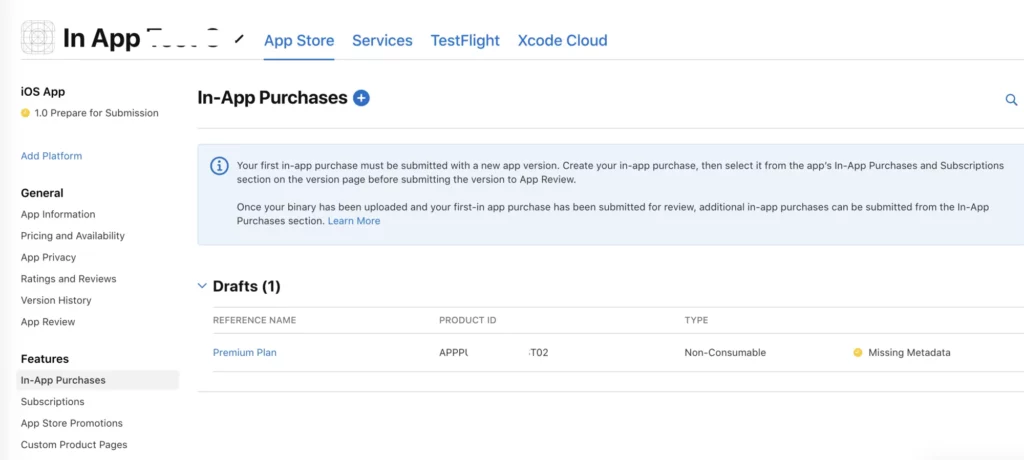
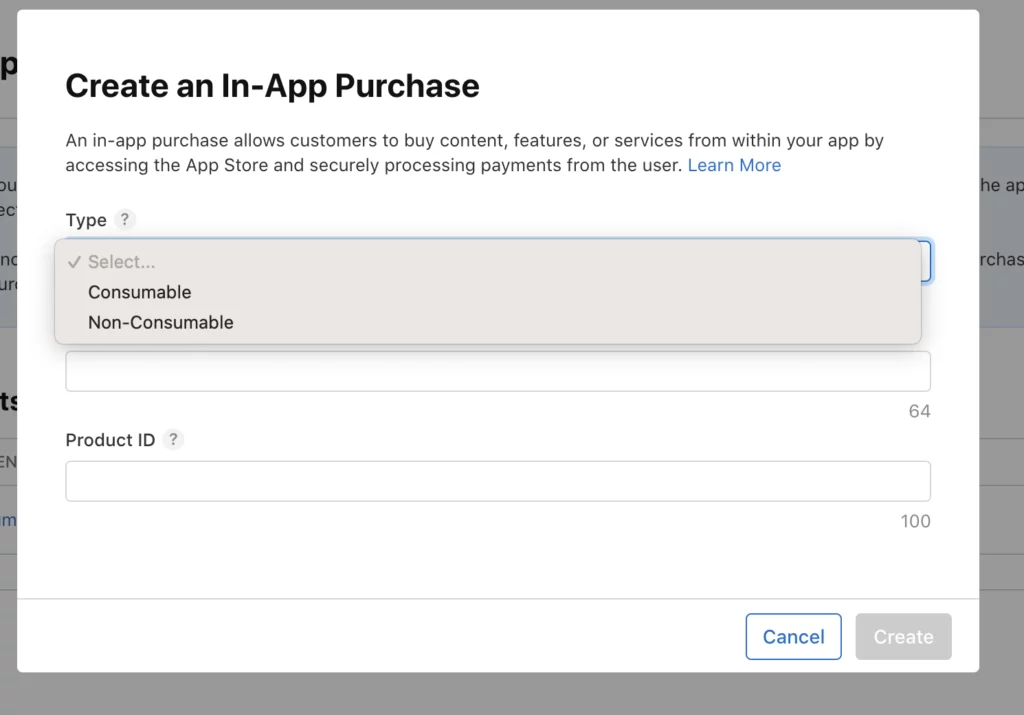
As a developer, you will receive an option to select what kind of IAP you want to cadd, while you’re creating a product in App Store Connect. You need to have a valid Developer account on the App Store to follow these steps.
Non-consumable IAPs
These items are purchased once and do not expire or get used up (for example, they may unlock premium features or remove ads). Non-consumable items are typically linked to the user’s account and can be restored on multiple devices.
Subscription-based IAPs
Subscription based IAPs come in two distinct types.
Auto-renewable subscriptions
These subscriptions provide access to content, services, or features on an ongoing basis. They automatically renew unless the user decides to cancel, and they are common for services like streaming subscriptions.
Non-renewing subscriptions
Similar to auto-renewable subscriptions, these don’t renew automatically. Users must manually renew when the subscription period ends.
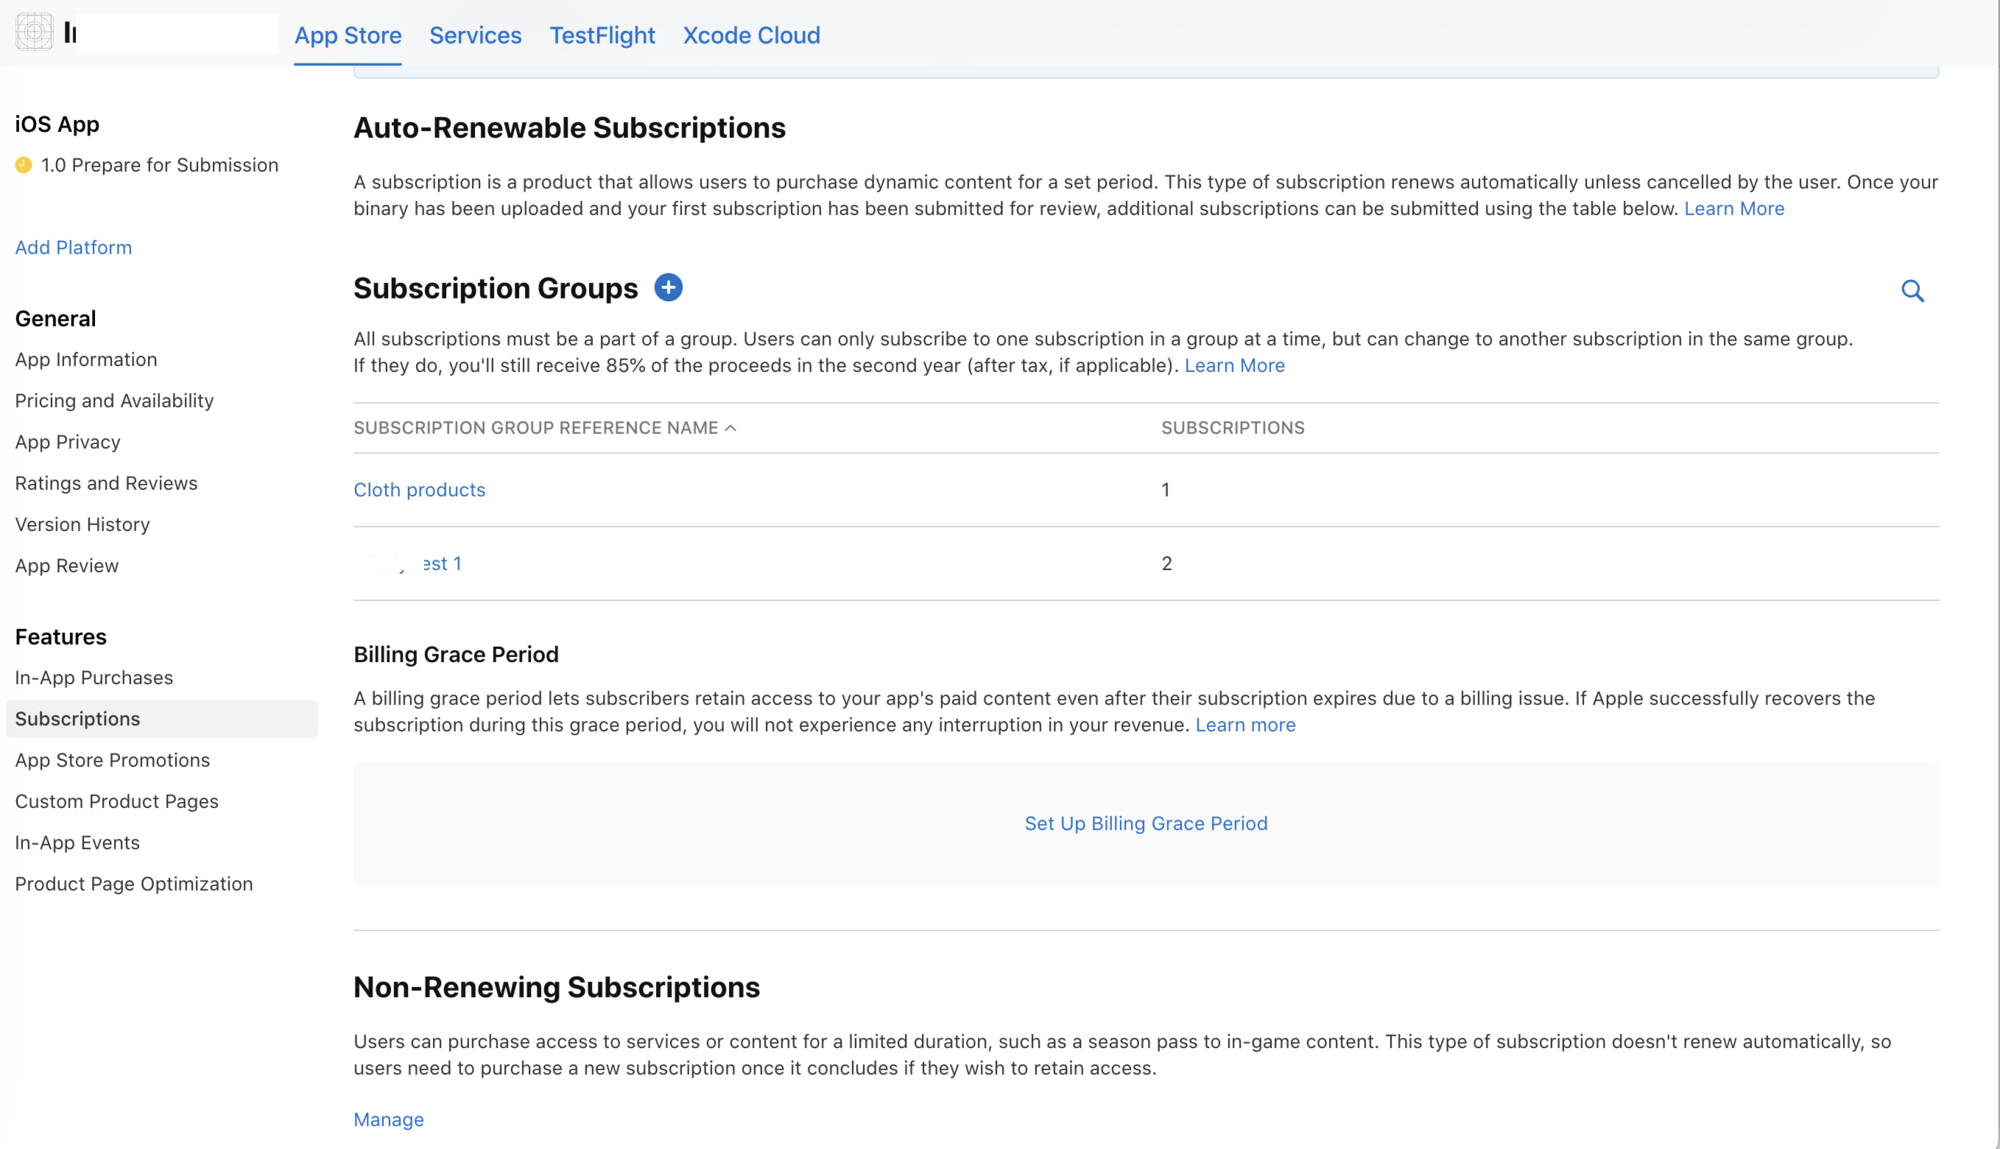
As you in the screenshot, apple app store offers the option to create subscription groups to enable app developers to manage and offer various subscription options. Developers can create flexible pricing structures within a subscription group, such as monthly, quarterly, or annual subscriptions, accommodating different budget preferences and usage levels.
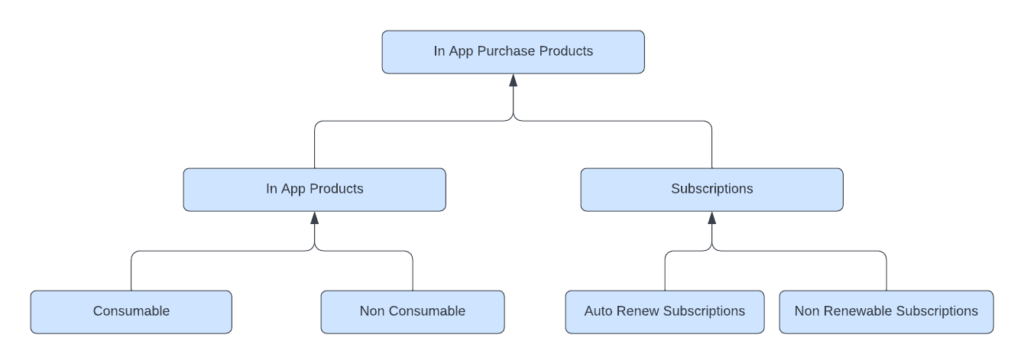
When creating your iOS in app purchase, you will receive the option to select the kind of subscription you want to create. Here is a quick summary of how IAPs are classified.
In-app purchase components and workflow
Now we’ve discussed the principal types of IAPs, let’s dig a little deeper into their key components.
StoreKit Framework
The StoreKit Framework is provided by Apple specifically to handle in-app purchases. It includes required classes as well as methods to request product information, make purchases and handle transactions and receipts.
To add this framework, simply go to the project’s General Tab and add it in the Frameworks & Libraries:
Adding the StoreKit framework
You can easily add the StoreKit framework to your iOS app via Xcode. The easiest method is to go to your project settings, choose your app target and add the framework.
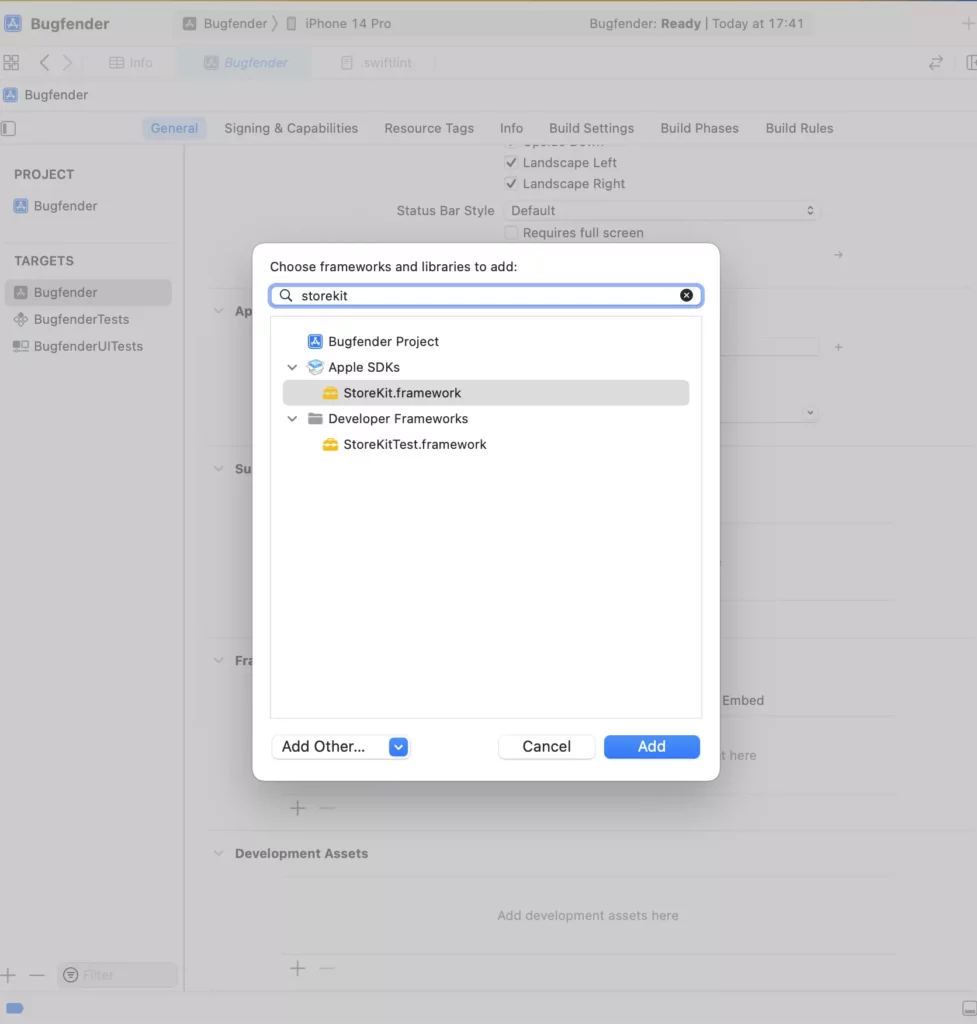
After you add the framework in Project, you can import it into your ViewController file to further utilize its classes and methods.
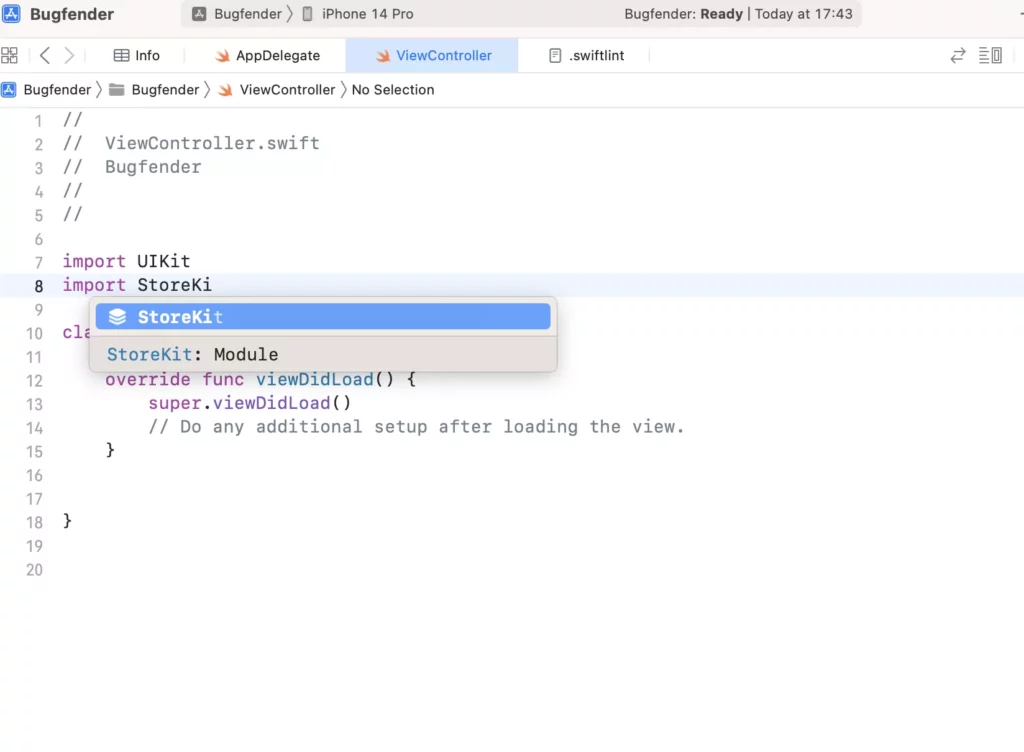
Now we’ve imported the Framework, let’s take the next step of creating products and getting the product identifiers.
App Store Connect
This is Apple’s web portal for developers to configure their IAPs and manage them in the App Store. Here we can create IAPs based on the specific type we need. If, for example, we want create a subscription, here’s how it will look: https://appstoreconnect.apple.com/apps
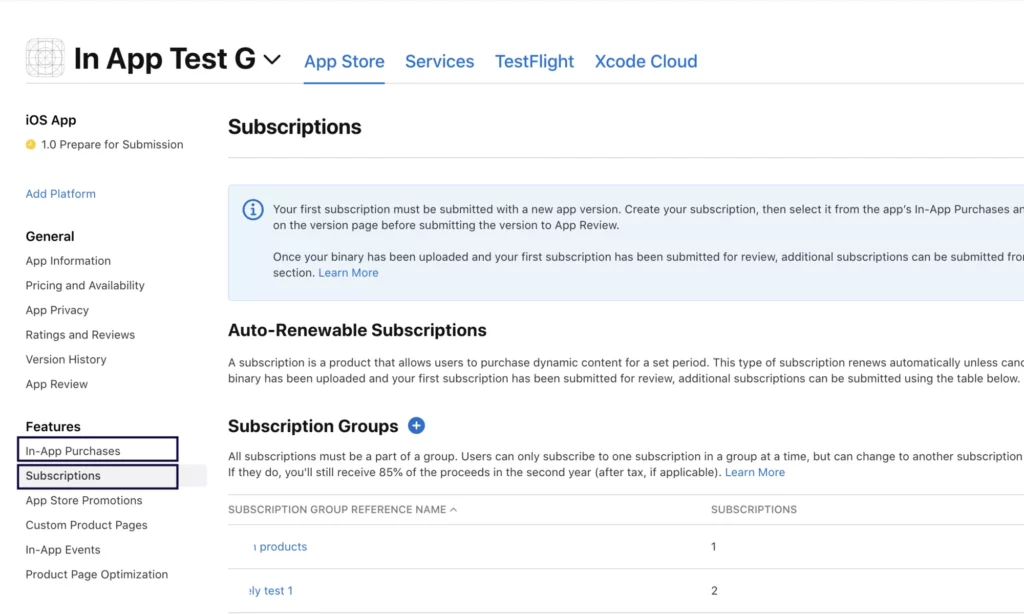
You can create the IAP, or subscriptions, monthly or annually, and set the prices from Apple’s pre-defined list of prices. You’ll also get a facility to add introductory offers for users and promotional discounts on certain events, whenever you want to give your users a discount.
Product Identifiers
These are unique strings that identify the products or items you list for IAPs in your mobile app. These identifiers are used by the API to communicate with the App Store so it can fetch information about the products, such as pricing and item availability. Clear, accurate implementation of each product id is important for the IAP’s successful integration into an iOS application.
Product identifiers are unique and case sensitive.
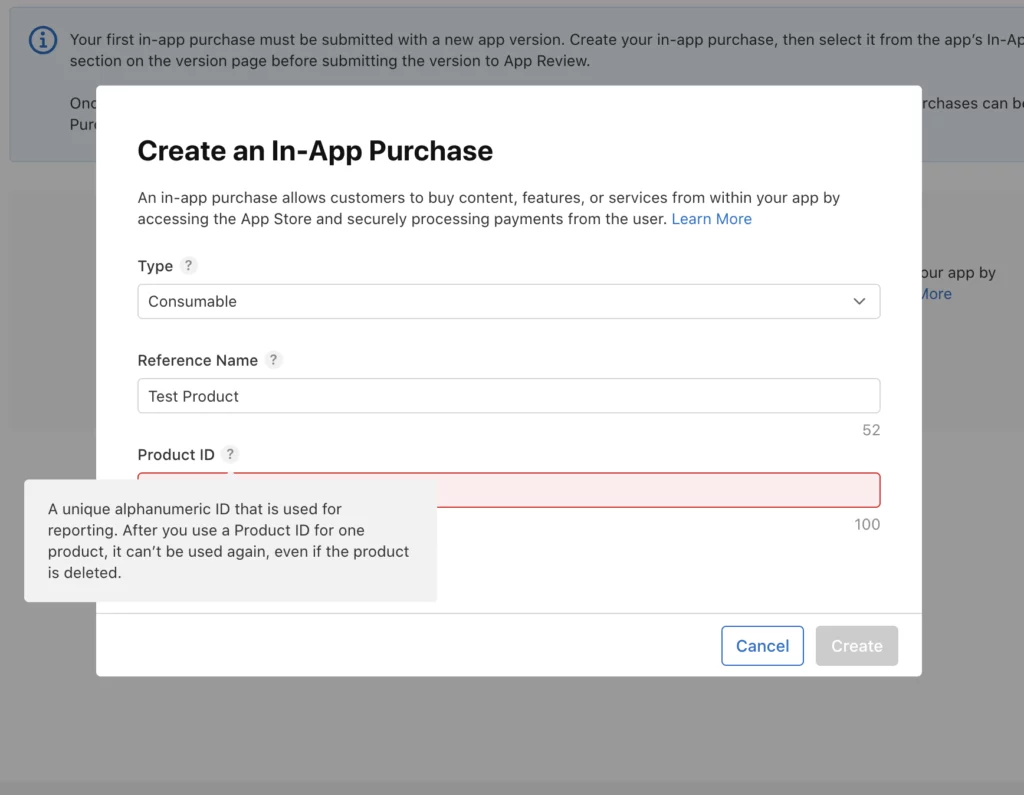
Here is how you can set up the product identifiers:
- You need to log in to your Apple Developer account and go to App Store Connect.
- Now, Select your app, and then choose ‘In App Purchases.’
- Add a new in app purchase and specify the type, reference name and product id.
To fetch product information
Let’s start with a request to fetch product information for In-App Purchases (IAP) on iOS using the StoreKit framework. To do this, you will need to create an instance of SKProductsRequest with a set containing the product identifiers you want to query.
let productIdentifiers: Set<String> = ["com.bugfender.monthly", "com.bugfender.yearly"]
let productRequest = SKProductsRequest(productIdentifiers: productIdentifiers)
productRequest.delegate = self
productRequest.start()
To handle the product information response
StoreKit framework will call the **productsRequest(_:didReceive:)** after a SKProductsRequest has successfully fetched product information from the App Store. Let’s see an example of it:
func productsRequest(_ request: SKProductsRequest, didReceive response: SKProductsResponse) {
    let products = response.products
    // Process the product information to display or to execute your logic
}
As you can see, the callback function has a SKProductsResponse that includes an array with detailed information about the products that were successfully retrieved, such as price, product identifier, localized title, and description.
Handle receipt validation
Receipt validation is a very important step in ensuring the integrity and authenticity of the transaction, checking the transaction ID on the Apple servers in real time will tell you whether the receipt is valid or not.
When a user carries out an IAP, the App Store provides a receipt (a json string) to the app. This receipt is a record of the transaction and includes information about the purchase made by the user, such as the product identifiers, quantity, and transaction ID. Validating this receipt on the server is essential to prevent fraud and unauthorized access to your paid content and app features.
Steps required for receipt validation
Fetch the receipt:
When an IAP is successfully completed by the user, the app receives a transaction receipt. You can obtain the receipt using appStoreReceiptURL from the Bundle class.
Send the receipt to the server:
Using a REST API, you can send a receipt for further validation from the Apple server. Using HTTPS will provide added security.
Verify the receipt signature using a public key:
All iOS receipts are signed by Apple. You can verify the signature using a public key provided by Apple to ensure receipts are not altered. This key is accessible from Apple’s Public Key Server.
Decode to validate the receipt:
To access purchase information, you need to decode receipts, and you can do this using the ASN.1 library or a third-party library. Receipts are encoded using the ASN.1 DER format by default.
Check the Bundle ID
You need to ensure that the bundle ID in the receipt matches your app identifier.
Verify product IDs and quantity:
Form the accessed information, confirm whether the product identifier and quantity in the receipt are matching the expected data points.
Check the expiry date for subscriptions:
You need to check the expiration date in the receipt to get the subscription status, whether it’s valid or expired. And you can take the action to show an upgrade option to the user if it’s expired.
Record a purchase:
You need to keep a record of the validated receipt on your server and acknowledge the purchase to update the user’s entitlements.
The next code shows you the basic process of getting the App Store receipt from the app’s bundle and preparing it for validation:
// Load the receipt data
guard let receiptURL = Bundle.main.appStoreReceiptURL,
      let receiptData = try? Data(contentsOf: receiptURL) else {
    // Handle error
    return
}

// Send the receipt data to your server for validation
// Perform validation and verification on the server
It’s good practice to use the following steps when we perform receipt validations:
- Using HTTPS requests.
- Handling the receipt response in case of revoked purchases.
- Saving the receipts in a secure location, keeping them confidential.
- Performing a regular refresh of receipts to ensure the subscription is valid.
A full IAP workflow
Here is a full workflow, from initial request through final validation.
And this is what each step represents
- Request product information: The app requests information about available products from the App Store.
- Show products to the user: Display the products and their prices to the user along with terms of use and conditions.
- Initiate the transaction: If the user decides to make a purchase, the app initiates the purchase request using StoreKit.
- Handle the transactions: Implement the methods to handle the transaction process and updates, including successful transaction, failed transactions, and restoration of the existing purchase.
- Unlock the content: Once the user has made the purchase successfully, you as the developer need to unlock the purchased content or provide the purchased services or access to paid features.
- Restore purchases: If user has already paid for a certain feature, allow the users to restore their purchases on multiple devices.
- Receipt validation: This is optional, but you should validate the purchase receipt on your server to ensure its legitimacy and validity.
Testing in-app purchases
Once an IAP has been implemented, testing is very important to ensure that integration and setup is working correctly before releasing the app to users so they can start making purchases.
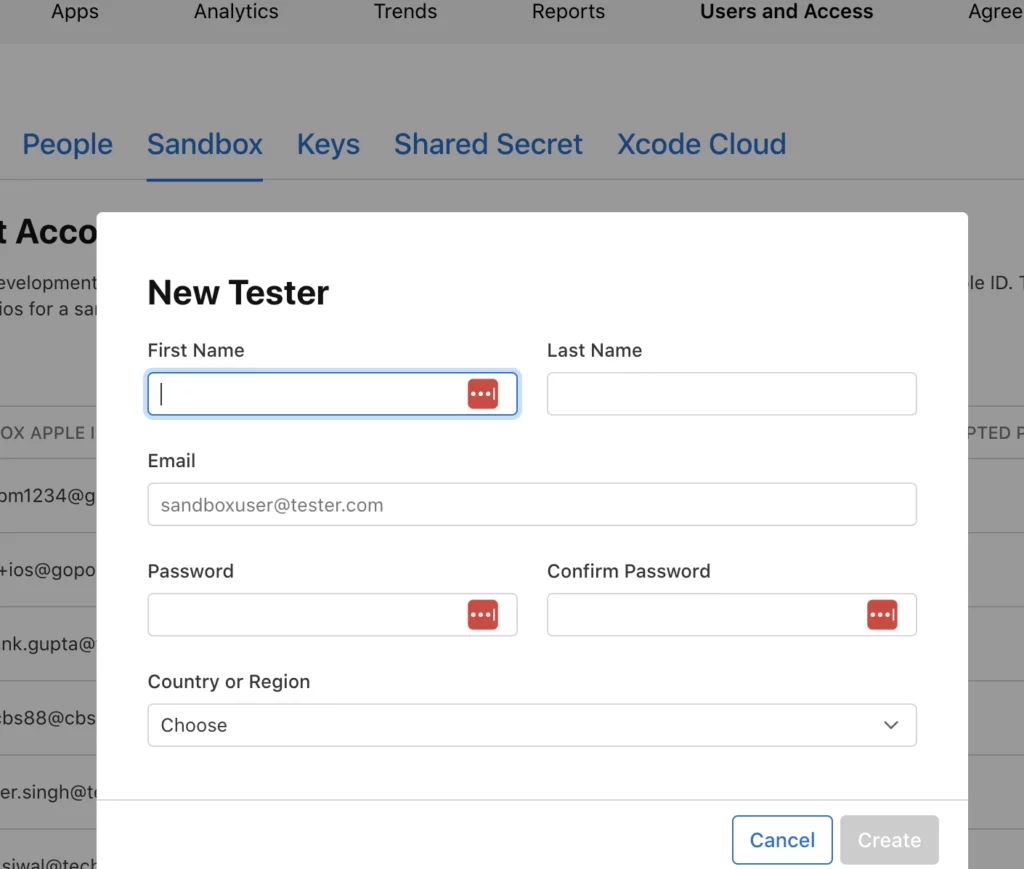
Apple provides sandbox environments that simulate real purchase scenarios without actual money being transferred from any side. Here are some steps to create sandbox testing transactions.
Create a sandbox tester account:
- Log in to App Store Connect.
- Go to ‘Users and Access’ and create a new sandbox tester account by providing your name and email.
- Use this account to log in to the App Store on your testing device.
Configure IAPs
- In App Store Connect, go to your app and configure the IAPs in the ‘Features’ menu.
- Make sure the product IDs in your app match those created in App Store Connect.
Use the test environment on Your iPhone
On your iOS phone, log out of your regular App Store account and log in using the sandbox tester account created with App Store Connect.
Build and run your app
Now build and run the app on your device and Initiate an IAP as you normally would within your app to make sandbox transactions.
Verify the transactions
Check and verify the transaction status, payment, and content unlocked in your app. You need to use the SKPaymentQueue and SKPaymentTransactionObserver to handle transactions in your code.
This is how you can implement the protocol in your code:
import StoreKit

class TransactionObserver: NSObject, SKPaymentTransactionObserver {

    // MARK: - SKPaymentTransactionObserver Methods

    func paymentQueue(_ queue: SKPaymentQueue, updatedTransactions transactions: [SKPaymentTransaction]) {
        for transaction in transactions {
            switch transaction.transactionState {
            case .purchasing:
                // The transaction is being processed by the App Store.
                break

            case .purchased:
                // The transaction was successful. Unlock content or provide services.
                handlePurchasedTransaction(transaction)

            case .failed:
                // The transaction failed. Handle the error.
                handleFailedTransaction(transaction)

            case .restored:
                // The transaction was restored. Unlock content or provide services.
                handleRestoredTransaction(transaction)

            case .deferred:
                // The transaction is in a state of temporary failure. Try again later.
                break

            @unknown default:
                break
            }
        }
    }

    func paymentQueue(_ queue: SKPaymentQueue, removedTransactions transactions: [SKPaymentTransaction]) {
        // Called when transactions are removed from the queue (e.g., after being restored)
    }

    func paymentQueueRestoreCompletedTransactionsFinished(_ queue: SKPaymentQueue) {
        // Called when the App Store has successfully restored previous transactions
    }

    func paymentQueue(_ queue: SKPaymentQueue, restoreCompletedTransactionsFailedWithError error: Error) {
        // Called when restoring completed transactions has failed
    }

    // Additional methods you may implement for handling download progress and finish

    func paymentQueue(_ queue: SKPaymentQueue, updatedDownloads downloads: [SKDownload]) {
        // Handle download progress
    }

    func paymentQueue(_ queue: SKPaymentQueue, shouldAddStorePayment payment: SKPayment, for product: SKProduct) -> Bool {
        // Return true if the transaction should be processed by the App Store, or false to defer processing.
        return true
    }

    // MARK: - Transaction Handling Methods

    func handlePurchasedTransaction(_ transaction: SKPaymentTransaction) {
        // Implement your logic for handling a successful purchase
    }

    func handleFailedTransaction(_ transaction: SKPaymentTransaction) {
        // Implement your logic for handling a failed purchase
    }

    func handleRestoredTransaction(_ transaction: SKPaymentTransaction) {
        // Implement your logic for handling a restored purchase
    }
}

class PurchaseManager {
    static let shared = YourPurchaseManager()

    private let transactionObserver = YourTransactionObserver()

    private init() {
        // Add the transaction observer to the payment queue
        SKPaymentQueue.default().add(transactionObserver)
    }
}

// Use this code to remove the observer
SKPaymentQueue.default().remove(transactionObserver)
Check App Store Connect for logs
You need to review the logs and transactions in App Store Connect under ‘Sales and Trends’ to ensure your implementation is correct.
App monetization strategies
Each app monetization strategy has its own potential revenue benefits, and the result and effectiveness of any strategy depends on many factors like your target audience, content, and user engagement.
Several monetization strategies including link, freemium model, paywalls and virtual currencies allow you to access the paid features of the app. The specific type you use depends on the kind of content and features you are providing to the users in return for the price.
Considerations for developers:
- User Experience of your app: You need to prioritize a positive user experience to build trust and encourage user loyalty.
- Testing and monitoring analytics: You need to regularly test the app and analyze events using certain tools. Analytics will help you to understand the user behaviour and adjust strategies accordingly.
- Communication transparency: You need to clearly communicate the value proposition to your users. Be transparent about how and why you are monetizing the app.
- Adaptability: Be flexible and willing to adapt your strategy based on user feedback and market trends.
- User satisfaction: Focus on finding a balance between the revenue you are generating and the value you are providing to your users.
Products to manage your app purchases
There are many third-party products and services that can help you to manage and optimize IAPs. These products provide various features, analytics, and essential insights to better manage both your IAPs and your wider monetization strategies.
These products include:
- Braintree: This is a full-stack payment platform from PayPal that supports in-app purchases and subscriptions.
- RevenueCat: This is a mobile subscription management platform that simplifies the implementation of IAPs, subscriptions and analytics.
- Chartboost: This is a mobile ad network focused on in-app advertising, including interstitials, rewarded video ads, and native ads.
- Tapjoy: A mobile advertising and monetization platform that offers rewarded advertisements, in-app marketing automation, and analytics.
- AppsFlyer: A mobile attribution and marketing analytics platform that helps developers track the performance of their IAPs and user acquisition campaigns.
- Adjust: A mobile marketing platform that provides analytics and attribution solutions to optimize IAPs and advertising campaigns.
- SOOMLA: A mobile game monetization platform offering IAP analytics, ad monetization, and other tools to optimize revenue.
- ironSource: A mobile monetization platform offering a range of solutions, including ad mediation, in-app purchases and user engagement tools.
iOS in-app purchases FAQ
What are iOS In-App Purchases?
iOS In-App Purchases (IAPs) allow developers to offer digital goods or services within their apps. This can include premium content, subscriptions, and features, enhancing the user experience and app functionality and allowing developers to monetize their iOS apps.
What types of in-app purchases are available for iOS apps?
There are three main types of in-app purchases in iOS: consumable (used once, like game currency), non-consumable (permanent features or content), and subscriptions (access to content or services for a period). Each serves different user needs and monetization strategies.
How do developers integrate in-app purchases in Swift applications?
Developers use the StoreKit framework to integrate in-app purchases, requiring setup in both the app code and App Store Connect.
Why is receipt validation important for in-app purchases?
Receipt validation for in-app purchases is crucial as it ensures transactions are legitimate and prevents fraud. It involves verifying that the purchase was indeed made through the App Store and confirms the purchase details directly with Apple’s servers.
Can developers test in-app purchases before releasing the app?
Yes, developers can and should test in-app purchases using sandbox testing in App Store Connect to ensure functionality. This sandbox testing environment enables developers to simulate In-App Purchase transactions without incurring into actual charges, allowing an easy testing of the purchase flow.
How do I handle subscription management and renewal in iOS apps?
Using the StoreKit framework, developers can manage subscriptions by tracking active periods, handling renewals, and providing options for users to manage or cancel their subscriptions through their Apple ID settings.
Are there specific guidelines for offering In-App Purchases within iOS apps?
Yes, Apple has strict guidelines covering user privacy, content, and the functionality of In-App Purchases, which must be adhered to for app approval on the App Store.
To sum up
A comprehensive understanding and effective integration of IAPs are essential for developers seeking to monetize their mobile applications successfully.
In this detailed guide we’ve focused on different types of IAPs, subscriptions and their usage. We’ve also discussed key topics including detailed IAP integration flows, sandbox testing and wider monetization strategies.
Hopefully, this has given you a broad base of knowledge to secure reliable, sustainable revenue for your products. Happy coding!
Expect The Unexpected!
Debug Faster With Bugfender

