Unit tests are performed on a single unit of code, usually on a specific function, variable or flow. They allow us to test the components in isolation and validate each single component’s reliability in turn.
In this article we’ll introduce the concept of Swift unit testing, and explain, at a high level, why you should carry them out, how you can start developing your iOS apps in a test driven development methodology and how you can write Swift unit test cases.
We’ll also go through an iOS Project that has never received a unit test, and add unit tests to show how to introduce them retrospectively using XCTest testing framework and how to write unit tests in Swift.
First off: Why should I perform unit testing in Swift iOS apps?
Unit tests offer several distinct and vital advantages, giving us the ability to:
Identify bugs and issues early. With unit tests, we can identify code changes that introduce unwanted functionality. So we’re the ones who catch the problem, rather than our users and customers.
Improve the overall quality of our codebase. Unit tests allow us to analyze our code at a granular level. So we can write cleaner code, breaking down the most complex functionalities into smaller, testable chunks.
Aid refactoring. Unit tests give us confidence, while refactoring, that our overall code will still behave as expected once changes are made. We simply need to re-run the tests and check whether the test scenarios still pass.
Streamline our documentation. Unit tests serve as living documentation of our code bases, since each test shows what’s expected to happen from our software.
The XCTest framework
Now let’s look at the XCTest framework, which is provided by Apple and enables iOS developers to write unit tests for Xcode projects and iOS apps. Using this framework makes it easy to integrate a test suite into our workflows, as we’ll show below.
By using the XCTest framework, iOS developers gain access to a wide range of features and functionalities that streamline the unit testing process. From writing test cases to automated testing execution and test results analysis.
With XCTest, developers can write test cases using Swift code, ensuring that their unit tests are fully compatible with the iOS platform. It also provide a really helpful code coverage tool, as it provides developers with metrics on how much of their code is covered by their unit tests, allowing them to identify areas that lack proper testing and prioritize their efforts accordingly.
Overall, using XCTest will help iOS developers to embark on test-driven development, ensure code integrity, and deliver exceptional user experiences.
The XCTest class
This is the abstract, and default, class that we’ll use to write our tests cases. It provides us with a few useful methods and properties by default, namely:
setUp(). The place where we can reset the state before running each test case.
tearDown. Where we can perform any cleanup at the end of a test.
testCaseCount. A variable that clarifies the number of test cases that apply to a given test.
Assertions
Unit tests are based on assertions. As the name implies, we assert that a certain condition matches our criteria. If it does, the test passes. Otherwise, it fails.
Types of assertions
The most important assertions for unit testing are:
Boolean assertions
A Boolean assertion in XCTest is used to validate whether a condition is met. It helps in verifying expected outcomes during unit testing. You can use XCTAssert, XCTAssertTrue or XCTAssertFalse to check for boolean values. Below is an example of a Boolean assertion in XCTest:
func testLoginSuccess() {
   // Simulate a login operation
   let loginManager = LoginManager()
   let result = loginManager.login(username: "john.doe", password: "password123")

   // Assert that the login is successful
   XCTAssertTrue(result, "Login should be successful")
}
Comparable value assertions
Which compare two values and check whether one is higher or lower than the other. In Swift’s XCTest, you can use methods like XCTAssertGreaterThan, XCTAssertGreaterThanOrEqual, XCTAssertLessThan, and XCTAssertLessThanOrEqual to perform a variety of comparisons.
import XCTest

class MyCalculatorTests: XCTestCase {

    // Function to be tested
    func addNumbers(_ a: Int, _ b: Int) -> Int {
        return a + b
    }

    // Test case using XCTAssertGreaterThan
    func testAddNumbersResultIsGreaterThan() {
        // Test that the result of 3 + 5 is greater than 7
        XCTAssertGreaterThan(addNumbers(3, 5), 7, "The result should be greater than 7")
    }
}
Equality or inequality assertions
Which compare two values and check if they are equal/different. XCTAssertEqual and XCTAssertNotEqual are used for this equality and inequality assertions, allowing you to test if values are the same or different than expected.
func testAddition() {
    let result = add(2, 3)
    XCTAssertEqual(result, 5, "Addition should return the correct sum")
}
Nil or non-nil assertions
Which check whether a condition has, or doesn’t have, a value.
This assertion checks that the someOptionalValue is nil. If the value is not nil, the assertion will fail and an error message will be displayed.
XCTAssertNil(someOptionalValue, "The value should be nil.")
This assertion checks that the someOptionalValue is not nil. If the value is nil, the assertion will fail and an error message will be displayed.
XCTAssertNotNil(someOptionalValue, "The value should not be nil.")
Naming test cases
There are several ways of naming each test case, and the standard differs between platforms and languages.
But no matter the standard, the name must be descriptive enough for any reader to immediately understand what the test case should be doing. By default, this means that we should break the name into three parts:
The word “test”.
A description of what we’re doing.
A summary of what should happen.
It’s fine for the names to be long, but they should give us a clear overview of what the test should be doing.
Let’s now imagine a specific test. It’s designed to establish whether removing an element from an array actually reduces the array size. In this case, the name could be:
testRemovingAnElementDecreasesArraySize
As we saw above, the word “test” marks it as a test. “RemovingAnElement” describes what we’re doing in the test, and “DecreasesArraySize” is the expected outcome of the test.
Just from the name, we already know what the test involves. We first need to remove an element, and then assert the array’s size.
What should, or shouldn’t, I test?
Choosing what to test, and what not to test, is mostly down to the individual philosophy of the developer or their team.
Some will try to achieve close to 100% test code coverage of their products. Others will choose to test only certain sections of the code or some types of objects. For example some devs will want to test view models, since that’s where the business logic lives. Or they’ll decide not to test the UI components.
Generally, we’ll only want to test the code that’s written by us, and we’ll leave anything that’s out of scope.
As an example, let’s imagine the following code:
var stringArray = ["1", "2", "3"]
stringArray.popLast()
How can we be sure that it actually pops the last element? Shouldn’t we write a test for it?
In cases like this, we can trust that a pop will actually pop the element. It’s practically certain that Apple has already tested this, and we can guarantee that it will happen.
We can test methods that change the elements of an array, as you will see in the example below. But we should only test those cases that also include the business logic.
If you want to learn more about Swift array and other collection methods, you can check out our Swift collections guide.
Example project: writing unit tests for a view model
Now that we’ve covered the theory, let’s get some hands-on experience and write test cases for a view model.
If you would like to follow along and write the tests yourself, while we cover the scenarios, the base iOS app project can be found in this Git repo.
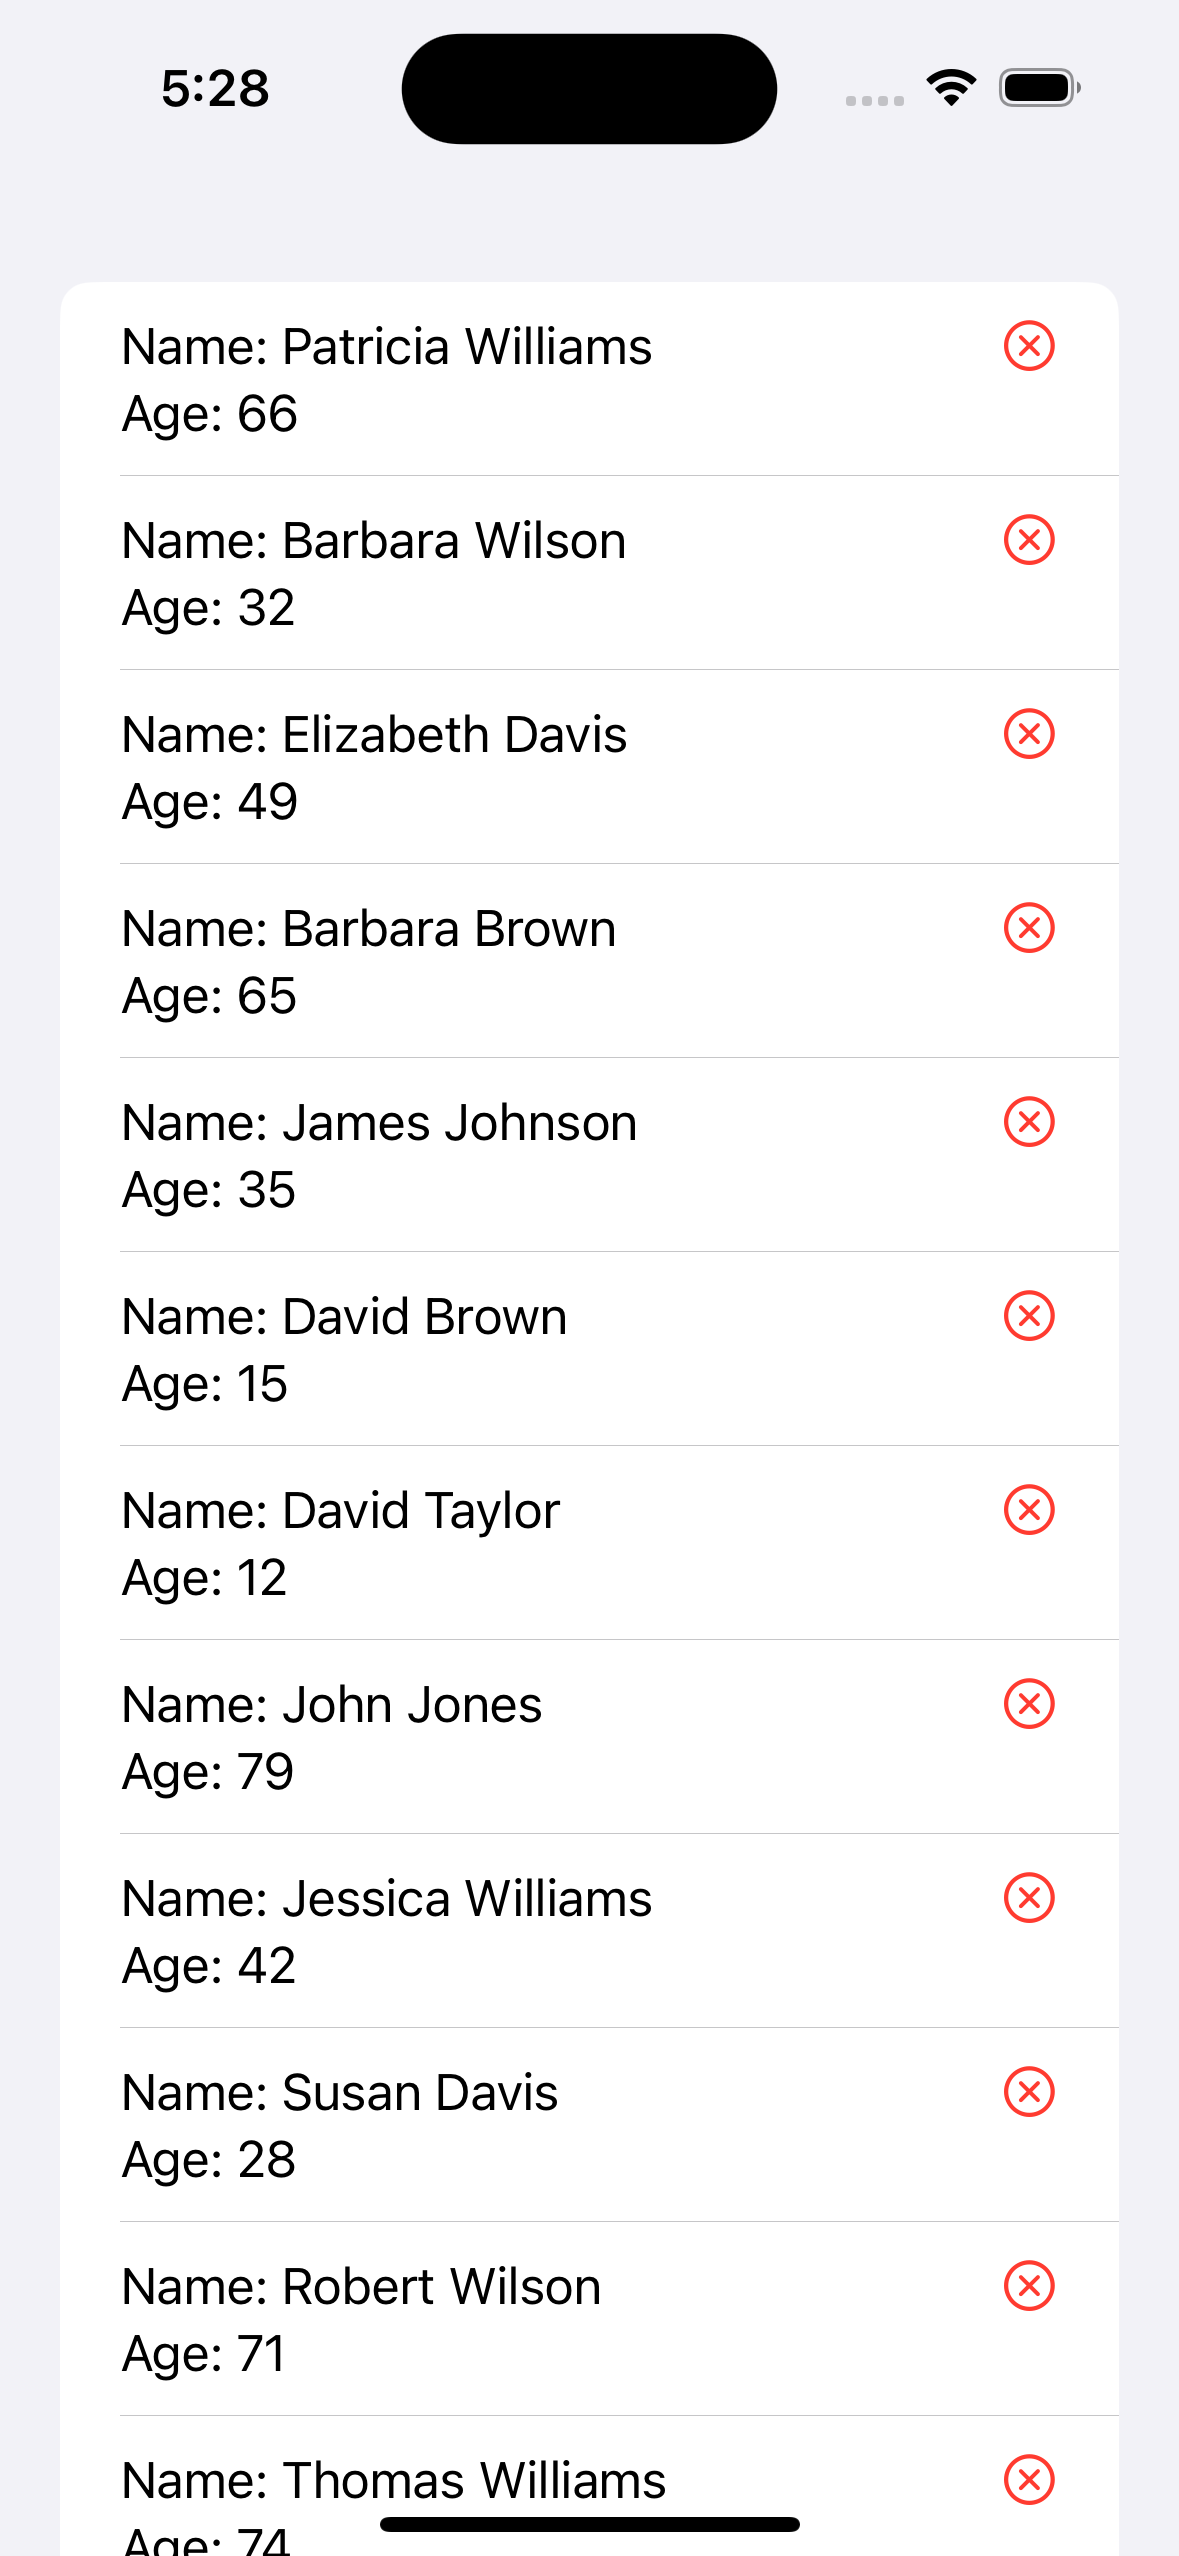
This iOS app is very simple. We have a list that contains information of people’s names and their respective ages. Since we’re using example data, there’s a method that randomly creates 1000 of those persons when we create the view model.
Each row also contains a delete button which enables us to remove people from the list, as seen here:
The UI, and the creation of the individual names, is not important. What we’re now going to focus on is writing Swift tests cases to the ViewModel. You can find the details in the Project folder, under ‘PeopleListViewModel’, and also here:
final class PeopleListViewModel: ObservableObject {
    @Published var people: [Person]

    init(people: [Person] = PeopleListViewModel.randomPeople()) {
        self.people = people
    }

    var numberOfPeople: Int {
        return people.count
    }

    func person(at index: Int) -> Person? {
        return people[index]
    }

    func addPerson(_ person: Person) {
        people.append(person)
    }

    func removePerson(at index: Int) {
        people.remove(at: index - 1)
    }
}
The View Model is quite simple. It holds an array of persons called People, which we use to initialize; a property that tells us how many people there are; and methods to get a Person, add a Person, and Delete a Person.
We will now write a test class that will contain our tests cases to assure us that the code behaves appropriately.
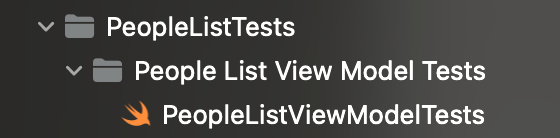
To start, if you’re following the Demo Project steps, look for the file on the Project Navigator called ‘PeopleListViewModelTests’. It’s inside the ‘PeopleListTests’ directory:
When you open the file, you’ll notice how it is initially set up. Let’s look at that in more detail:
//We import the XCTest Library we spoke of earlier
import XCTest
@testable import PeopleList

final class PeopleListViewModelTests: XCTestCase {

 		//Here is where we're declaring the System that is Under Test, therefore SUT
    var sut: PeopleListViewModel?

		//The setup, has mentioned earlier, will execute before each test.
		//It's where we reset our test data
    override func setUp() {

        super.setUp()

				//We prrepare our System Under Test with controlled data
        sut = PeopleListViewModel(people: [
            Person(name: "John Stewart", age: 25),
            Person(name: "Martha George", age: 18),
            Person(name: "Mike Smith", age: 15)
        ])
    }

		//After each test we dispose of any resources
    override func tearDown() {
        sut = nil
        super.tearDown()
    }
}
As you can see, we have created a test class that it’s a XCTestCase subclass. This class serves as the foundation on which we can build our test cases.
For a comprehensive understanding of top iOS testing tools besides XCTest framework, explore our detailed guide on the best automated testing tools for iOS.
Now that our setup is complete, let’s write our tests.
We will start with the simplest one — the one that verifies that our View Model correctly counts the number of elements it’s supposed to show on our app’s list:
This test both checks that the original amount of people is correct, and also verifies that adding a Person does increase the amount of elements.
Now there are two tests that can benefit us. One checks that getting a person, using our View Models method, returns the correct individual record. The other verifies that removing a person correctly erases them from the collection of people.
Now that you’ve written those two renaming tests, our testing class is ready and should look something like:
With that, we’re testing everything our View Model provides.
Running the tests
We can run the tests and check the results by pressing “cmd + U” while on Xcode, or by clicking the “play button” on the left of each test. When the tests run, they will show us the green diamond that mean the tests have passed:
And that’s it! You can find the complete project, with tests, in this Git repo.
In case the test fails, you will get a red diamond indicating that there’s a failing test case and Xcode will also show an error message where the unit test case failed.
Are unit tests the only kind of tests available?
No, not at all.
Unit tests are very important, since they give us visibility of each component’s possible issues, but they’re just a small part of your overall testing toolkit. Here are a few alternatives that are very common:
Swift unit testing refers to the process of testing individual units, such as functions, methods, and classes, written in Swift code to ensure that they behave as expected. It is an integral part of software development, allowing developers to verify the correctness and reliability of their code. Embracing a test-driven development (TDD) methodology can make a big impact in your iOS app development process.
Why is unit testing important in Swift development?
Unit testing in Swift iOS app development it’s important because it helps ensure the stability and reliability of the codebase. By thoroughly testing individual units, developers can uncover any potential flaws or errors early on, making it easier to address them promptly. This can make a big impact on saving time and money on trying to fix the bugs on a later stage.
How do you write a unit test in Swift?
To write a unit test case in Swift, use the XCTest framework to create test cases. This involves setting up conditions, executing the code under test, and using assertions to verify the outcomes. Each Swift test case should be named descriptively to indicate their purpose.
Can XCTest be used for UI testing?
Yes, XCTest can be user for UI testing, even if it’s primarily used for unit testing. UI tests simulate user interactions with the app’s interface to ensure that UI elements behave as expected.
Is XCTest the only testing framework for Swift?
XCTest is not the only testing framework for Swift, even if is the primary framework provided by Apple, there are other third-party frameworks and tools available for different testing needs, like Quick/Nimble for behavior-driven development.
How Do You Integrate XCTest into an Existing iOS Project?
XCTest can be easily integrated into an existing iOS project by adding a new test target in Xcode and writing test cases within that target. Existing code can then be tested by creating instances of the classes and invoking methods within the test cases.
What are some best practices for writing effective unit tests in Swift?
Some best practices for writing effective unit tests in Swift include: focusing on test isolation, ensuring tests are independent and can be run in any order, using meaningful test names, covering various edge cases, avoiding code duplication in tests, and aiming for high code coverage.
Can you perform asynchronous unit testing in Swift?
Yes, Swift supports asynchronous unit testing. XCTest provides APIs that allow you to write async tests using completion handlers, expectation objects, or dispatch queues. This enables you to test code that involves asynchronous operations, such as networking or asynchronous UI updates.
What is the role of dependency injection in Swift unit testing?
Dependency injection is a technique used in Swift unit testing that involves injecting dependencies into your code units instead of creating them internally. This allows you to replace real dependencies with mock objects during testing, making it easier to isolate and test individual units.
To sum up
As we’ve seen, Unit tests are a great tool to assure our apps, and software in general, stay as bug-free as possible, and that we are kept aware if any issues are introduced. We’ve looked at the concept of unit tests, and also, more specifically, at XCTesting for iOS. But remember: you should test, when appropriate, your business logic as that can save you a lot of headaches in the future.
Hopefully the demo project has helped you understand how to write simple unit tests, and this will enable you to produce more battle-tested code in future.
Interested in how things work since I was little, I love to try and figure out simple ways to solve complex issues. On my free time you'll be able to find me with the family strolling around a park, or trying to learn something new. You can contact him on Linkedin or GitHub