19 Minutes
Integrating iOS Push Notifications Using Swift
Fix Bugs Faster! Log Collection Made Easy
Push notifications play a vital role in user engagement and retention, keeping users up to date and creating a sense of FOMO that leads to purchases. And in iOS, we get the added benefit of Apple’s Push Notification Service (APNs). which acts as a middleman between the app server and the user’s device, facilitating the delivery of push notifications even if the app is not active or the user is checking another of their apps.
In this article, we will explore the step-by-step integration of push notifications into our iOS apps and discuss the critical aspects of implementation, as well as introducing several products and tools that can simplify and amplify user engagement.
Table of Contents
- But first, what are the benefits of push notifications?
- What are the components of iOS Notifications?
- Setting up iOS push notifications
- Sending notifications from the app server
- Understanding the notifications payload
- Local notifications
- Testing Push Notifications and sending on a real device
- Products to help with push notifications
- iOS Push Notifications FAQ
- What are push notifications in iOS?
- Can users control push notifications on iOS?
- Are push notifications limited to text-only messages?
- Do push notifications require an internet connection?
- Are push notifications supported on all iOS devices?
- Is there a cost associated with sending iOS push notifications?
- To sum up
But first, what are the benefits of push notifications?
iOS push notifications improve user engagement, retention, and overall user experience. When push notifications are used strategically, they can significantly enhance the effectiveness of mobile apps across various business domains.
We can deploy push notifications for a number of specific purposes, including:
- Updating users on the status of their booking.
- Providing clarifications and updates on the orders they have placed.
- Advising users of changes in the back end.
- Helping them track their package.
- Creating hype around the events our apps deal with.
- Introducing the user to new offers, promotions and opportunities.
- Encouraging them to try new app features with teasing messages.
- Notifying them of server updates and other back-end changes.
When executed properly, push notifications provide timely, effective information in the form our iOS users actually want, so they play a vital role in our overall UX and wider marketing strategy.
What are the components of iOS Notifications?
iOS notifications typically come in three main components:
- Apple Push Notification Service: This is the central hub responsible for the delivery of notification messages on iOS devices. To enable APNs, developer need a paid Apple developer account and they need to have created an app ID to further configure the push notifications on Apple’s developer portal.
- Device token: This is a unique identifier generated for each iOS device. The APNs generates the device token and when a notification message is sent to a token, it reaches out to the relevant device. Developers need to register the app for push notifications in the AppDelegate to obtain this device token.
- App Server: The app server is responsible for triggering push notifications. It communicates with APNs along with message payload, and sends the notification payload to the targeted device. Here, we manage and prepare the message payload and send requests to APNs, which sends the payloads to the user’s device. Payloads are created in the JSON format.
Setting up iOS push notifications
Ok, so we’ve covered the basics. Now let’s dig deeper into the iOS push notification setup using Swift, which involves several important steps on the Apple developer portal, Xcode, App server and device token registration.
Setting up App ID and the provisioning profile
Once you’ve created your Apple developer account, you can log in to the Apple developer portal, create an App ID and configure it for the integration of push notifications.
Here are the steps to follow in the Apple developer portal (note that you’ll need Account Holder or Admin permissions).
- In Certificates, Identifiers & Profiles, click Identifiers. Then click the add button (+) on the top left.
- Select the App IDs from the list of options and click Continue.
- From the list of options, confirm the App ID type has been automatically selected, then click Continue.
- Enter a name or description for the App ID in the Description field.
- Select Explicit App ID and fill out the Bundle ID field. The explicit App ID you enter here should match the bundle ID you entered in the target’s Summary pane in Xcode.
- Now, select Wildcard App ID and enter a bundle ID suffix in the Bundle ID field.
- Select the corresponding checkboxes to enable the app capabilities you want to use. Note that the capabilities available to your type of app and program membership appear under Capabilities. A checkbox is disabled if the technology requires an explicit App ID and you’re creating a wildcard App ID, or the technology is enabled by default. Not all capabilities are eligible for all platforms.
- Click Continue, then review the registration information, then click Register.
Here is a video to illustrate the process:
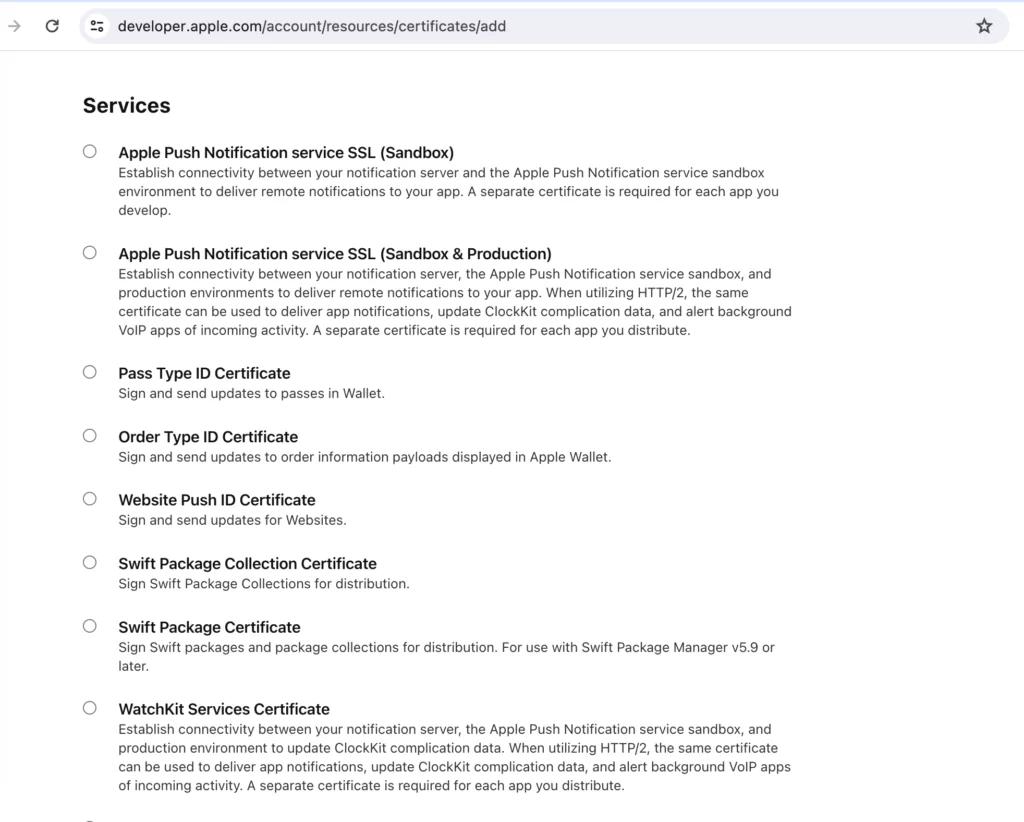
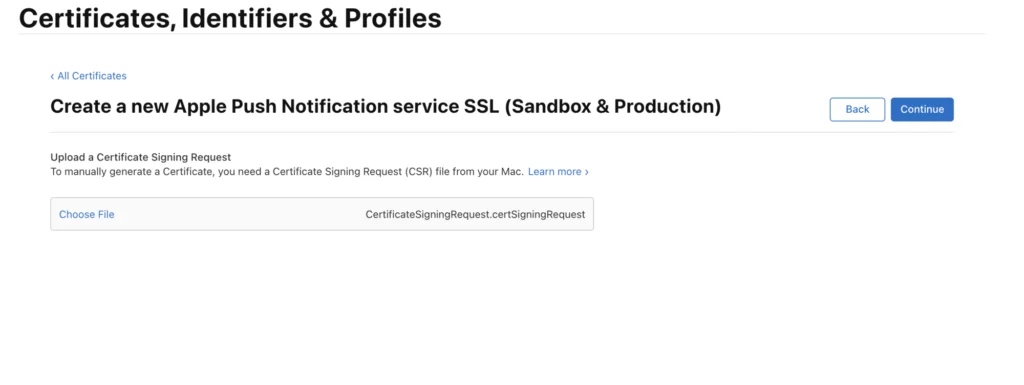
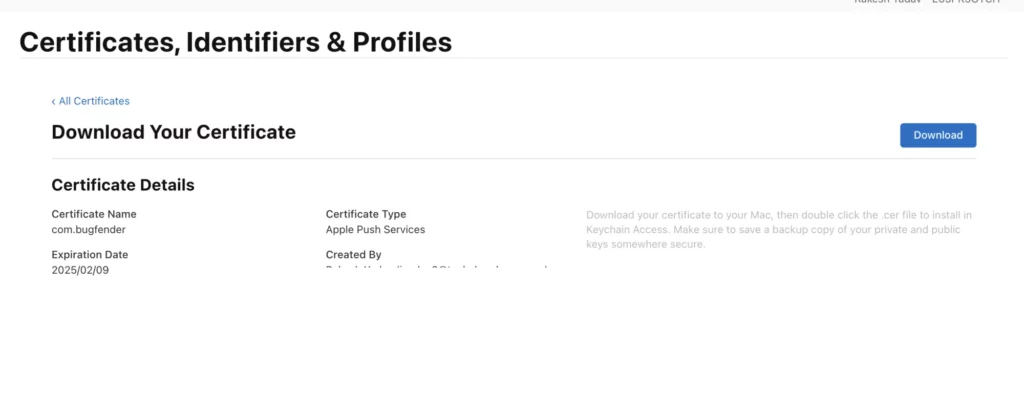
Now, follow these steps to create a push notification certificate:
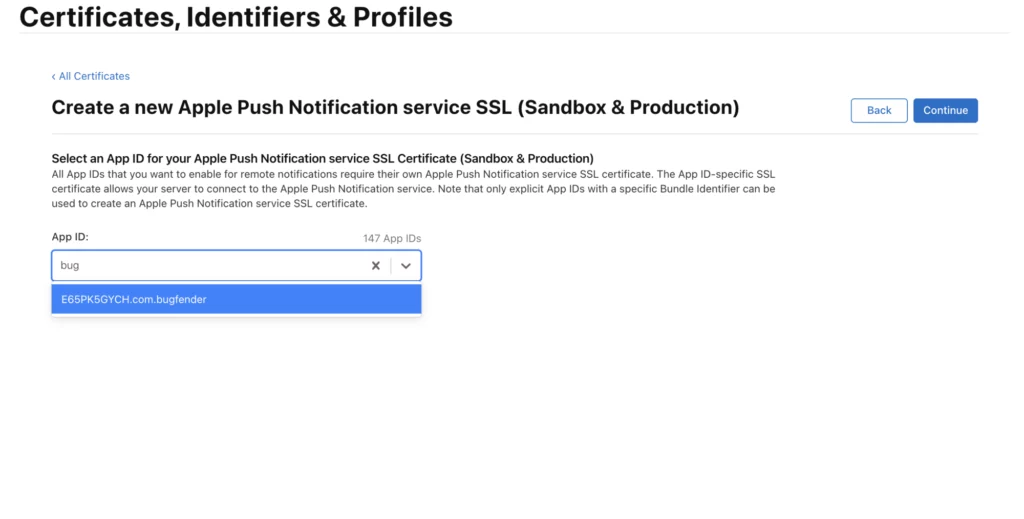
You can follow these steps to create a provisioning profile:
- Open the Apple developer portal.
- In the iOS Dev Dashboard, click Certificates, Identifiers & Profiles.
- In the Developer dashboard, click Profiles. Then Click +.
- Select iOS App Development and click Continue.
- Select an App ID to associate with the provisioning profile and click Continue. To be able to use one development provisioning profile across multiple apps, select a wildcard App ID, if available.
- Select one or more certificates for development to include in the provisioning profile and click Continue. Only certificates for development are listed.
- Select one or more devices to include in the provisioning profile and click Continue.
- Enter a meaningful name for the profile and click Generate.
- Click Download to download the provisioning profile and use it in your Xcode.
Configuring Xcode
In Xcode project settings, you need to use the App ID. This has push notifications enabled and allows you to utilize the provisioning profile.
You also need to enable push notifications in your project settings’ capabilities.
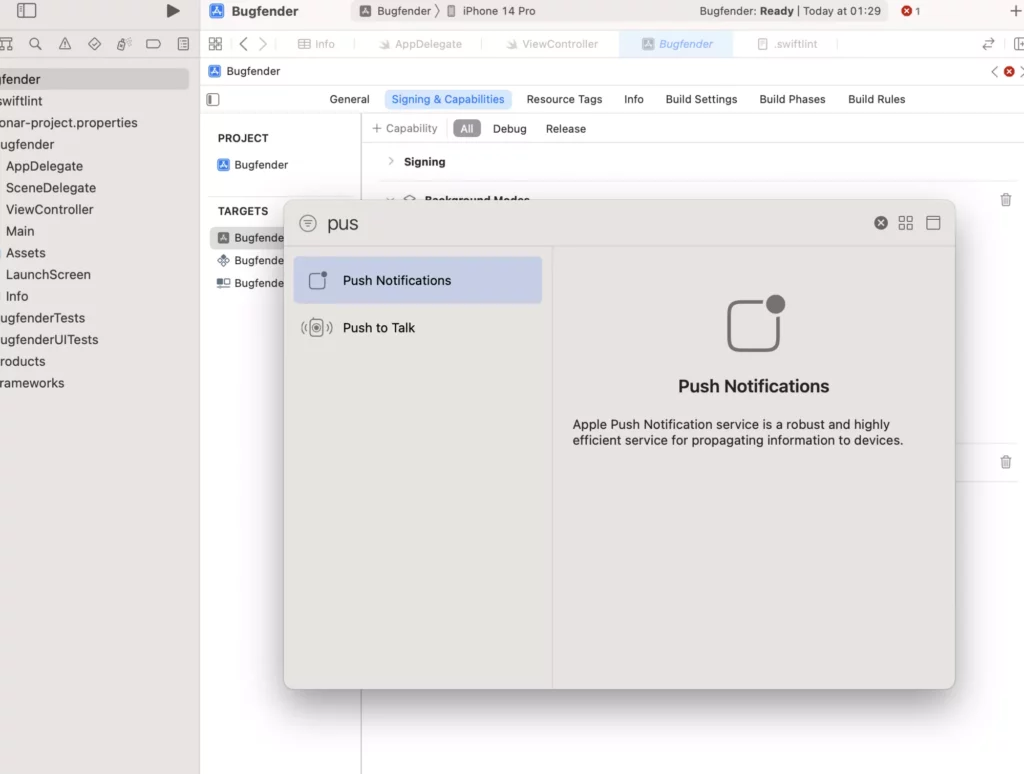
After you enable push notifications capability, you need to implement the push notification code in your AppDelegate file.
Note: you need to import the UserNotifications Framework first.
import UserNotifications
Now, we need to request permission from the user to enable push notifications for this app. We can use the requestAuthorization method of the UNUserNotificationCenter class.
func application(_ application: UIApplication, didFinishLaunchingWithOptions launchOptions: [UIApplication.LaunchOptionsKey: Any]?) -> Bool {
    // Other setup code

    // Request notification authorization
    UNUserNotificationCenter.current().requestAuthorization(options: [.alert, .sound, .badge]) { granted, error in
        if granted {
            print("Notification authorization granted")
            // You can now schedule and send notifications
        } else {
            print("Notification authorization denied")
            // Handle the case where the user denied notification permissions
        }
    }

    return true
}
Based on the user’s reaction to the push notification permission pop-up, we need to handle the ‘granted’ and ‘denied access’ eventualities.
Registering for remote notifications
To register for remote notifications, you need to call the registerForRemoteNotifications() method of UIApplication. We will call this in the app’s AppDelegate, registering the device for remote notifications and obtaining the device token.
class AppDelegate: UIResponder, UIApplicationDelegate {

    func application(_ application: UIApplication, didFinishLaunchingWithOptions launchOptions: [UIApplication.LaunchOptionsKey: Any]?) -> Bool {
        // Request notification authorization
        UNUserNotificationCenter.current().requestAuthorization(options: [.alert, .sound, .badge]) { granted, error in
            if granted {
                print("Notification authorization granted")
                // Register for remote notifications
                DispatchQueue.main.async {
                    application.registerForRemoteNotifications()
										UNUserNotificationCenter.current().delegate = self
                }
            } else {
                print("Notification authorization denied")
                // Handle the case where the user denied notification permissions
            }
        }

        return true
    }
}
Handling device token registration
Once you have registered your application for Notifications, you need to obtain the device token. This identifies the user device, so you can send notifications from your server later.
class AppDelegate: UIResponder, UIApplicationDelegate {

    func application(_ application: UIApplication, didFinishLaunchingWithOptions launchOptions: [UIApplication.LaunchOptionsKey: Any]?) -> Bool {
        // Request notification authorization
				// ...
    }

    // Handle successful registration for remote notifications
    func application(_ application: UIApplication, didRegisterForRemoteNotificationsWithDeviceToken deviceToken: Data) {
        let token = deviceToken.map { String(format: "%02.2hhx", $0) }.joined()
        print("Device token: \\(token)")

        // Send the device token to your server for push notification handling
    }

    // Handle unsuccessful registration for remote notifications
    func application(_ application: UIApplication, didFailToRegisterForRemoteNotificationsWithError error: Error) {
        print("Failed to register for remote notifications: \\(error.localizedDescription)")
    }
}
In the example above, we implemented the successful and unsuccessful device registration methods. If the registration works properly, you will obtain the device token and then you will need to send it to your servers, so it can be stored with this user. Without the device token, you won’t be able to send notifications to this device.
A bit of self-promo here: In the event that the registration fails, the best thing you can do is to use a service like Bugfender, so you can get the logs from the devices that are failing to register and analyze the root cause of the problem. Otherwise, trying to figure out the problem can be a daunting process.
Handling remote notifications
Once we’ve got the device token, the app is ready to get notifications. Now, we need to implement the relevant methods to handle incoming notifications from the server. These methods are based on the app’s state, and they will differ depending on whether the app is working in the foreground or background.
If the app is running in the foreground
Here, we are implementing the method to handle push notifications when the app is in the foreground:
extension AppDelegate: UNUserNotificationCenterDelegate {
    // Handle notification when the app is in the foreground
    func userNotificationCenter(_ center: UNUserNotificationCenter, willPresent notification: UNNotification, withCompletionHandler completionHandler: @escaping (UNNotificationPresentationOptions) -> Void) {
        // Handle the notification presentation here
        completionHandler([.alert, .sound, .badge])
    }
}
If the app is running in the foreground, iOS won’t display the notification in the notification center. Instead, it will deliver the notification directly to the app. So if you want to show an alert to the user, you will need to write code to do so.
If the app is running in the background
If you want to handle notifications when the app is not running, you should implement the following method.
// Handle receipt of remote notification while the app is in the background
func application(_ application: UIApplication, didReceiveRemoteNotification userInfo: [AnyHashable: Any], fetchCompletionHandler completionHandler: @escaping (UIBackgroundFetchResult) -> Void) {
    // Handle the received remote notification here

    // Print the notification payload
    print("Received remote notification: \\(userInfo)")

    // Process the notification content
    if let aps = userInfo["aps"] as? [String: Any], let alert = aps["alert"] as? String {
        // Extract information from the notification payload
        print("Notification message: \\(alert)")
    }

    // Indicate the result of the background fetch to the system
    completionHandler(UIBackgroundFetchResult.newData)
}
This method allows you to handle and take actions once a notification has been received.
Now, if the user taps on the notification, the app will be opened. In this case, the app can detect whether it was opened due to a user interaction with the notification and can take the relevant action, like navigating to a specific view controller.
Sending notifications from the app server
When we have the device tokens stored on the server to send notifications to specific devices, we need to implement the code in the backend sever to trigger the request to Apple Push notification servers, and send the notification to that device.
In Node.JS, you can use the following code to send the push notification:
npm install apn

const apn = require('apn');

// Configure APNs with your credentials
const apnProvider = new apn.Provider({
  token: {
    key: 'path/to/APNsAuthKey.p8',  // Path to your APNs Auth Key
    keyId: 'YourKeyID',
    teamId: 'YourTeamID',
  },
  production: false,  // Set to true for production environment
});

// Create a notification payload
const notification = new apn.Notification({
  alert: 'Hello Bugfender Testing!',
  sound: 'default',
  badge: 1,
});

// Specify the device token for the target device
const deviceToken = 'xxxx';  // Replace with the actual device token

// Send the notification
apnProvider.send(notification, deviceToken).then(result => {
  console.log('Notification sent:', result);
}).catch(error => {
  console.error('Error sending notification:', error);
});
The device token belongs to a particular device and this implementation will send this payload to the device. Remember, though, that we also need to handle the errors and responses.
Understanding the notifications payload
Notification payloads are the JSON data sent from the server to APNs, which is then delivered to user’s device. The device will use this payload to show the notification to the user and can also carry custom data for the app to use.
Basic notification payload
Let’s look at an example of a JSON payload:
{
  "aps": {
    "alert": {
      "title": "Notification Title",
      "body": "Notification Body"
    },
    "badge": 1,
    "sound": "default"
  },
  "customKey": "Custom Value" //Any custom data or object
}
As you can see in the example, the payload has a customKey . You can add as many custom keys as you need to send any information to the app that relates to the notification, and perform any operation that might be required.
Size limitations Be aware that the payload must be a JSON object, and it has a maximum size limit of 4KB. The limit ensures there are no problems with the notification delivery.
Silent notifications
If you want to send a silent notification, you need to send the payload without the alert, badge and sound key. You can use a silent notification to execute actions in your app without notifying the user. Some use cases for these kind of notifications are:
- Background data refresh: You can trigger a notification from your server to force the app to update, so the user always gets the latest data when they open it.
- Analytics: You can use a silent notification to force the app to send analytical data updates to the server. These include app usage statistics or diagnostic information.
- Data Sync: If you have an app that can be used in multiple devices, you can force a data sync when there’s a change in one of the apps.
Here’s a handy example of a silent notification:
{
    "aps": {
        "content-available": 1,
        "priority": "5"
    },
    "updateType": "newArticles",
    "timestamp": "2024-01-12T10:00:00Z"
}
Push notification localization
If you keep track of the user’s preferred language in the server, you can send the alert key localized in a different language.
Local notifications
iOS local notifications are a special category that allows an application to self-schedule the delivery of notifications at a specified time or in response to a specific event, independent of a server. These notifications are particularly useful for reminders, calendar events, or any similar scenario. Be aware that in order to get them working, you also need to request authorization, as is the case with remote push notifications.
Let’s see an example of how to create a local notification:
import UserNotifications

// Create the notification content
let content = UNMutableNotificationContent()
content.title = "Reminder"
content.body = "Don't forget to check the new updates!"
content.sound = UNNotificationSound.default

// Create the trigger as a repeating event.
let trigger = UNTimeIntervalNotificationTrigger(timeInterval: 60, repeats: false)

// Create the request
let uuidString = UUID().uuidString
let request = UNNotificationRequest(identifier: uuidString, content: content, trigger: trigger)

// Register the request with the system.
UNUserNotificationCenter.current().add(request) { error in
   if let error = error {
       print("Error scheduling notification: \\(error)")
   }
}
Testing Push Notifications and sending on a real device
Following the successful integration of push notifications, you need to run the app on a real device or on a simulator (which has been available since Xcode 11.4) to properly test the push notifications code.
You can use your server or an online tool like Pusher to send a test notification to the device token obtained earlier.
That’s not all: you can also verify whether the notification sent from the server or tool have been received on the device or not, and you can also check the handling of the notification and redirections if you have implemented in your app.
Steps to test notifications in Simulator:
- Choose a simulator device & run your app.
- In Xcode, navigate to the Features menu and select Push Notifications.
- Choose the predefined notification or create a custom payload.
- Click the Run button in Xcode.
Send the notification:
You can use the following curl to send test push notification:
curl --header "apns-topic: your.bundle.identifier" \\
     --header "apns-push-type: alert" \\
     --header "authorization: bearer YOUR_AUTH_KEY" \\
     --data '{"aps": {"alert": {"title": "Notification Title", "body": "Notification Body"}, "sound": "default", "badge": 1}}' \\
     --http2 \\
     --cert /path/to/your/certificate.pem \\
     --cert-type PEM \\
     --key /path/to/your/private-key.pem \\
     <https://api.push.apple.com/3/device/YOUR_DEVICE_TOKEN>
- You need to ensure that you are using the correct APNs endpoint for your environment (
api.push.apple.comfor production orapi.development.push.apple.comfor the development environment). - The headers
apns-push-typeandapns-topicare required. - Your certificate and private key are properly formatted in PEM.
Products to help with push notifications
There are many third-party services and tools that can help developers easily integrate and test push notifications in iOS applications.
These services offer a range of different features, including sending targeted messages, analytics, and other functionalities to improve the overall push notification experience and analyze the data. Here are some notable products:
- Firebase Cloud Messaging (FCM): FCM, provided by Google, is a cross-platform messaging solution that enables the reliable delivery of messages on iOS, Android, and web apps.
- OneSignal: OneSignal is a popular push notification service that supports multiple platforms. It offers advanced targeting, A/B testing, in-app messaging and real-time analytics.
- Pusher Beams: Pusher Beams is a push notification API that allows developers to send push notifications to iOS and Android devices.
- Amazon Simple Notification Service (SNS): ****SNS is a well-managed messaging service from AWS that supports push notifications. It helps you to send messages to a variety of endpoints, including iOS devices, and provides good flexibility in message formats.
- Airship: Airship offers a mobile engagement platform that includes push notifications, in-app messaging, and automation capabilities.
- Pushwoosh: Pushwoosh is a push notification service that supports various platforms. It provides a range of features including personalized push notifications, geo-targeting, and real-time analytics.
- IBM Push Notifications: IBM Push Notifications is part of the IBM Cloud services and provides a scalable solution for sending push notifications to iOS and other platforms.
- CleverTap: CleverTap is a comprehensive mobile marketing platform that includes push notifications, in-app messaging, and user engagement tools.
iOS Push Notifications FAQ
What are push notifications in iOS?
Push notifications in iOS are short messages that are sent from servers to iOS devices in order to notify users about new information, updates, or events related to apps installed on their devices. These notifications are delivered directly to the user’s device, even when the app is not open.
Can users control push notifications on iOS?
Yes, iOS users have the ability to control which apps can send them push notifications and how those notifications are displayed. Users can manage their notification settings in the iOS Settings app, where they can choose to enable or disable notifications for specific apps, customize the notification style, and control other aspects of how push notifications are handled.
Are push notifications limited to text-only messages?
No, push notifications on iOS can include rich media. You, as an iOS developer, have the option to send rich push notifications, which can include images, sounds, and other interactive items. Allowing developers and marketers to create more visually appealing notifications to better capture the user attention.
Do push notifications require an internet connection?
Yes, in most of the cases you need internet connection to receive push notifications on iOS devices. When a push notification is sent to a user’s device, it is delivered over a cellular connection. There’s one exception: local notifications can be shown without an internet connection because these are handled by the device itself.
Are push notifications supported on all iOS devices?
Yes, push notifications are supported on all iOS devices, including iPhones and iPads. As long as the device is running a compatible version of iOS and the user has allowed notifications for the respective app, push notifications can be sent and received on any iOS device.
Is there a cost associated with sending iOS push notifications?
Sending push notifications is generally free, but using third-party services to manage notifications may incur costs depending on the features and scale of your project.
To sum up
By combining the steps and principles above, developers can create a dynamic and effective notification strategy for users’ satisfaction, engagement, and the overall success of mobile applications.
In this article, we have provide a complete step-by-step guide to the integration of push notifications, from configuring app IDs right through to the detailed configuration of Xcode, the creation of a well-structured notification payload and the testing of push notifications in your iOS app.
If you need any assistance choosing a push notification service, you should consider a range of factors including easy integration, platform support, scalability, analytics capabilities, and pricing. Each third-party service has its strengths, and the choice depends on the your requirements and preferences.
Happy coding!
Expect The Unexpected!
Debug Faster With Bugfender

Sachin Siwal
Sachin is an accomplished iOS developer and seasoned technical manager, combining 12 years of mobile app expertise with a knack for leading and delivering innovative solutions. You can contact him on Linkedin