16 Minutes
How to Identify and Troubleshoot Issues in Your Electron App
Fix Bugs Faster! Log Collection Made Easy
Introduction
As developers, it’s easy to get fixated on the mobile sphere. We’re now spending 4-5 hours a day browsing apps on our phone (that’s over 1,800 hours a year), which means a huge volume of demand is channelling into Android and iOS projects.
But desktop apps are booming too. The growth in digital working, allied with the creative possibilities unlocked by apps like Figma, Discord and Loom, mean millions of people now depend on these programs to create, communicate and organize their lives.
So it’s essential that we, as a community, are as conversant with desktop as mobile technologies. And, in this article, we’ll unlock a framework that’ll give you the jump.
Electron is ideal for building those apps that drive the world of work. And today we’ll use this framework to build an app with a basic interface, styling, and API call to interact with the server.
Also, you’ll learn to integrate Bugfender with an Electron app.
What is Electron?
Electron is a brilliant open-source framework for building desktop applications using JavaScript, HTML, and CSS.
It embeds Node.js and Chromium to support web technology stacks, and crucially it enables us to build cross-platform (Windows, Linux, and macOS) applications that can run on these operating systems while adhering to the underlying architecture.
By empowering developers to build apps with JavaScript, HTML, and CSS, Electron opens up the surface area to a whole sweep of other web development frameworks and libraries. You can now use ReactJS, Angular, Next.js, TypeScript, TailwindCSS, and many other exciting web development technologies to build a desktop application.
Electron also enables you to customize the GUI of the app to match the look and feel of the native operating system. You can build the app installer and publish to an application store, for users to download and install.
Ok, we here you… enough of the promo. Now, let’s start building a desktop application using electron.
What are we building today?
We will build a desktop application to fetch the user details from GitHub by providing a user name. The app may sound simple, but you will cover the following areas:
- Bootstrapping an electron app
- Adding required libraries
- Getting the app running with
main.js - Understanding preloading
- Building the user interface
- Using API to fetch data
- Basic Styling
- Integrating Bugfender API with the app and starting to collect the logs
In the end, we will have an application that looks like this:
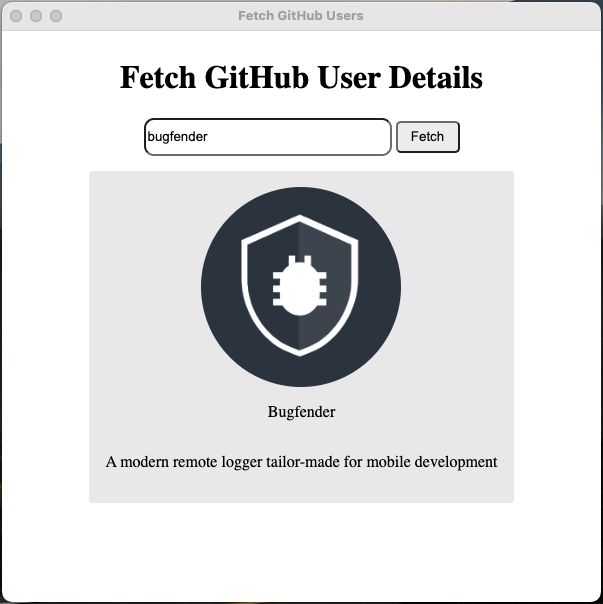
Ready? Let’s get into it.
Building the app using Electron
Let’s start by installing dependencies and setting up a project. If you want to get eyes on the code early, you can find it on this GitHub repository:
Install and Set up
It’s important to note that you must have Node.js installed, so check whether you have a valid instance on board. To do so, simply open a terminal and type the command mentioned below:
node -vThe above command should print the version of Node.js.
Now, create a project directory and change it accordingly.
mkdir fetch-github && cd fetch-githubNow we will initiate a project. We will be using yarn instead of npm in this article; however, if you are only familiar with npm, no worries. You will find the alternate npm commands beside the yarn commands.
When you use this command to initiate a project, it will prompt a few questions. When you give the answers, make sure you have provided main.js as the entry point of your application.
yarn init # Or, npm initIn the end, you will find a file called package.json created inside the folder. The below content is from my personal package.json file.
{
  "name": "fetch-github",
  "version": "1.0.0",
  "description": "It is an electron app that showcase the GitHub fetch!",
  "main": "main.js",
  "keywords": [
    "electron",
    "github"
  ],
  "author": "Tapas Adhikary",
  "license": "MIT"
}
Let’s install the electron package now. We will install it as a dev dependency.
yarn add --dev electron # Or, npm install --save-dev electronNow, we need to edit the package.json file to add a script entry to start the electron app using the yarn/node command.
{
  "scripts": {
    "start": "electron ."
  }
}
Finally, you can use the start command to start the application locally.
yarn start # Or, npm startAt this stage, you will encounter an error if you try to start the app locally. Don’t worry! We have not created an entry point for the app to run yet. So let’s do that.
The main process
We need to define the main script to create the entry point of the electron application. Looping back around, you’ll remember that we provided the value main.js for the entry point.
Now, let’s create a file called main.js at the root of the project folder. The main.js is a JavaScript file that will control the app’s lifecycle, manage renders, help with native display, and more.
Add the following code in the main.js file:
const { app, BrowserWindow } = require('electron')

// include the Node.js 'path' module at the top of your file
const path = require('path')

const createWindow = () => {
  const win = new BrowserWindow({
    width: 800,
    height: 600,
    webPreferences: {
      preload: path.join(__dirname, 'preload.js')
    }
  })

  win.loadFile('index.html')
  win.webContents.openDevTools()
}

app.whenReady().then(() => {

  createWindow()
  app.on('activate', () => {
    if (BrowserWindow.getAllWindows().length === 0) createWindow()
  })
})

app.on('window-all-closed', () => {
  if (process.platform !== 'darwin') app.quit()
})
Let’s review the code section by section to understand what’s happening here.
- First, we have added two electron modules, the
appandBrowserWindow. Theappmodule takes care of the app’s lifecycle, and theBrowserWindowmodule helps deal with the application windows. - We also require the
pathmodule to locate apreloadscript (don’t worry, we will explore this in a while). - Then we added a
createWindowfunction that will load theindex.htmlfile (we will create it shortly) on a defined window size of 800X600. - We have made sure that we open DevTools so that we can debug the code whenever it is needed.
- Notice the
webPreferencessection inside the createWindow method. Thepreloadoption of the webPreferences object helps us to load a script that runs before any rendering takes place in the application’s interface. We will not use it much in our application, but it is good to know about it. - Finally, we invoked the
createWindowfunction once thewhenReadypromise was resolved successfully. We have also taken care of quitting the app when the window is closed.
The Interface
Now create an index.html file at the root of the project folder, with the following content:
<!DOCTYPE html>
<html>
  <head>
    <meta charset="UTF-8">
    <title>Fetch GitHub Users</title>
    <link rel="stylesheet" href="./style.css">
  </head>
  <body>
    <div class="container">
      <h1>Fetch GitHub User Details</h1>
      <div class="fields">
        <input type="text" placeholder="Enter user name" id="uname" />
        <button id="fetch-action">Fetch</button>
      </div>
      <div id="users"></div>
      <div id="error"></div>
    </div>
    <script src="renderer.js"></script>
  </body>
</html>
This is a simple HTML file linked to a CSS file called style.css. The body contains a heading and input text for users to provide a GitHub user name and a button to initiate the search by user name.
We have added a couple of empty div sections, showing the search result and the error messages. In the end, we see a script called render.js, where we will place all the rendering logic of the application. We will learn about it soon, but before we get there, let’s create the style.css file.
To create a file called style.css , you can use the following content:
.container {
  display: flex;
  flex-direction: column;
  align-items: center;
  justify-content: center;
  align-content: center;
}

.fields {
  margin-bottom: 5px;
}

.fields input[type="text"] {
  height: 2rem;
  width: 15rem;
  border-radius: 10px;
}

.fields button {
  height: 2rem;
  width: 4rem;
  border-radius: 5px;
  cursor: pointer;
}

.result {
  background-color: #ebebeb;
  padding: 1rem;
  border-radius: 3px;
  display: flex;
  flex-direction: column;
  align-content: center;
  justify-content: center;
  align-items: center;
  margin: 10px;
}

.result img {
  width: 200px;
  height: 200px;
  border-radius: 50%;
}
Now go to your terminal and run the yarn start command to start the app locally. This time, you should see the app running on a window.
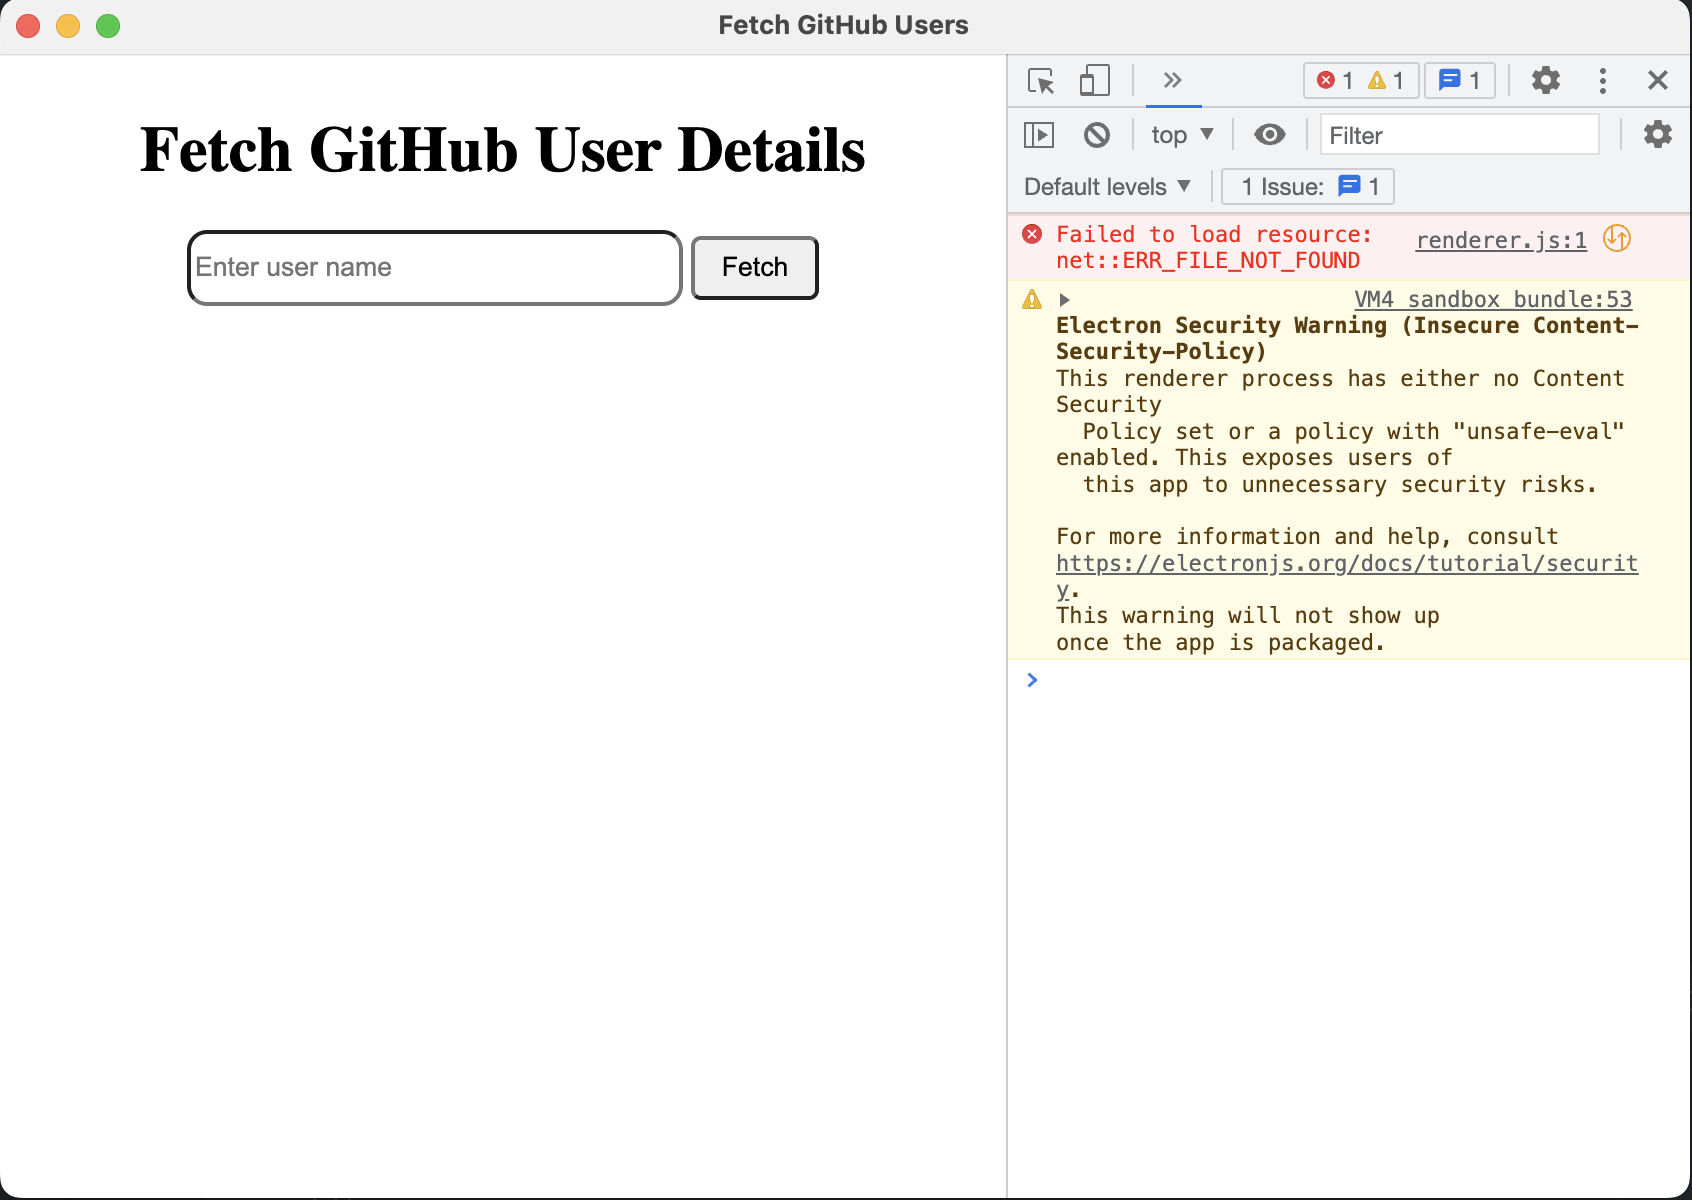
As you’ll notice, the DevTools section is open, showing an error which indicates that the render.js file is not found. That’s correct, because we haven’t created it yet. So let’s do that now.
Logic and Rendering
So far, we have built an application that renders HTML, which is not very useful on its own. To make it more useful, we need to add a little pinch of logic.
Create a file called render.js at the root of the project folder, with the following content:
// 1. The logic to fetch user details from GitHub and show to the UI
const fetchUser = () => {
  const userName = document.getElementById('uname').value
  fetch(`https://api.github.com/users/${userName}`)
		.then(response => response.json()) //Converting the response to a JSON object
		.then( data => {
      if (data.name) {
        document.getElementById("error").innerText = ''
        document.getElementById('users').innerText = ''

        document.getElementById('users').classList.add('result')

        if(data['avatar_url']) {
          const img = document.createElement('img')
          img.src = data['avatar_url']
          img.alt = data.name
          document.getElementById("users").appendChild(img)
        }
        addData('p', data.name)

        if(data.bio) {
          addData('p', data.bio)
        }
      } else {
        document.getElementById('users').classList.remove('result')
        document.getElementById("users").innerText = ''
        document.getElementById("error").innerText = `No information available for the user ${userName}`
      }
    })
		.catch( error => {
      console.error(error)
    })
}

/**
  a method to add an element to the DOM with a text value
*/
const addData = (elem, value) => {
  const element = document.createElement(elem)
  element.innerText = value
  document.getElementById("users").appendChild(element)
}

// 2. Add the Click Event Handler to the button
document.getElementById('fetch-action').addEventListener('click', fetchUser)
There’s a lot to unpack there, so let’s go back and review what we’ve done.
- We have defined a method called
fetchUser()to fetch the user details using the GitHub API. We have also made an async call using JavaScript’s fetch API. - After fetching the user details, we have extracted the avatar, name, and bio from the response.
- We have used the method
addData()to create DOM elements and added the details as text values. - Finally, we have attached the
fetchUser()method to the click handler of theFetchbutton defined in theindex.htmlfile.
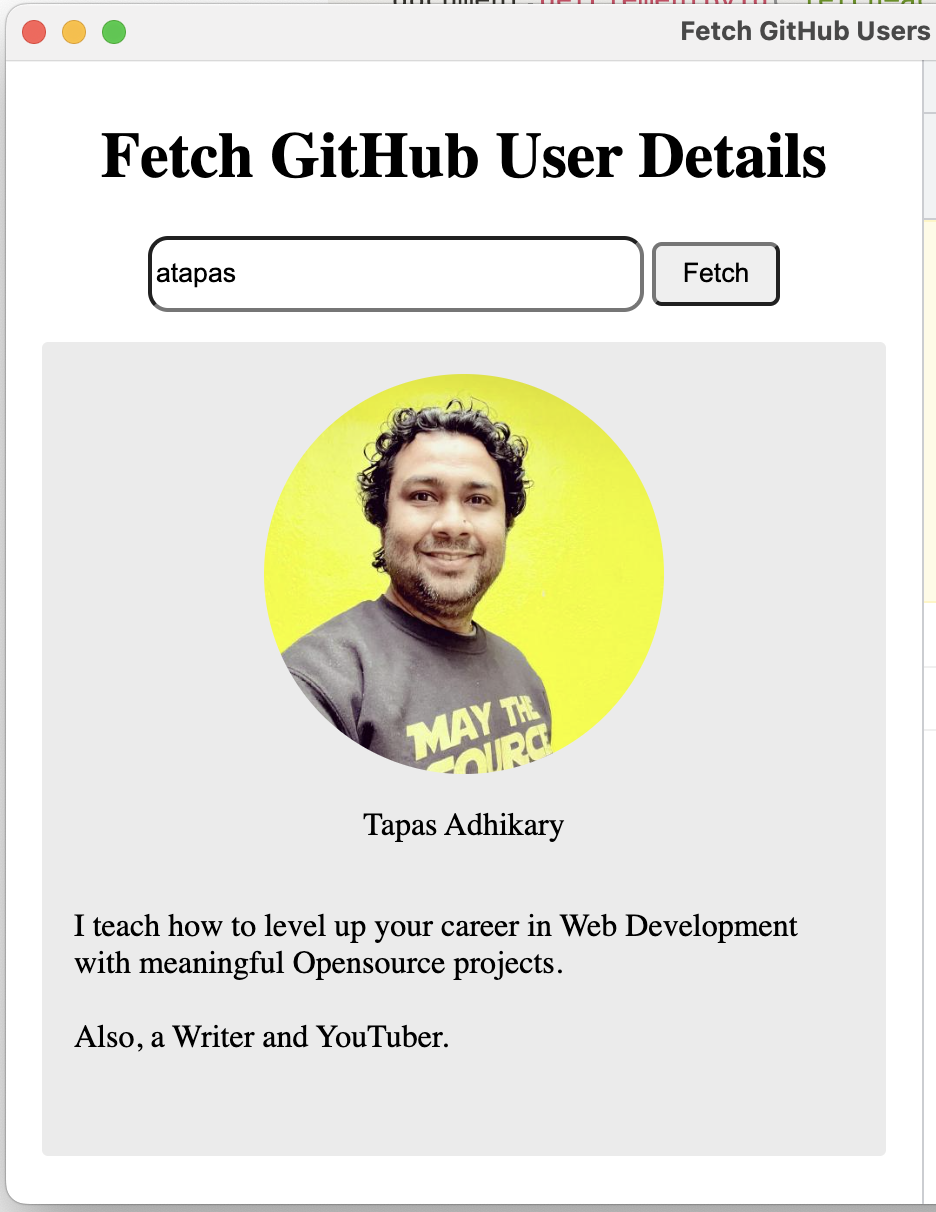
Now close and reopen the app. You should find the app working on fetching the user details based on the user name. Here, you’ll see I can use the user name to fetch my details from GitHub (cool, right?)
Integrating Bugfender with Electron
Ok, now for the bit we’ve all been waiting for…
Bugfender is a remote logging service that allows users to collect logs for everything in the application. It is easy to integrate Bugfender with Electron and get started, and it’s also possible to integrate SDKs with other web and mobile applications (if we say so ourselves).
To kick off the integration, simply create an account with Bugfender. Once logged in, create a Bugfender application for web apps using the Web SDK option. You can follow this step-by-step guide to create a Bugfender application, and you will find an API key ready for you. Keep it safe.
Once you have created your app, the Bugfender dashboard will enable you to keep track of logs, issues, feedback and crashes. This is how my dashboard looks:

Add Bugfender to the Electron app
Bugfender provides SDKs you can use as NPM or a browser script. We have built our application using Plain JavaScript and HTML, so we will import the SDK directly into the index.html file.
Please import the Bugfender SDK script inside the <head>...</head> tags.
<script src="<https://js.bugfender.com/bugfender-v2.js>"></script>Next, we need to initialize Bugfender to start using its services. To do so, you need to use the API key you created in the previous step.
Please add this code snippet at the top of the render.js file.
Bugfender.init({
  appKey: '<YOUR_API_KEY>',
})

// the code below remain unchanged
const fetchUser = () => {
.....
....
...
Now let’s use the methods from the Bugfender SDK. The SDK provides the following logs to send to the server.
Bugfender.trace()Bugfender.info()Bugfender.log()Bugfender.warn()Bugfender.error()Bugfender.fatal()
You can modify the fetchUser() method in the render.js file to include some of these methods. Please note the Bugfender method usage in the modified code below. We have used the log, warn, and error methods to log these scenarios:
- A normal log message when grabbing the user name provided by the user.
- A normal log message, when we find user data from the GitHub API response.
- A warning log, when the avatar is missing in the user data.
- A warning log, when the bio is missing in the user data.
- An error log, when the user data itself is missing.
const fetchUser = () => {
  const userName = document.getElementById('uname').value

  Bugfender.log(`Grabbed the username as ${userName}`)

  fetch(`https://api.github.com/users/${userName}`)
		.then(response => response.json()) //Converting the response to a JSON object
		.then( data => {
      if (data.name) {
        Bugfender.log(`Found the user ${data.name} by the user name!`)

        document.getElementById("error").innerText = ''
        document.getElementById('users').innerText = ''

        document.getElementById('users').classList.add('result')

        if(data['avatar_url']) {
          const img = document.createElement('img')
          img.src = data['avatar_url']
          img.alt = data.name
          document.getElementById("users").appendChild(img)
        } else {
          Bugfender.warn(`No avatar presents for the user ${userName}`)
        }

        addData('p', data.name)

        if(data.bio) {
          addData('p', data.bio)
        } else {
          Bugfender.warn(`No bio presents for the user ${userName}`)
        }
      } else {
        Bugfender.error(`A problem occured!!! We couldn't fetch the data for the user name ${userName}`)

        document.getElementById('users').classList.remove('result')
        document.getElementById("users").innerText = ''
        document.getElementById("error").innerText = `No information available for the user ${userName}`
      }
    })
		.catch( error => {
      console.error(error)
      Bugfender.error(error)
    })
}
View the Logs in the Bugfender Console
Now you’ll need to reopen your application window and perform some key actions, including:
- Search details of a user who returns all data, including avatar, name, and bio.
- Search details of a user who is missing an avatar or bio
- Search details of a user that doesn’t exist!
Head over to the Bugfender console and log in. Now you should start seeing the respective logs appearing for you to analyze.
- Log by grabbing user name and a valid response from the GitHub API:

- Observe the warning log (in the yellow background) for an event where the bio info is missing in the API response:

- Here is an event where we couldn’t get the user information as the user name doesn’t exist with GitHub:

Apart from the user-defined logs, you can also observe the user interactions and activity logs in the Bugfender console. Knowing how your users would have passed through the application and used it is very helpful. Take a moment to go through the logs in the image below:
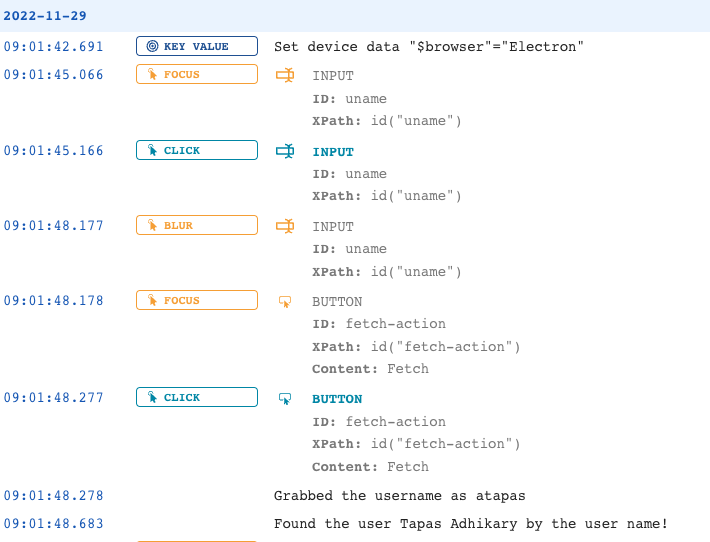
Now let’s read it in sequence.
The device browser is detected as Electron, and that’s right. Next, we’ll see that the user has focused on the user name input box, interacted with it and then focused out. Next, the user focused on the button and clicked. With this action, we can fetch the user data and log that as well.
But wait, that’s not all folks!
You can perform other advanced usages with the Bugfender SDK. For example, you can create issues to keep track of important errors. To create an issue, you can use the sendIssue() method like this:
Bugfender.sendIssue('Invalid User Name', 'Please check the user name. It is Invalid.');You can also view the issue in the Bugfender console to send it to GitHub for tracking.

Finally, you can collect user feedback using Bugfender’s SDK and send it back to the server. You can send logs with tags, send device-associated data and many more options. Please read this guide to know the usage better.
Right, what’s Next?
I hope you’re energised after this article and that it helps you to get started with Electron and Bugfender SDK. You can explore other Electron features to enhance the app and plan to build-publish it on the app store.
Before we end, here are some resources to read and explore further.
Expect The Unexpected!
Debug Faster With Bugfender

Tapas Adhikary
Tapas Adhikary is a Full Stack Developer. He loves building web apps, mobile apps, and JAMstack solutions. He is a technology blogger who publishes articles for freeCodeCamp, daily.dev, dev.to, his blog.greenroots.info and also in his YouTube Channel. Follow him on Twitter(@tapasadhikary) to stay connected.