17 Minutes
Kotlin Unit Testing Guide for Android Developers: Best Practices & Techniques
Fix Bugs Faster! Log Collection Made Easy
What is unit testing in Kotlin?
Unit testing is one of the most powerful features of Android app development, saving us crucial time and reducing overall project cost and allowing developers to embrace test driven development
With unit testing, we take an individual slice of code and test it to our requirements. If it passes, then the slice of code is pushed to the repository to merge with the existing code. If it fails, the developers fix the error and retest until it passes.
In Android app development, most developers use the JUnit5 or JUnit3 libraries to run unit test cases. These are part of the JUnit testing library, which is very easy to use but requires us to use a mocking library for complex tests (which we’ll explain later).
The picture below helps us understand the flow diagram of Android unit testing.

In this article we’re going to cover a range of topics, including:
- The core principles and parameters of unit testing.
- The ways to set up your project for unit testing.
- The key things to consider when choosing a framework.
- The key requirements for test-driven development.
We hope this provides a clear progression pathway and gives you the building blocks to nail this particular aspect of your work.
Table of Contents
First, what are the advantages of unit testing in Kotlin?
Unit testing helps development reduce lines of code and thus boost overall productivity. It also helps us:
- Find errors quickly and reduce the time and cost of development.
- Maintain the standardization of code architecture.
- Detect unused code, remove it, and retest the code until it passes.
- Make project documentation easier to read.
Most importantly of all, unit testing improves overall code quality. If we want to ensure simple, bug-free and well-documented code, we need to verify each and every single line. Unit testing is a more efficient way to do this than manual testing.
This pyramid should help demonstrate the benefits of unit testing in more detail:

As you can see in the diagram, there are multiple testing methodologies available. Unit testing is the cheapest method and produces the fastest results. What’s more, other automated testing methods usually require the use of specific tools, but unit testing is much more flexible.
Right. so what are the benefits of using Kotlin for unit testing?
There are four main benefits to using Kotlin as opposed to Java or other languages:
- Kotlin Code typically helps to reduce Android app crashes by 20%.
- Kotlin provides more high-level functionality than other languages.
- Developers can easily convert Java code to Kotlin code.
- Java testing often produces a ‘nulll’ error, which can be a real snag. Kotlin does not.
Getting started with Kotlin unit tests
Let’s start with Android Studio, which provides some really useful help on several early steps.
The first thing you need to do is choose the framework that will be used to write and run the tests. Once the framework has been selected, you need to assess your app and identify which unit of code needs to be tested. This can be a function, method, or even a whole class.
Then when we test each individual thing, we will the write the test case code in the framework of choice. Finally, once everything is in place, we will be ready to run the tests.
This is an iterative process. If the test passes, you can go back to write a new unit test case and check it. If the test fails, you need to go back and change your original code.
Choosing a testing framework for Kotlin
As a developer, you can choose between multiple testing frameworks. The most commonly used in Android unit tests are Mockito, PowerMock, EasyMock, JUnit5, etc. Here’s a quick overview of each.
Mockito
Mockito helps you create and define the behavior of mock objects, and simulate dependencies and interactions. This makes it easier to isolate and test individual units of code. Mockito also has powerful assertion capabilities to check method invocations and parameter values.
PowerMock
PowerMock is great because it can mock static methods, final classes, and perform complex mocking scenarios. If your Kotlin code relies heavily on static methods or utilizes final classes that need to be mocked, PowerMock is a great option.
EasyMock
EasyMock offers a straightforward, intuitive API that allows you to define the behavior of your mock objects and verify method invocations. EasyMock is known for its simplicity and ease of use.
JUnit5
Unit5 is the latest version of the JUnit testing framework and has introduced significant enhancements over its predecessors. It offers a modular architecture, allowing you to use only the components that are relevant to your testing needs. With its powerful assertion library and support for parameterized tests, JUnit5 provides a robust foundation for writing comprehensive and effective.
Our preferred testing framework is Mockito, so it will form the basis of our article because because it is easy to implement and to use in Kotlin with Android Studio.
Let’s check how to add the Mockito library to the Gradle file under the dependency tag.
    testImplementation("junit:junit:4.13")
    testImplementation("org.mockito:mockito-core:5.2.1")
    testImplementation("org.mockito.kotlin:mockito-kotlin:5.2.1")
Mockito is used to create fake objects and test a slice of code. The mock() function is used to create a fake object. Here’s an example.
// Syntax

val objectName = Mockito.mock("ClassName"::class.java)

// if you want to create a mock object of class Abc then

val objectAbc = Mockito.mock(Abc::class.java)
There are several annotations and methods we will use to perform unit testing later on. Annotations are as follows:
@Before , @Test , @After , @RunWith
and methods are as follows:
verify() , when () , thenReturn() , thenThrow ()
Setting Up a Kotlin project for unit testing
Setting up the Kotlin project for unit testing is actually very simple. We just need to write, copy, or paste a few lines in the gradle dependency and sync it.
As mentioned earlier, we are using Mockito for unit testing. Just copy these three lines and paste them in your Gradle file. It looks like the below.
    testImplementation("junit:junit:4.13")
    testImplementation("org.mockito:mockito-core:5.2.1")
    testImplementation("org.mockito.kotlin:mockito-kotlin:5.2.1")
Once you have pasted the above lines under the dependencies tag, you need to sync Gradle to use the library in your code later.
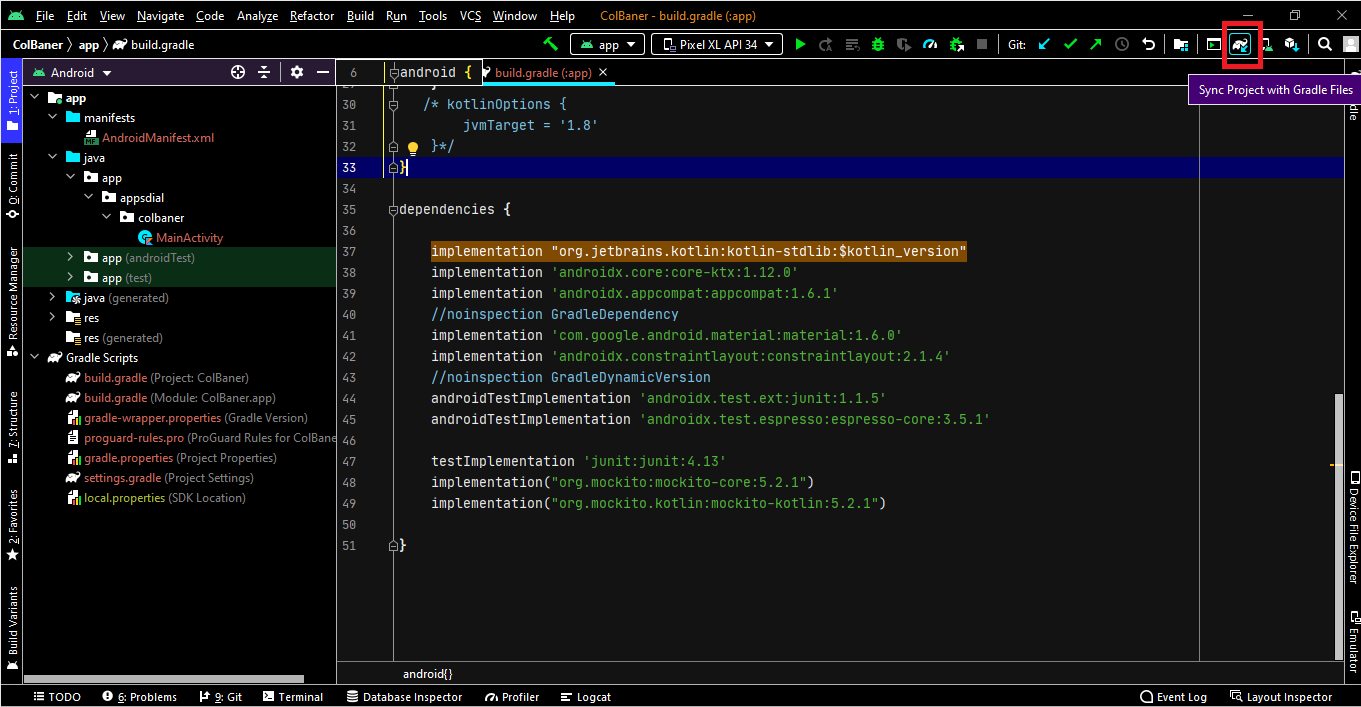
Now the dependencies are successfully synced and ready to use.
Still have questions? Don’t worry, this video explains it all.
Writing Kotlin unit tests
Android Studio provides great support here.
Creating test classes and test methods in Kotlin
Here are the steps to create a Kotlin test class and develop a robust method for unit testing.
- Double-click on the class name for which you want to create a test class.
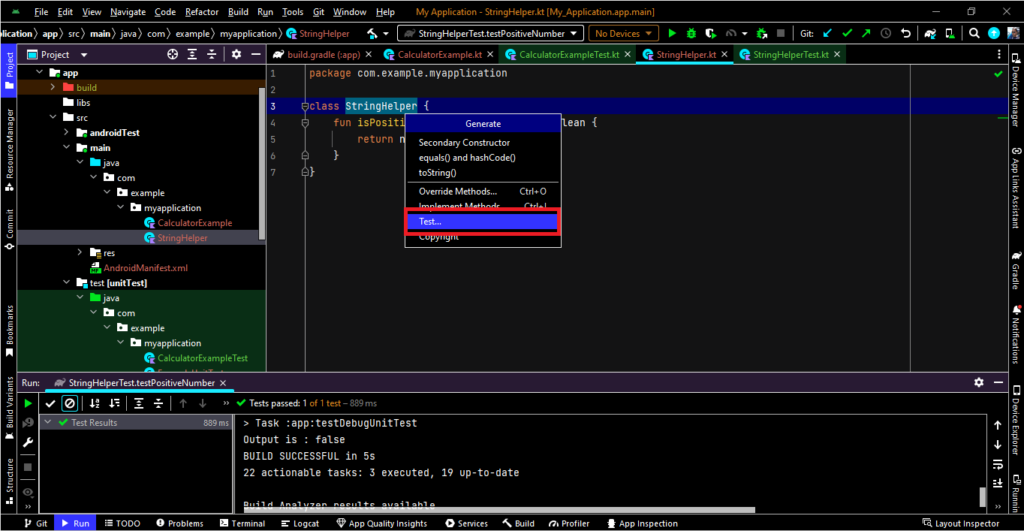
- Right-click on the class name and then click the Generate (Alt+Insert) option from the menu.
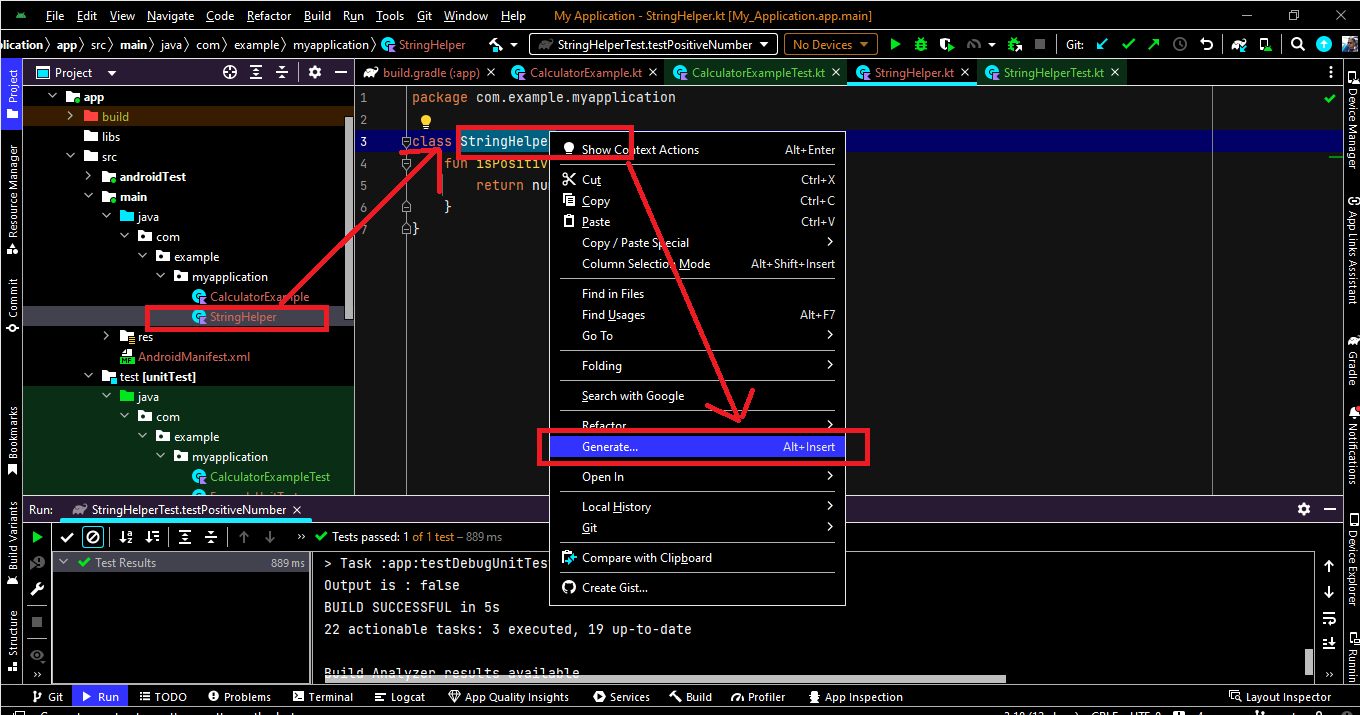
- After that, a dialog will appear. Then click Test.
- Now, a Create Test dialog will appear. Write your test class name and click OK.
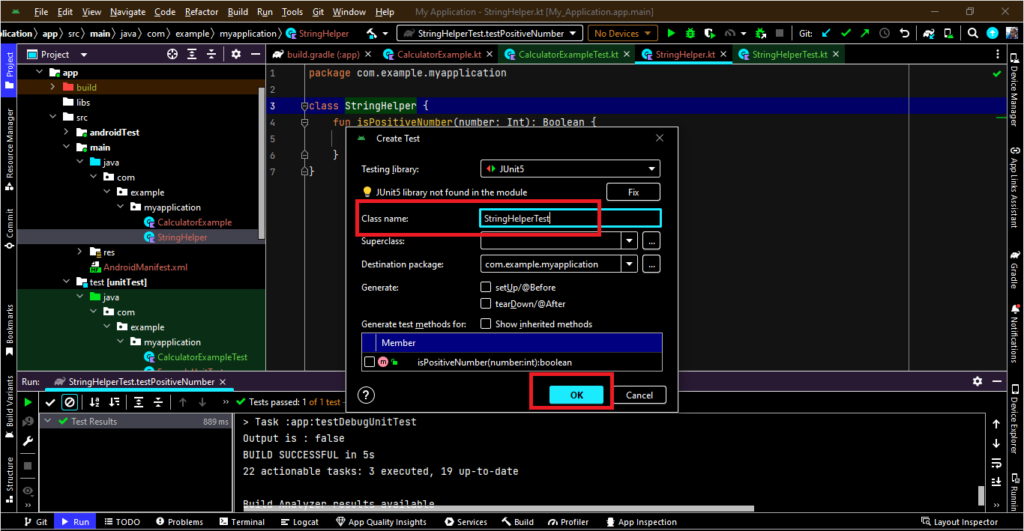
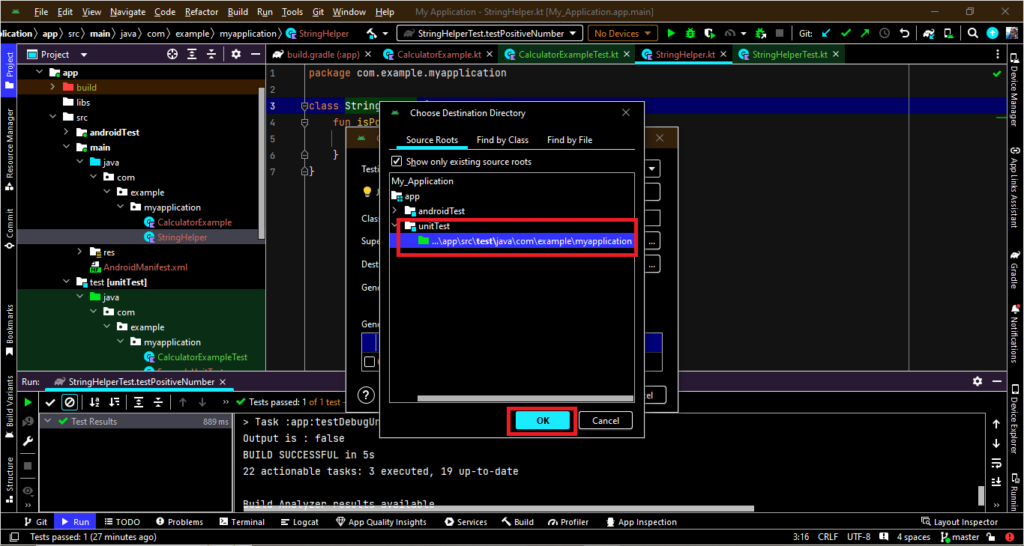
- Now, a Choose Destination Directory dialog will appear. Just choose where the test class will be saved, and click OK.
- Now we are ready to write test cases in our test class. Let’s check out an example.
// Create a simple class under app/src/main/java folder
class PositiveNumberHelper {
    fun isNumberPositive(number: Int): Boolean {
        return number > 0
    }
}
// Test Class of Class PositiveNumberHelper Class which is create under app/src/main/java folder

import org.junit.Before
import org.junit.Test
import org.junit.runner.RunWith
import org.mockito.junit.MockitoJUnitRunner

@RunWith(MockitoJUnitRunner::class)
class PositiveNumberHelperTest{
    lateinit var pnHelper : PositiveNumberHelper
    @Before
    fun setUp(){
        pnHelper = PositiveNumberHelper()
    }

    @Test
    fun testPositiveNumber(){
        val result = pnHelper.isNumberPositive(-2)
        println("Is Positive Number : $result")
    }
}
In the above example, we have used three tags. Let me explain them one by one.
@RunWithannotation is used to identify which library class we need to add to run the unit test.@Beforeannotation is used to initialize values before starting unit testing.- The
@Testannotation is used to test the method of the class.
Now we can run the newly created test.
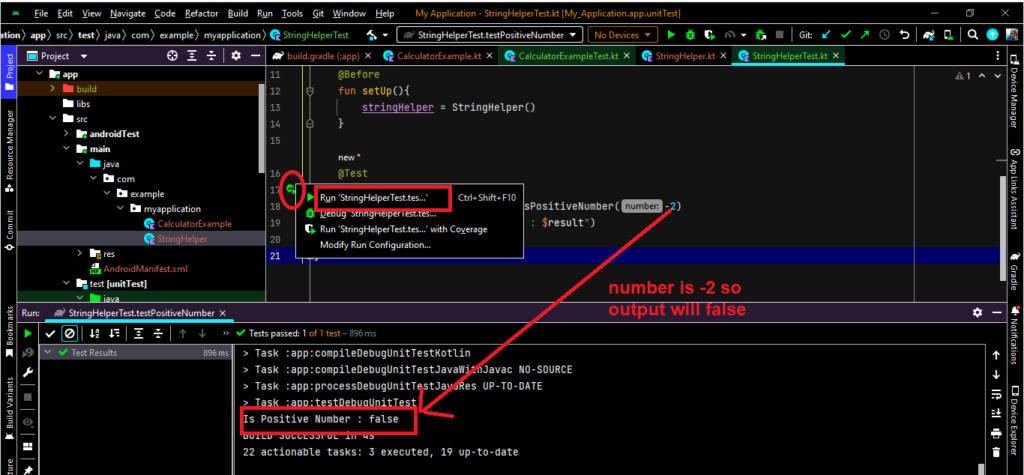
As you can see, the test has failed. In this case, fixing the error is the easiest option, because our test is very simple. In more complex scenarios you might need to debug your code to find the problem, but the good thing about Unit Testing is that usually the tests will be a lot simpler than other testing methodologies, like integration or E2E testing.
Writing assertions in Kotlin unit tests
Writing assertions is a good way to compare the expected result with the actual result. There are several methods used for assertions in unit tests. Here, we will use the assertEquals() method.
We need to pass two arguments: one is the expected value, and the other is the actual value. Let’s give a quick example.
class ExampleUnitTest {
    @Test
    fun addition_isCorrect() {
        assertEquals(5, 2 + 2)
    }
}
Once we run the above code, the output will look like that below.
expected:<5> but was:<4>
Expected :5
Actual   :4
2+2 = 4, but we expected it would be 5, which means the case has failed. If we write the code below, however, then we get:
class ExampleUnitTest {
    @Test
    fun addition_isCorrect() {
        assertEquals(4, 2 + 2)

    }
}
There are no exceptions. The build is successful, and the test case has passed because we met the expected value with the actual value.
Testing Kotlin code with mock objects
As of now, we have learned how to test code using the JUnit library. Now we are testing code using a mock object.
A mock object is a type of test double that mimics the behavior of real objects in controlled ways. They are great for unit tests when real objects are not possible and you need a predefined state and test data to test your code. This allows you to isolate your test from external dependencies, which help to run the test quickly and predictably.
Here’s an example. The class we want to test is CalculatorExample, which has one function to test: fun addTwoNumbers(a: Int**,** b: Int). On the other hand, the name of the object class is Operators. We will create a mock object of operators, pass it to the CalculatorExample class, and add two integer values. Let’s see an example.
class CalculatorExample ( val operators:Operators) {
    fun addTwoNumbers(a: Int, b: Int): Int = operators.addTwoInt(a,b)
}
object Operators {
    fun addTwoInt(m: Int, n: Int): Int = m + n
}
import org.junit.Before
import org.junit.Test
import org.junit.runner.RunWith
import org.mockito.Mockito
import org.mockito.Mockito.`when`
import org.mockito.junit.MockitoJUnitRunner

@RunWith(MockitoJUnitRunner::class)
class CalculatorExampleTest {

    lateinit var CE: CalculatorExample
    lateinit var OP: Operators

    @Before
    fun onSetup() {
        OP = Mockito.mock(Operators::class.java)
        CE = CalculatorExample(OP)
    }

    @Test
    fun addTwoNumber_PrintValue() {
        val a = 100
        val b = 20

        `when`(OP.addTwoInt(a, b)).thenReturn(a + b)

        val result = CE.addTwoNumbers(a, b)

        println(" after add two number : $result")

    }
}

Remember, if you comment out the below “when(OP.addTwoInt(a, b)).then Return(a + b) line, the output of the test execution will be 0 because we have created a mock of the Operators object. The mock object’s default value is null or 0.
Parameterized tests in Kotlin
Parameterized unit testing means passing different values with a common object to the test case. To create these tests, we need to add the parameterized class with the @RunWith annotation, and define the function with the @Test annotation. Let’s see an example.
class StringHelper {
    fun isPositiveNumber(number: Int): Boolean {
        return number > 0
    }
}
import org.junit.Assert.assertEquals
import org.junit.Test
import org.junit.runner.RunWith
import org.junit.runners.Parameterized
@RunWith(value = Parameterized::class)
class StringHelperParameterTest (private val input: Int, private val expectedValue: Boolean){
@Test
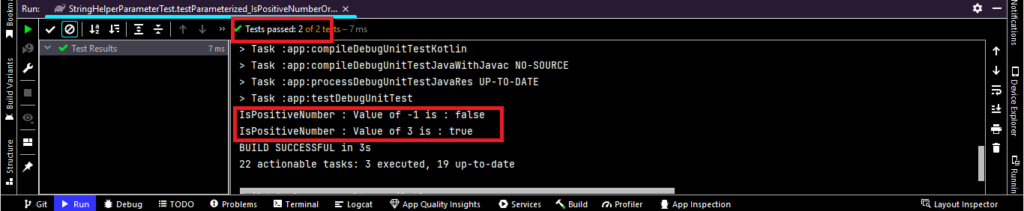
fun testParameterized_IsPositiveNumberOrNot() {
val SH = StringHelper()
val result = SH.isPositiveNumber(input)
assertEquals(expectedValue,result)
}
companion object {
@JvmStatic
@Parameterized.Parameters()
fun data(): List<Array<Any>> {
return listOf(
arrayOf(-1,false),
arrayOf(3,true)
)
}
}
}
Handling exceptions in unit tests
Handling exceptions is one of the most powerful techniques for finding actual errors. We can find errors with the try catch block.
In the below example, we are trying to catch an index-out-of-bound error. This means we are trying to find an index that is not in the array. Let’s see an example.
class IndexOutOfBoundExceptionExample {
    val array = intArrayOf(1, 2, 3)   // index is 0,1,2 value 1,2,3

    fun getValue(index : Int) : Int{
       return array[index]
    }
}
import org.junit.Test
import org.junit.runner.RunWith
import org.mockito.junit.MockitoJUnitRunner
import java.lang.Exception

@RunWith(MockitoJUnitRunner::class)
class IndexOutOfBoundExceptionExampleTest {
    @Test
    fun testException_IndexOutOfBound() {
        val ob: IndexOutOfBoundExceptionExample = IndexOutOfBoundExceptionExample()
        try {
            val value = ob.getValue(3)
            println("value of getvalue() is : $value")
        }catch (e : Exception){
            println(e.message)
        }
    }

}

// Exception has occured and thrown in catch block and print the message

import org.junit.Test
import org.junit.runner.RunWith
import org.mockito.junit.MockitoJUnitRunner
import java.lang.Exception

@RunWith(MockitoJUnitRunner::class)
class IndexOutOfBoundExceptionExampleTest {
    @Test
    fun testException_IndexOutOfBound() {
        val ob: IndexOutOfBoundExceptionExample = IndexOutOfBoundExceptionExample()
        try {
            val value = ob.getValue(2)
            println("value of getvalue() is : $value")
        }catch (e : Exception){
            println(e.message)
        }
    }

}

// Exception has not occured and we get the value of array at index 2 is 3.

Advanced topics in Kotlin unit testing
Test doubles in Kotlin unit testing
In order to ascertain that certain bits of code work, it might be necessary to provide an intermediate object. For example, in order to test a collection of items, we might need to simulate the behavior of a server.
To solve this problem, software development guru Gerard Meszaros introduced the ‘Test Double’ concept in his book XUnit Test Patterns: Refactoring Test Code. Meszaros uses this as a generic term for any kind of fake object that’s used instead of a real object for testing purposes **(fun fact: the name comes from the notion of a stunt double in movies).
There are five principal kinds of test doubles: Dummies, Fakes, Stubs, Spies and Mocks. We have already used an example of Mocks in this post, because they are the most common object to test in Android, and hence we’ll be referring to Kotlin. Let’s see a short overview of each of the test doubles.
Dummies
Dummies are the simplest kind of test double. They are placeholders that fulfil parameter requirements, but are never actually used to execute a test.
Mocks
We can think of a mock as a fake object that holds the expected behavior of a real object, but without any genuine implementation. For example, we can have a mocked server that looks like a server but simply sends a specific json object when calling a specific endpoint.
If we are creating a login service and we want to test the login flow, assuming that we are using a correct username and password, we may send a mocked ‘OK’ response throughout the server (like a json with some information, such as a user identifier).
Stubs
Stubs provide predetermined responses to function calls, and are used to simulate scenarios in a controlled manner. In Kotlin, a stub might override a method to return a specific value, like always returning a particular user object when a user retrieval method is called.
Spies
Spies are similar to stubs but with added functionality to record information about how they were called. In Kotlin, a spy could be used to wrap a real object and record how its methods are called, including the parameters passed to them. Spies are particularly useful for verifying that certain methods were called, or verifying the interactions between components.
Test-driven development (TDD) in Kotlin
TDD is a software methodology where the developer writes test cases for a piece of code before actually writing it. TDD lifecycles are covered in the points below.
- Define an interface or specification for your class or module.
- Write a test against that interface or class. At this stage the test should fail because we have no code yet.
- Write the implementation code that causes the test to pass.
- Refactor the code if needed.
- Repeat until completed.
Once you have completed a functionality, you can start the process again with the new functionality you want to write.

Integration with CI/CD pipelines
CI/CD stands for continuous integration and continuous development. CI helps the developer merge the code into the repository on a regular basis; CD is basically used to enhance the productivity of delivery, including bug fixes and new enhancements. Integrating unit testing into your CI/CD flow is crucial to improve team productivity, as code will be tested continuously and any problem will be detected as early as possible.
The way you add unit testing to your CD/CI is totally dependent on the tool you choose. You will need to check its documentation, but usually it requires you to add a few steps to your build process.
For example, with GitHub Actions, the workflow will be similar to this:
name: Kotlin CI

on: [push, pull_request]

jobs:
  build:

    runs-on: ubuntu-latest

    steps:
    - uses: actions/checkout@v2
    - name: Set up JDK 11
      uses: actions/setup-java@v2
      with:
        java-version: '11'
        distribution: 'adopt'

    - name: Grant execute permission for gradlew
      run: chmod +x gradlew

    - name: Build with Gradle
      run: ./gradlew build

    - name: Run unit tests
      run: ./gradlew test
Key takeaways
We’ve given you plenty of detail above, so we won’t go overboard in this closing summary. Instead, we’ll recommend some top-line principles that will serve you well.
- Write small test cases and execute them until they pass.
- Write a test case before writing the actual code.
- Ensure the function name is meaningful.
- Write the verify method of the test case to ensure that the object is called successfully.
- Code the test until it passes.
Stick to these principles and you’re bound to have success in unit testing. And if you have any specific questions, be sure to reach out and we’ll do our best to help. Go well!
Expect The Unexpected!
Debug Faster With Bugfender

Anupam Singh
Anupam Singh is a Native Android Developer as well as Hybrid Mobile App Developer. More than 10 years of experience in Developing Mobile Apps. He is a technology blogger. Follow him on Linkedin to stay connected.