In iOS, geofencing is a location-based feature that enables us to define geographical boundaries and trigger actions, or alerts, when a device enters or exits those boundaries. This feature has become vital to all kinds of apps, enabling them to deliver personal, timely and contextual experiences.
Geofencing apps uses virtual perimeters, defined by geo-coordinates creating polygon geofences, to trigger actions, alerts or push notifications based on user location. This technology works on the device’s current location and is detected by GPS, WiFi, cellular data and other location-based services. In Swift, Geofencing can be implemented using the Core Location Framework. And this is what we’re going to discuss today, with this article you will learn how to create a geofencing app.
The Core Location framework (check Core Location Apple documentation) enables applications to access and use location data, including GPS coordinates, altitude, course, and speed. Developers can use this information to tailor the app’s behaviour based on a user’s real, current location.
Let’s now check some essential components of this framework.
The core location framework interacts with various location services on iOS devices, including GPS, Wi-Fi, and cellular data. This ensures accurate and timely location information.
Core Location also provides geocoding, the process of converting a location name or address into geographic coordinates, and reverse geocoding, which converts the coordinates into a human-readable address.
For iOS applications that require knowledge of device orientation, this framework provides information about the iOS device’s heading (compass direction) and pitch (tilt).
As an iOS developer in Swift, don’t miss our in-depth article on Swift Closures. It’s a deep dive into a crucial aspect of Swift that can significantly improve your Swift coding skills.
The CLLocationManager class is a fundamental component of the Core Location framework, and acts as a central manager for all location-related operations.
The class enables us to request permission for location service, initiate location updates and coordinate the delivery of location-related events to your iOS app. Not only that, it provides a simple interface for configuring and initiating location services, as you can see here:
import CoreLocation

class LocationManager: NSObject, CLLocationManagerDelegate {

    private var locationManager = CLLocationManager()

    override init() {
        super.init()

        // Set the delegate to receive location updates
        locationManager.delegate = self

        // Request permission to use location services
        locationManager.requestWhenInUseAuthorization()

        // Specify the desired accuracy and distance filter
        locationManager.desiredAccuracy = kCLLocationAccuracyBest
        locationManager.distanceFilter = 10.0  // Minimum distance in meters for an update

        locationManager.startUpdatingLocation()
    }

    // MARK: - CLLocationManagerDelegate Methods

    func locationManager(_ manager: CLLocationManager, didUpdateLocations locations: [CLLocation]) {
        // Handle location updates here, As location changes, this method will be called
        if let location = locations.last {
            print("New Location: \\(location.coordinate.latitude), \\(location.coordinate.longitude)")
        }
    }

    func locationManager(_ manager: CLLocationManager, didFailWithError error: Error) {
        // Handle location error
        print("Location update failed with error: \\(error.localizedDescription)")
    }
}

// Create an instance of LocationManager to initiate location updates
let locationManager = LocationManager()
Now let’s look at requesting and handling location permissions in more detail. This is a vital area to grasp as it enables us to properly implement the location manager class, and obtain the user’s location.
Here you have the steps to get Core Location ready in your mobile app.
Import the Core Location framework.
import CoreLocation
Set up the CLLocationManager.
let locationManagerObj = CLLocationManager()
locationManagerObj.delegate = self
Request authorisation for location services.
func requestLocationPermission() {
    if CLLocationManager.locationServicesEnabled() {
        switch CLLocationManager.authorizationStatus() {
        case .notDetermined:
            // Request permission
            locationManager.requestWhenInUseAuthorization()
        case .restricted, .denied:
            // Prompt the user to enable location services in settings
            showLocationPermissionAlert()
        case .authorizedAlways, .authorizedWhenInUse:
            // Location permission already granted
            break
        @unknown default:
            break
        }
    } else {
        // Location services are not enabled
        showLocationServicesDisabledAlert()
    }
}
Handle permission changes.
func locationManager(_ manager: CLLocationManager, didChangeAuthorization status: CLAuthorizationStatus) {
        if status == .authorizedWhenInUse || status == .authorizedAlways {
            // Permission granted, start location updates
            locationManager.startUpdatingLocation()
        } else {
            // Handle denied or restricted status
            showLocationPermissionAlert() // show alert to redirect user to settings.
        }
    }
Generate alerts for the permission request.
func showLocationPermissionAlert() {
    let alert = UIAlertController(
        title: "Location Access Required",
        message: "Please enable location access in Settings.",
        preferredStyle: .alert
    )

    let settingsAction = UIAlertAction(title: "Settings", style: .default) { _ in
        if let url = URL(string: UIApplication.openSettingsURLString) {
            UIApplication.shared.open(url, options: [:], completionHandler: nil)
        }
    }

    let cancelAction = UIAlertAction(title: "Cancel", style: .cancel, handler: nil)

    alert.addAction(settingsAction)
    alert.addAction(cancelAction)

    present(alert, animated: true, completion: nil)
}

func showLocationServicesDisabledAlert() {
    let alert = UIAlertController(
        title: "Location Services Disabled",
        message: "Please enable location services in Settings.",
        preferredStyle: .alert
    )

    let settingsAction = UIAlertAction(title: "Settings", style: .default) { _ in
        if let url = URL(string: UIApplication.openSettingsURLString) {
            UIApplication.shared.open(url, options: [:], completionHandler: nil)
        }
    }

    let cancelAction = UIAlertAction(title: "Cancel", style: .cancel, handler: nil)

    alert.addAction(settingsAction)
    alert.addAction(cancelAction)

    present(alert, animated: true, completion: nil)
}
To initiate this process of requesting the location access, you need to call method from the viewDidLoad() method of ViewController.
Circular regions are virtual areas on the map defined by a radius from a central location, set by the user. Using this feature, we can trigger events when we get a notification that a user enters and exits the geographical region in question.
The Core Location framework provides the functions and methods to detect the entry and exit triggers, and you can define the functionalities based on these triggers.
Defining circular regions
Core location has a CLCircularRegion class, which can be initiated by providing the coordinates (latitude and longitude), a radius (in meters) and an identifier (a unique string).
Identifiers are used to distinguish between different regions to detect which region was entered and exited by the user, so a defined action can be taken.
Using circular regions for Geofencing
To kick things off, you need to monitor the region:
let locationManager = CLLocationManager()
locationManager.startMonitoring(for: geofenceRegion)
Now you need to handle the geofencing event notifications, using the following methods:
These delegate methods will be called when user enters and exits the region and defined functions can be performed when these methods are called.
Occasionally, you will generate a region monitoring and geofencing error. Here’s how to handle it:
func startMonitoringGeofence() {
    guard CLLocationManager.isMonitoringAvailable(for: CLCircularRegion.self) else {
        // Handle case where region monitoring is not available on this device
        showRegionMonitoringNotAvailableAlert()
        return
    }

    let geofenceRegion = CLCircularRegion(center: CLLocationCoordinate2D(latitude: 37.7749, longitude: -122.4194),
                                          radius: 100.0,
                                          identifier: "YourGeofenceIdentifier")

    locationManager.startMonitoring(for: geofenceRegion)
}
func showLocationPermissionDeniedAlert() {
    // Alert user about permission denial
}

func showLocationServicesDisabledAlert() {
    // Alert user about disabled location services
}

func showRegionMonitoringNotAvailableAlert() {
    // Alert user that geofencing is not available on this device
}
Beacon region monitoring
Beacon region monitoring leverages Bluetooth Low Energy (BLE) beacons to define regions and it’s another geofencing technology you can leverage. Beacons are small, battery-powered devices that transmit bluetooth signals. These signals can be detected by phones and used for geofencing purposes.
Some of the key benefits of using beacon-based region monitoring include:
Precision and proximity.
Low energy consumption.
Indoor positioning.
Cost efficiency.
Easy deployment.
Customized interactions.
These benefits make Beacon regional monitoring ideal for a range of mobile app genres, including healthcare, where tools like the best EMR for solo practice enhance efficiency, along with retail and marketing, indoor navigation, event management, education, asset tracking, and tourism & hospitality.
There are several steps involved in setting up and using Beacon-based region monitoring:
Setup Bluetooth and Location permissions in an info.plist file in your project:
<key>NSLocationWhenInUseUsageDescription</key>
<string>We need your location to provide personalized content.</string>
<key>NSBluetoothAlwaysUsageDescription</key>
<string>We need Bluetooth to detect beacons.</string>
Create a BeaconManager class object to handle the beacon monitoring:
import CoreLocation

class BeaconManager: NSObject, CLLocationManagerDelegate {
    private let locationManager = CLLocationManager()

    override init() {
        super.init()
        locationManager.delegate = self
    }

    func startMonitoringBeacon() {
        guard CLLocationManager.isMonitoringAvailable(for: CLBeaconRegion.self) else {
            print("Beacon monitoring is not available on this device.")
            return
        }

        let uuid = UUID(uuidString: "BEACON_UUID")!
        let region = CLBeaconRegion(uuid: uuid, identifier: "BeaconRegion")

        locationManager.startMonitoring(for: region)
    }

    // MARK: - CLLocationManagerDelegate

    func locationManager(_ manager: CLLocationManager, didEnterRegion region: CLRegion) {
        if let beaconRegion = region as? CLBeaconRegion {
            print("Entered beacon region: \\(beaconRegion.identifier)")
            // Perform actions when entering the beacon region
        }
    }

    func locationManager(_ manager: CLLocationManager, didExitRegion region: CLRegion) {
        if let beaconRegion = region as? CLBeaconRegion {
            print("Exited beacon region: \\(beaconRegion.identifier)")
            // Perform actions when exiting the beacon region
        }
    }
}
The BeaconManager class object is used to initiate region monitoring by calling startMonitoringBeacon():
class ViewController: UIViewController {
    let beaconManager = BeaconManager()

    override func viewDidLoad() {
        super.viewDidLoad()
        beaconManager.startMonitoringBeacon()
    }
}
When the device enters or exits the region defined by your beacon, the didEnterRegion and didExitRegion delegate methods will be called, and you can perform actions accordingly. This operation can be tested only on the real device.
Interested in enhancing your testing strategies in Swift? Explore our detailed guide on Swift Unit Testing using the XCTest Framework. This resource is perfect for iOS developers aiming to refine their testing skills.
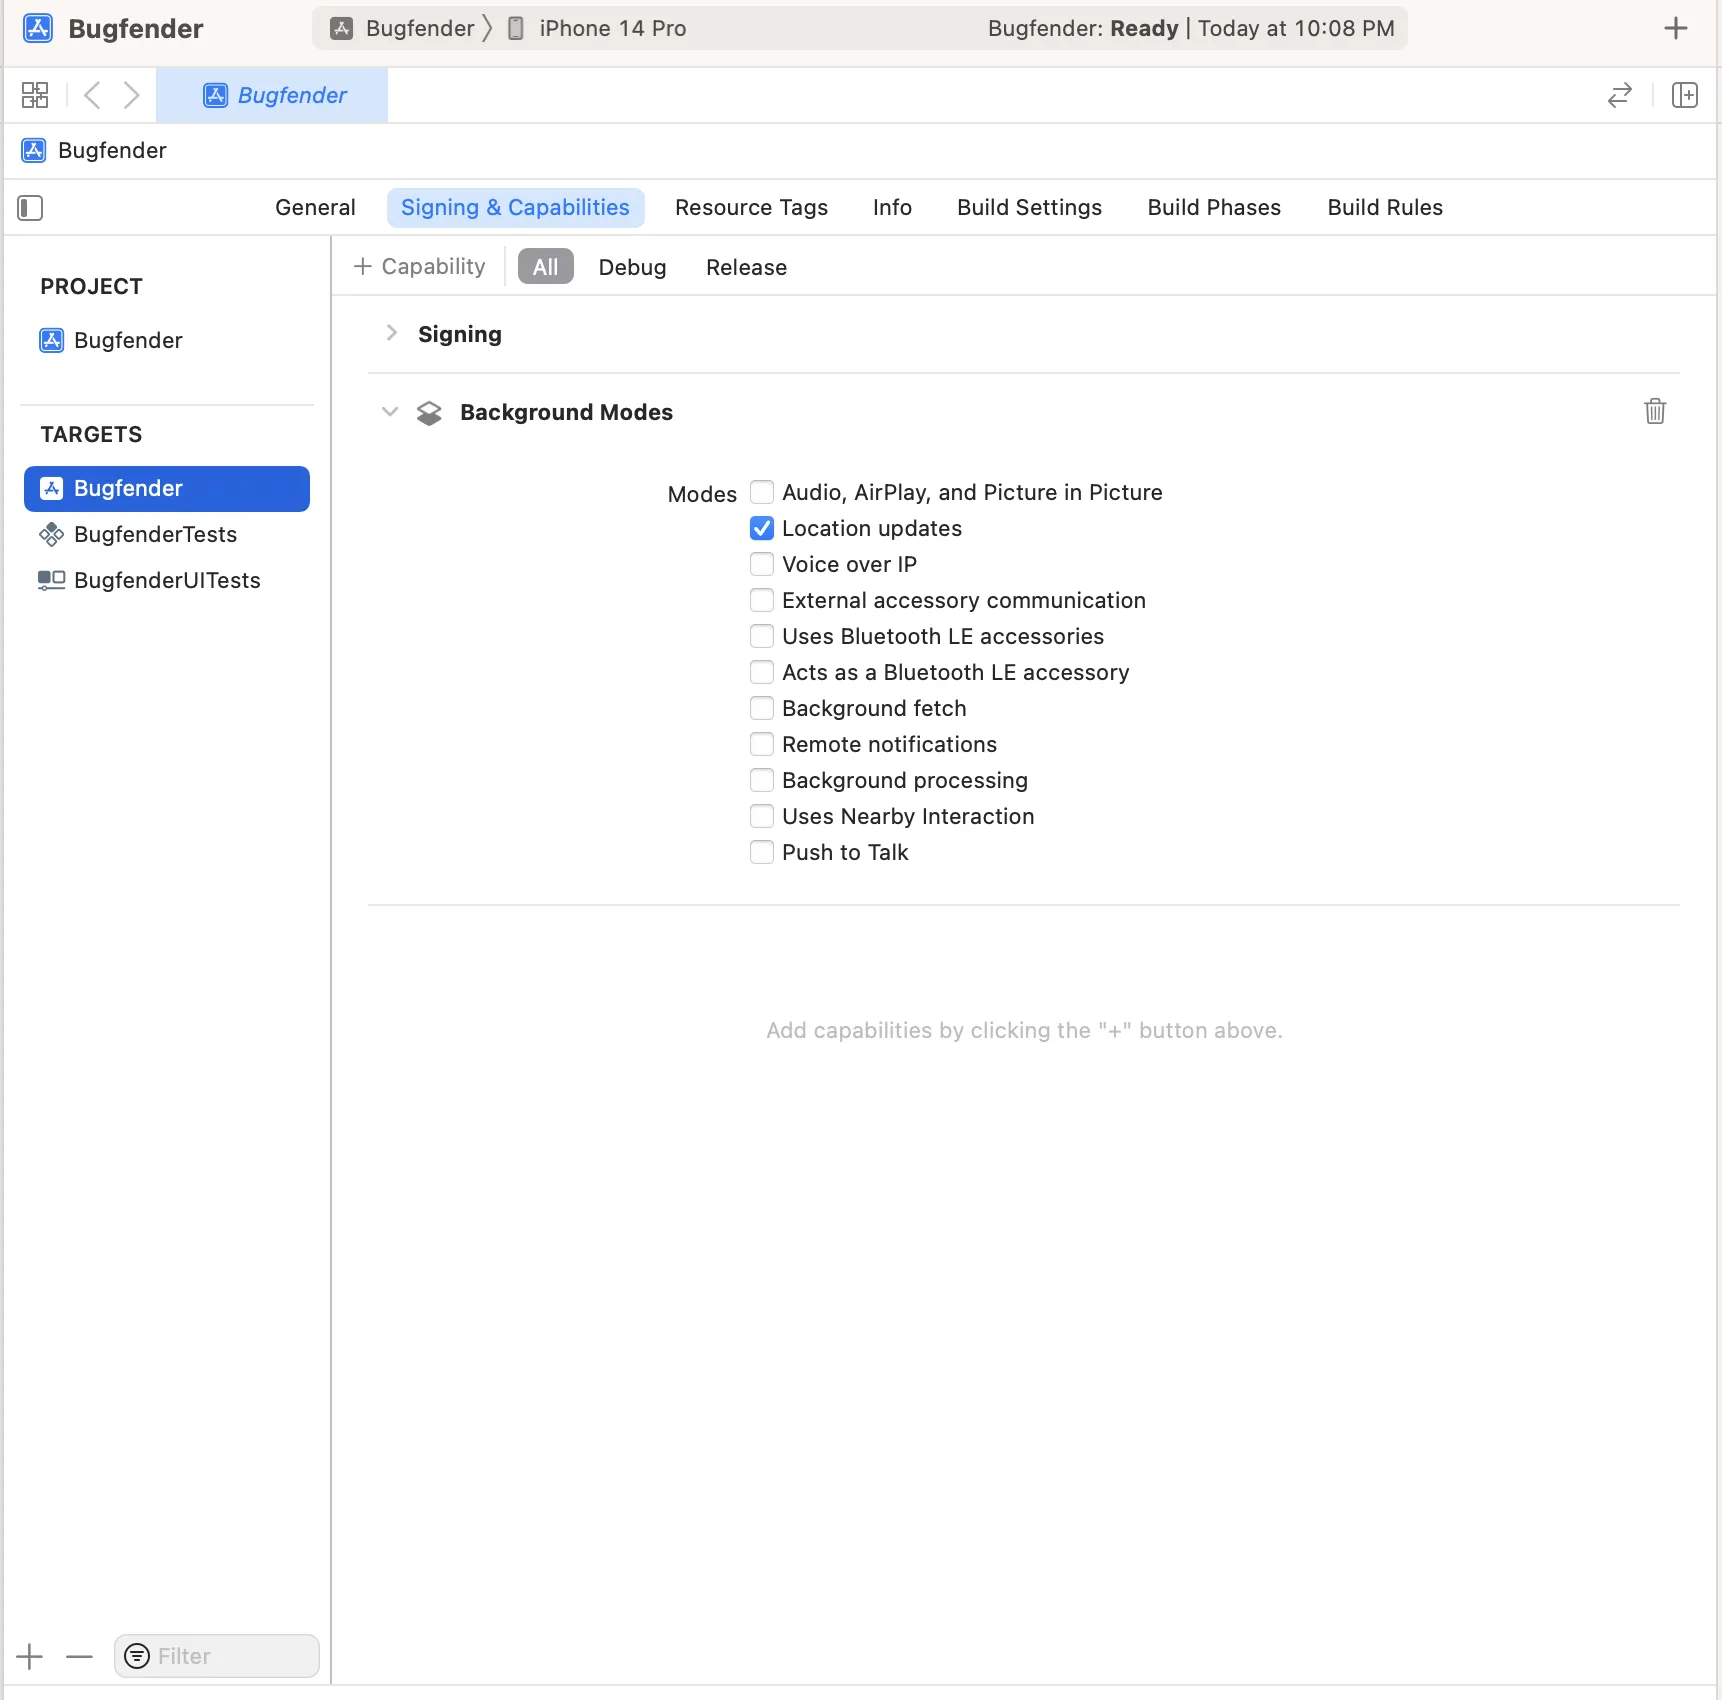
The background execution configuration of geofencing requires a series of necessary permissions and capabilities to access the device’s location when your app is running in the background state.
Now let’s look at the various steps to configure the background execution and permissions.
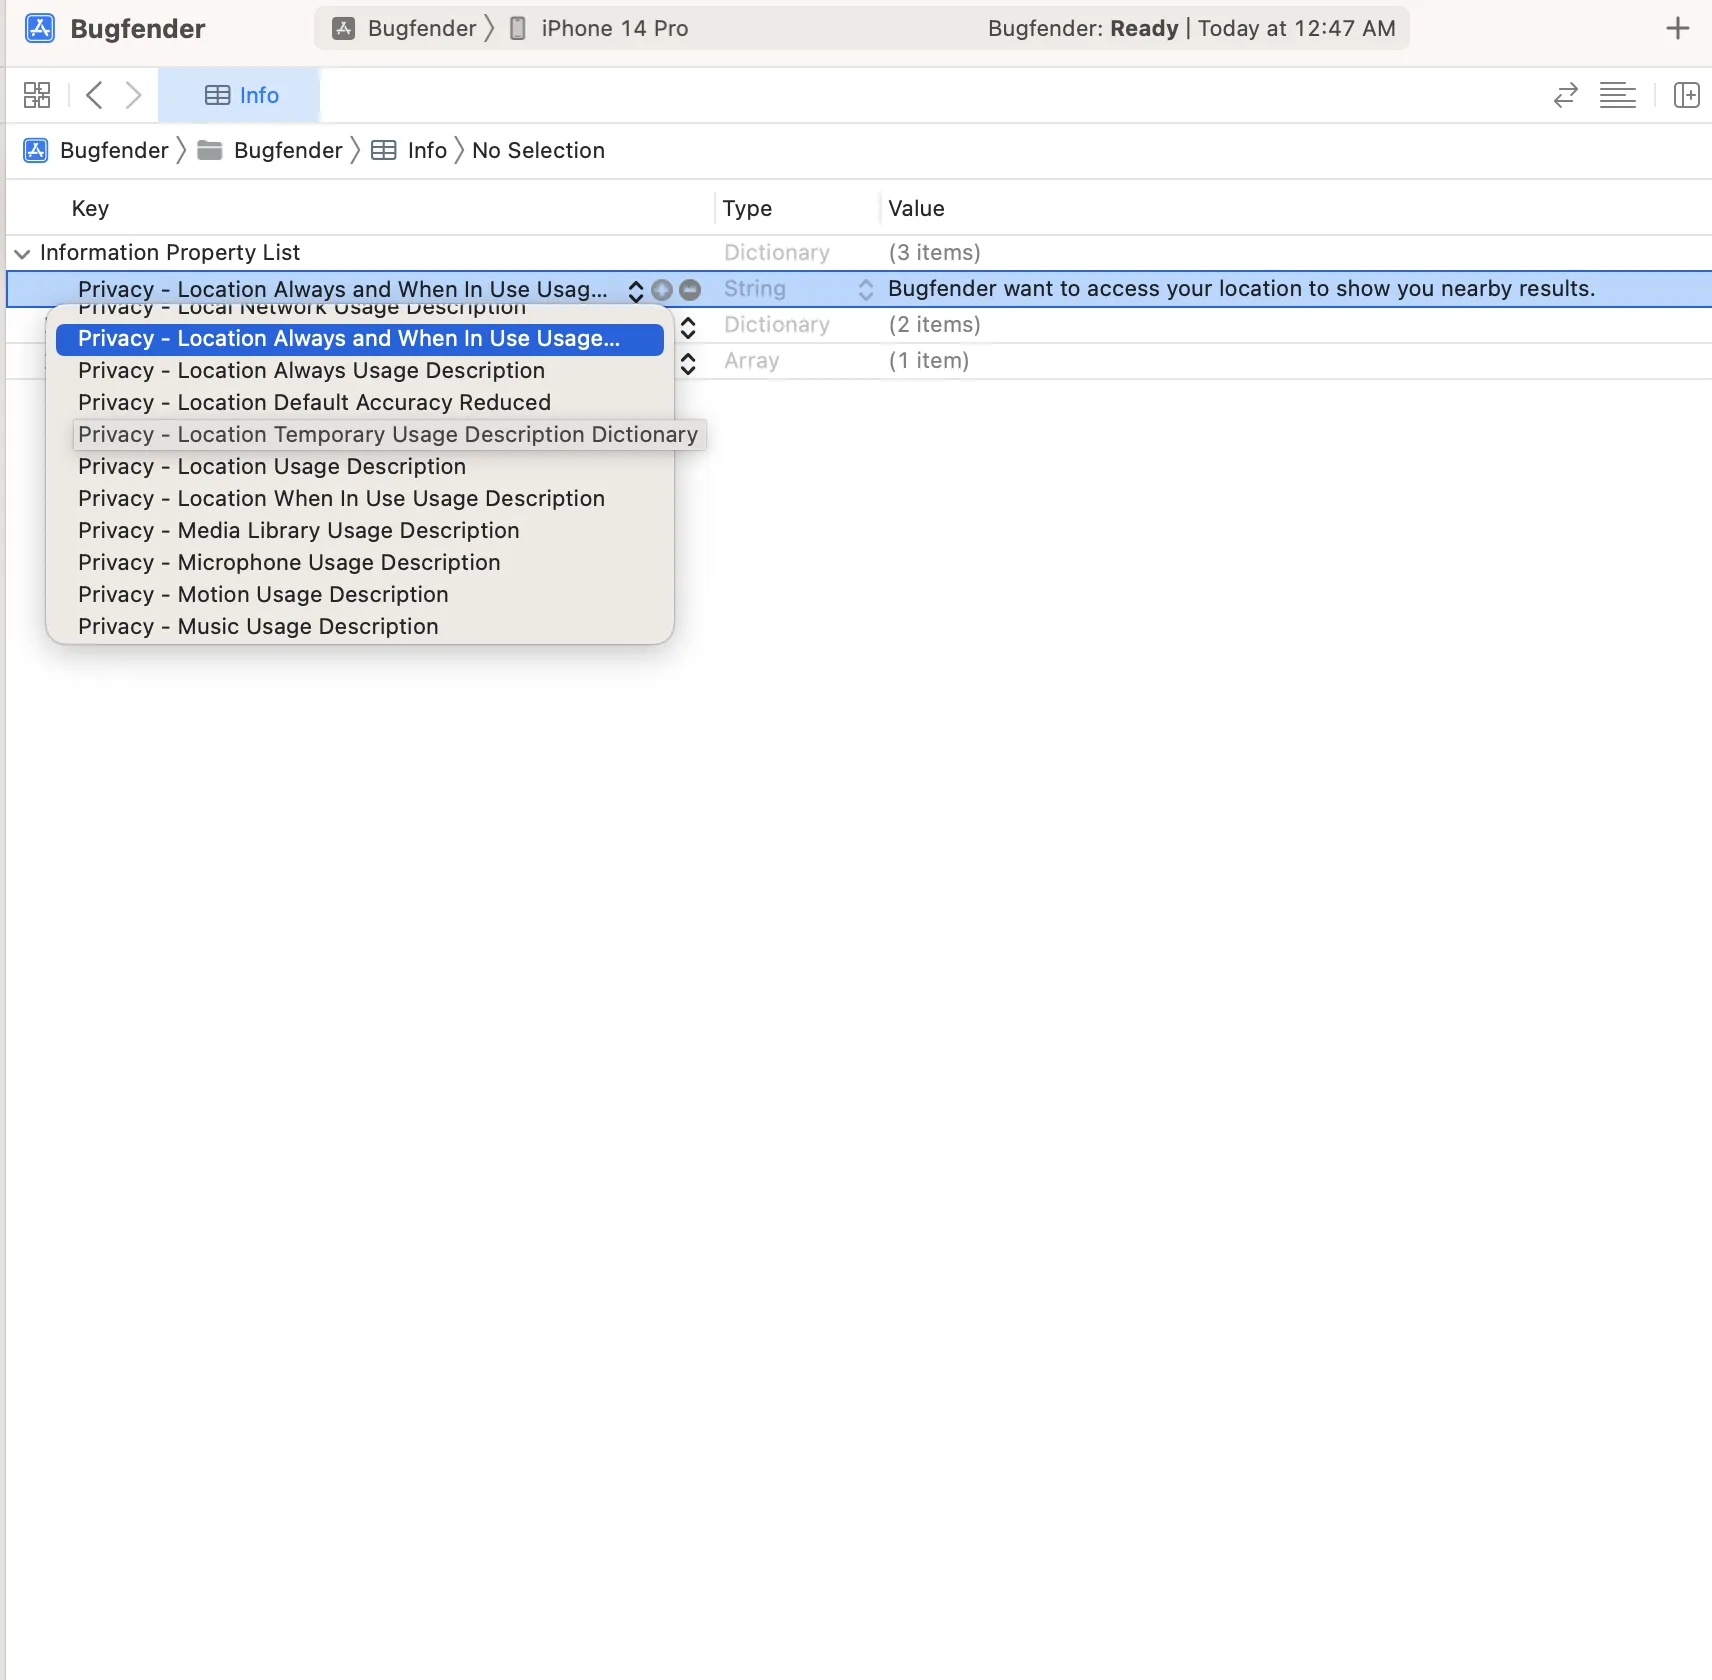
Update info.plist: Explain why the background location is required.
<key>NSLocationAlwaysUsageDescription</key>
<string>Bugfender want to use your location to show you nearby results.</string>
<key>UIBackgroundModes</key>
<array>
    <string>location</string>
</array>
xCode Image:
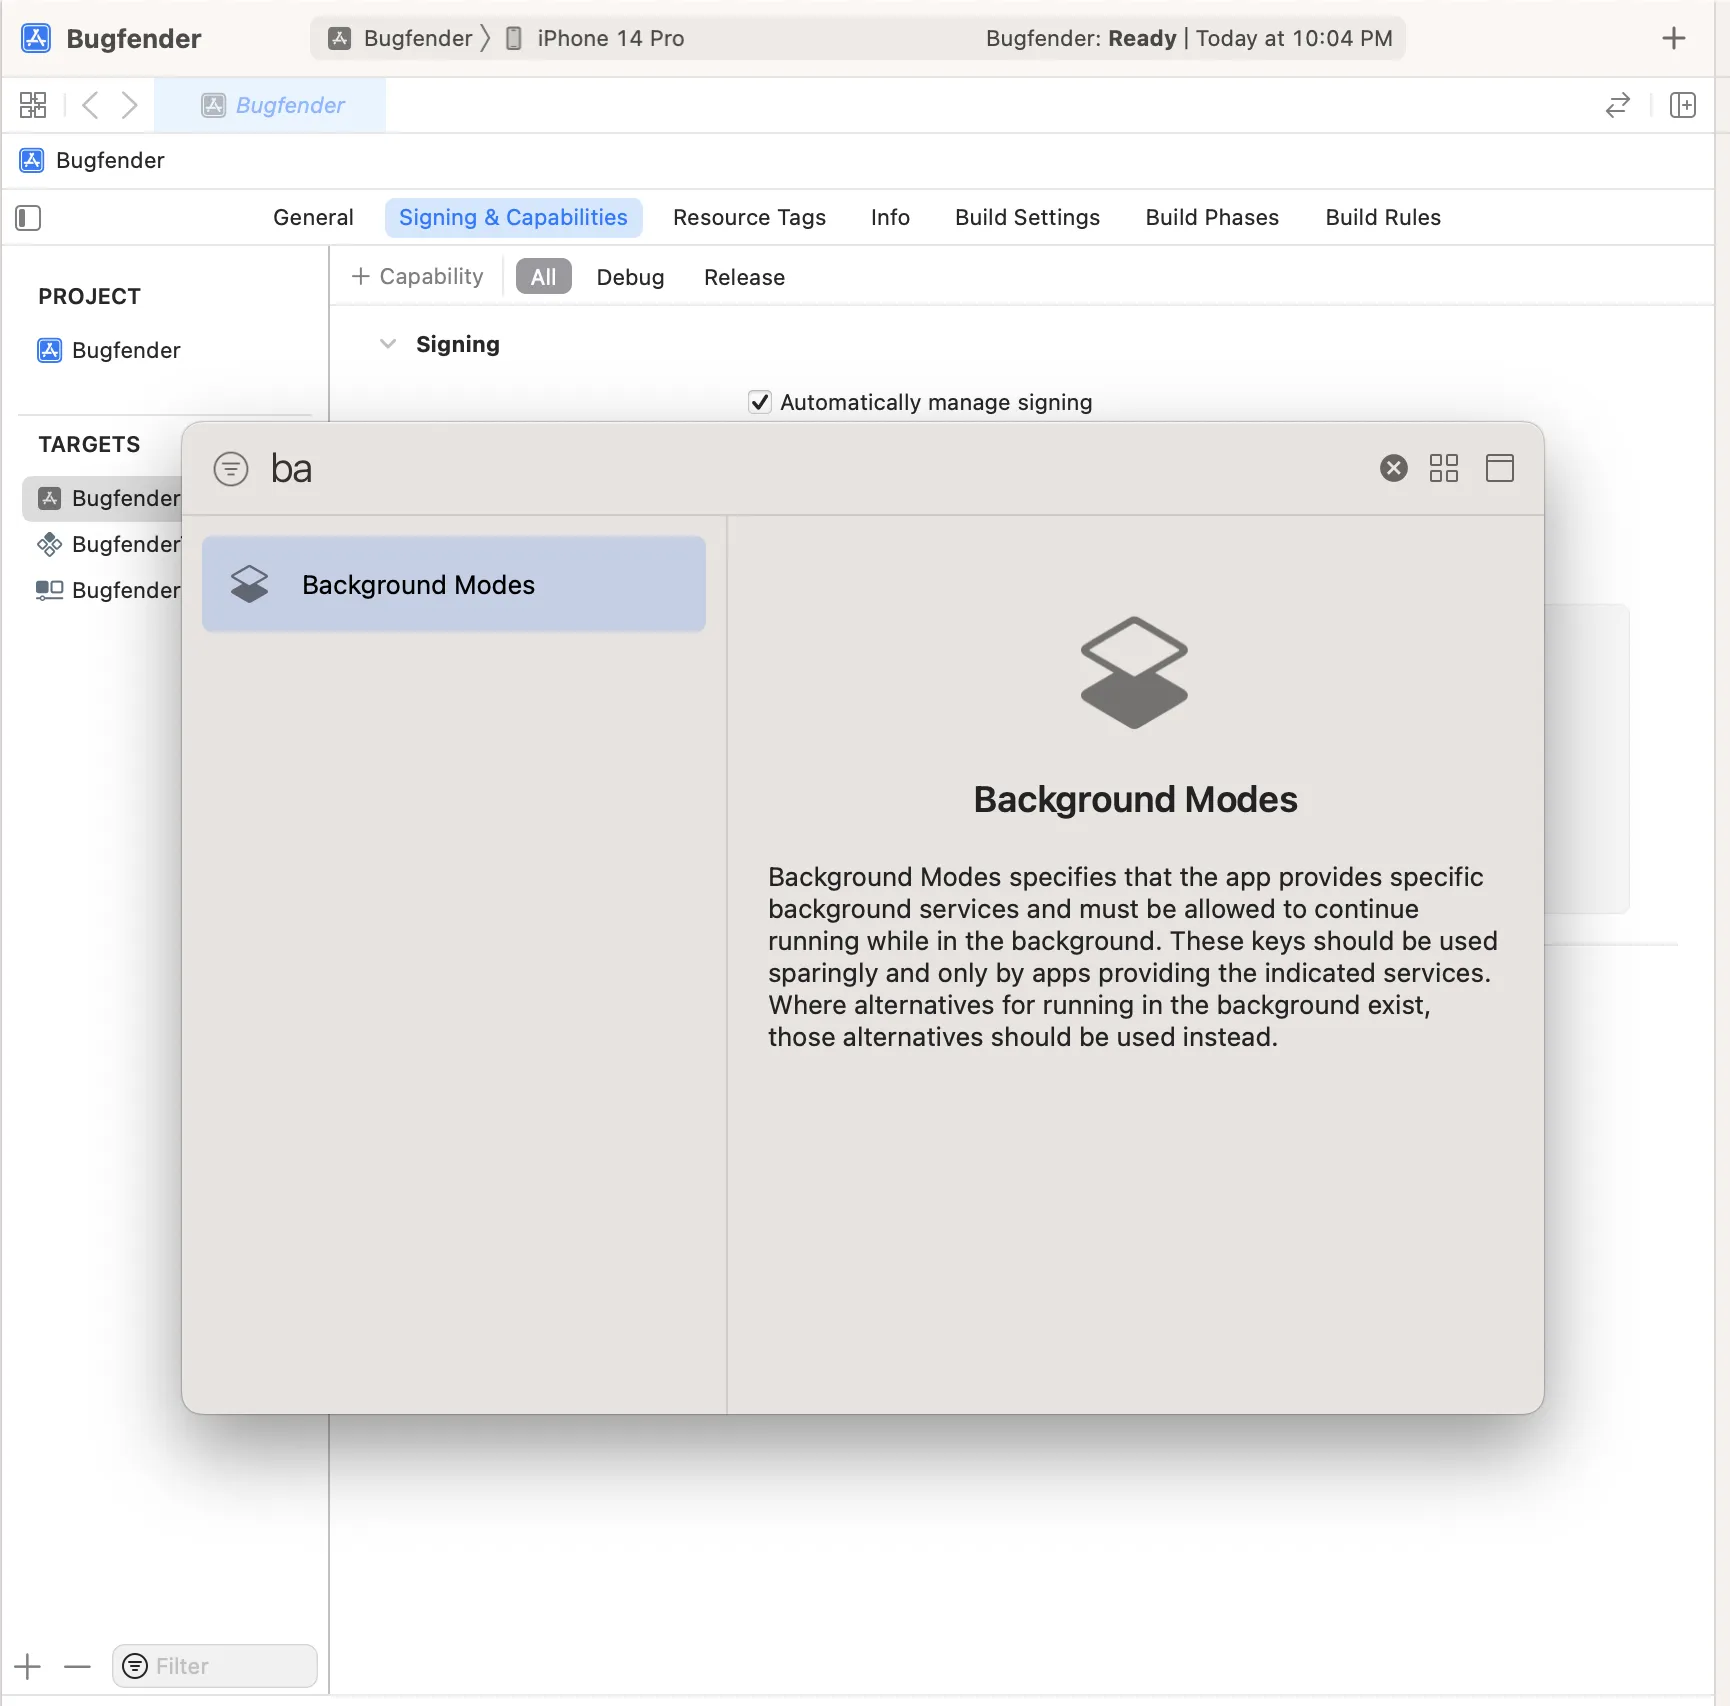
Request background location permissions:
While requesting background location permissions, be sure to request both “When In Use” and “Always” authorization when you use location in background.
To receive location updates and notifications in the background, ensure that your app delegate conforms to UIApplicationDelegate and implements the following method:
Implementing location services requires us to consider user experience, performance, and privacy. Here are some best practices:
User experience
Request permissions. Clearly explain why your app needs location access in user-friendly language.
Provide opt-out options in your app. Allow users to opt out of location tracking or provide a toggle switch in your app settings.
Gracefully handle location changes. Your app should smoothly transition between different location states to avoid abrupt changes or flickering on the user interface. Consider using proper animations to provide a better user experience.
Display location-related information. It’s important to show location information at the right time and place. Content with context enhances user engagement.
Performance and battery life
Optimize the location updates. Your app should optimize the frequency of location updates based on its needs. Real-time location updates will impact the battery life.
Use significant location updates. If your app does not require high location precision, use the significant change location updates to save battery power.
Implement background fetching. You should use background fetching to update location data periodically, even when your app is not in the foreground, to ensure the app has the latest location data.
Resume and pause location updates. You should use the pausesLocationUpdatesAutomatically property of CLLocationManager to automatically pause updates when the device is stationary, and resume when it starts moving. This helps save battery.
User privacy. It’s vital thar you clearly communicate why your app needs location data and how it will benefit the user. Be sure to respect user preferences and provide an option to easily manage and revoke location permissions.
Handle location data securely. Location data is sensitive information. You should securely transmit and store location data, and collect the minimum data required for your app’s functionality.
Use Geofencing appropriately. Too many geofences in your app can kill the battery life, so optimize the usage based on the app’s requirements.
Implement user-driven location services. It’s better to give the users the option to initiate location-based actions, rather than automatically and constantly monitoring in the background. This will give the user control and help protect their privacy.
Testing and debugging
Test on real devices. Testing location-based features on real devices will deliver more accurate results. Simulators are not capable of emulating real-life conditions.
Simulate location changes. During development and testing, Xcode’s Location Simulation feature enables you to simulate the scenarios and locations in which your app will actually be used once it’s live.
Handle location errors. You should develop a robust error-handling process for location-related errors, and inform users when location services are unavailable or if there are issues getting accurate location data.
Future Proofing of implementation
Keep an eye on framework changes. Staying up to date with the latest iOS updates, and changes to location APIs and classes, will ensure you’re always first to react when Apple introduces new features or deprecates existing ones.
Leverage other location services frameworks. Be sure to explore and use other frameworks like MapKit, Core Motion, and ARKit. This will enable you to enhance your location-based services with mapping, motion tracking and augmented reality.
Challenges and Limitations
Working with location-based services, like any other feature of app development, carries its own challenges and limitations. Let’s look at some of them.
Geofencing Challenges
Use of location services consumes battery power and is essential to optimize both location updates and transmission frequency.
Privacy is a central point of concern when working with location services. Transmission and storage of location data should be handled with the utmost care.
Indoor positioning is a challenge. GPS signals and beacons are weak indoors, and WiFi cannot always provide a high level of accuracy.
iOS imposes a number of restrictions regarding the background processing and handling of location data.
In areas with poor network coverage, location services do not always work accurately. And when the phone is in flight mode, obtaining real-time locations is particularly challenging.
Geofencing Limitations
Testing of location-related services require a physical device. This is one area of app development where simulator testing is not conducive to proper implementation and testing.
Geofencing has limitations regarding the pin-point accurate triggering of events. In fact, a delta will always be there.
If a user does not allow location access, location-related services will not work and this will affect all location-related functionalities.
Location data all depends on third-party services, and other APIs are extremely important if location-related features are to work in your app.
Factors such as tall buildings, tunnels and natural obstacles can weaken GPS signals, which in turn will affect the accuracy of location data.
Future trends in geofencing
The confluence of artificial intelligence (AI), augmented reality (AR), web3 and other fourth-revolution technologies will have a significant impact on Geofencing going forward, leading to a significant uptick in user experience.
Geofencing with AR will enhance location-based UX by giving users context-based information and interactive content, based on their physical surroundings.
Edge computing includes processing data closer to the source, reducing latency. In geofencing, it can improve real-time decision-making for users.
Artificial intelligence can improve user experience with improved algorithms and predictive results that further improve the triggers based on events and functionalities.
Blockchain technology can be used to add security to location data.
Enhanced indoor beacon positioning systems can help users improve service delivery and provide more accurate information.
5G network connectivity will provide faster, more reliable geo-based services for accurate results and services.
Integration with wearable devices like smart watches and glasses will improve the user experience with hands-free user interactions and seamless operations.
Privacy-centric geofencing practices will improve the trust and reliability of both location data and location-based services.
IoT integrations with Geofencing will give an extra edge to the Smart city and urban planning-like activities, helping to improve public services.
Cross-platform integrations will make it easier for developers to create reliable location-related experiences across iOS, Android and other platforms.
iOS Geofencing FAQ
What is iOS Geofencing?
Geofencing in iOS is a feature that defines geographical boundaries to trigger actions or alerts when a device enters or exits these areas. With iOS geofencing, the possibilities for innovative and location-aware apps are endless.
How does iOS geofencing work?
iOS geofencing relies on the device’s GPS, Wi-Fi, cellular, and Bluetooth technologies to determine the user’s precise location. When a geofence is created within an app, the app registers the desired geographic coordinates and a geographical region of interest. As the user moves around with their iOS device, the Core Location framework continuously tracks the device’s location and compares it against the defined geofences. When the user enters or exits a geofence boundary, the system generates a geofence event, and the app can respond accordingly. This event-driven approach minimizes unnecessary battery drain by only waking up the app when necessary, making it an efficient and reliable solution for location monitoring.
How can developers implement iOS geofencing in their apps?
To implement iOS geofencing in an app, developers can utilize the Core Location framework and its related classes and methods. They can define geofences using the CLLocationManager class and its functions, such as startMonitoring(for:) to begin tracking the user’s location. The app then needs to handle the delegate methods, such as locationManager(:didEnterRegion:) and locationManager(:didExitRegion:), to respond to geofence events and trigger the desired actions.
Is it possible to create multiple geofences in an iOS app?
Yes, iOS allows developers to create multiple geofences with different parameters, regions and actions. This flexibility enables developers to design complex geofencing scenarios and cater to various user interactions within their apps.
Can iOS geofencing work offline?
Yes iOS geofencing can work offline but on a limited way. iOS support a form of offline geofencing using significant location changes, but it may not be suitable for all use cases, especially those that require high accuracy and real-time notifications. For more precise and real-time geofencing, you may still need an internet connection or GPS-based solutions when available.
Can iOS geofencing be used for indoor locations?
iOS geofencing can be used for indoor locations when using technologies like Wi-Fi and BLE beacons. he specific choice of technology will depend on the requirements and constraints of your indoor location-based application.
Can iOS geofencing drain the device’s battery?
iOS geofencing drains device battery, but Apple has optimized iOS to minimize battery drain. The device intelligently manages location updates based on user movement and conserves power whenever possible. Moreover, developers can take steps to optimize their app’s battery consumption by using efficient location monitoring strategies.
To Sum Up
Geofencing is a crucial feature of modern app development, offering a wide range of functionalities to enhance user experiences and address the needs of various industries.
The importance of geofencing lies in its capacity to leverage location data and allow apps to respond smartly to users surroundings. This not only aids targeted marketing, personalized notifications and efficient resource management; it also plays a crucial role in safety, security, and privacy applications.
In this guide we discussed a range of topics including Core location frameworks, the CLLocationManager class, location permissions, the various forms of geofencing and its implementation, finishing off with a nice dose of futurism.
Geofencing is the combination of user centric design, technological innovation, and industry relevance. As the world gets more mobile, it’s more important than ever.
Sachin is an accomplished iOS developer and seasoned technical manager, combining 12 years of mobile app expertise with a knack for leading and delivering innovative solutions. You can contact him on Linkedin