13 Minutes
Reactive Programming In Swift: Using RxSwift
Fix Bugs Faster! Log Collection Made Easy
Our users surprise us every day. They constantly find new and exciting ways to use our apps, and create all kinds of edge cases with their behaviour.
As developers, it’s impossible to predict every single edge case. What we can do, however, is train our apps to react, and this is the core of Reactive programming, a development paradigm which has rapidly gained popularity for Swift programmers in recent years.
With Reactive programming, whenever any of our app’s values change, it triggers a chain reaction that filters through to all other places where this value is being used. This allows us to handle asynchronous events and operations, and makes our apps genuinely sustainable.
In this article, we’re going to give you a thorough deep-dive into Reactive Programming.
Table of Contents
But first, some key things to note
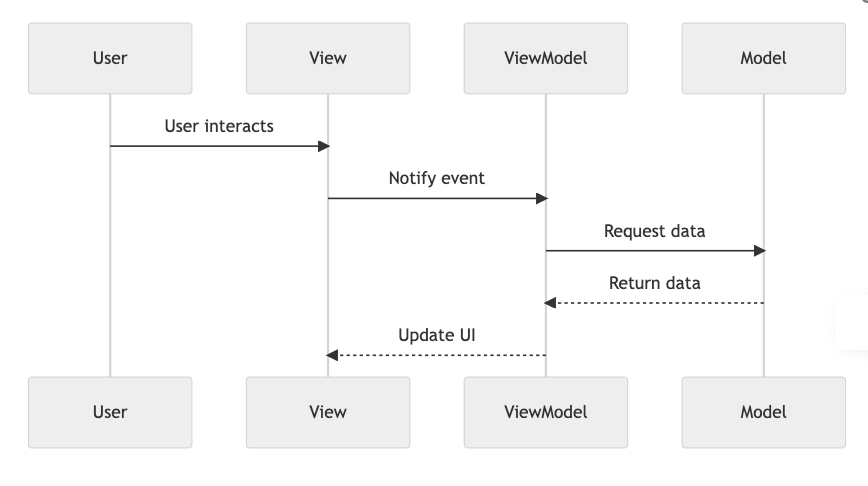
- Reactive Programming is a subscription-based approach, where the observables emit the data and other part of the program, subscribed to the observables, reacts to the emitted events and performs accordingly.
- Observers are the functions that react when any changes and events occur, and emitted events are observed to perform any task based on the new value, error or any event in the program.
- Operators are used to transform, filter, and combine the observables in reactive programming, and they also allow us to create workflows by chaining the observables.
- Schedulers are used to control the execution context of the observables. They are helpful in determining the thread and queue for the observable and observers to run.
- Swift has several frameworks available for reactive programming, and they all have different features and syntax. Reactive Swift, RxSwift, Combine are some of the most popular frameworks.
RxSwift is a great reactive programming library for Swift, which is based on the ReactiveX programming paradigm. This framework consists of reactive primitives, operators, and schedulers.
Combine is a reactive programming framework which is compatible with Swift and SwiftUI, specifically designed for user interfaces.
Why we use Reactive Programming
Reactive programming is particularly useful when:
- Any piece of data changes anywhere in our project.
- We want to handle asynchronous operations like updating the UI.
- We want to take care of any changes or completion of key tasks, like responses received from the network request, or changing message delivery and read in real-time.
In Swift, Reactive Programming is great for simplicity and readability because:
- It follows declarative syntax, allowing us to clearly specify and express what we want to achieve instead of specifying how to achieve it. Declarative programming provides clean, more readable code, helping to reduce the complexity of async tasks.
- Reactive Swift programming has a good range of operators that help us manage complex async operations. We can chain the different operators together and create complex process pipelines.
- It is based on event handling, which really helps provide a uniform approach. We can use the Observables to model various events, and Subscribers will react to these events as an when they are notified.
- Reactive Swift has schedulers to maintain and manage the concurrency of task execution. We have the flexibility to specify the thread or queue on which the Observable events can be observed and executed, helping us to properly handle background tasks and UI updates along with other async tasks.
- Reactive Swift has a good approach for handling execution errors. These can be sent using the Observable sequence, and Subscribers can be listed and react to errors according to defined logins and rules.
Key concepts of Reactive Programming
- Stream represents the flow of data, user inputs and events from one function to another emitted on any event or change. Streams are flexible and can be manipulated using the desired operators if needed.
- Events are the trigger occurrence in the execution of a program. They include updates in data, user interactions, or any asynchronous user activities.
- Schedulers determine which specific thread or queue should be observed or subscribed to. They also control the execution context of the code associated with the function. Schedulers help manage the concurrency and threading model in reactive apps.
Reactive Swift using RxSwift
RxSwift is a reactive programming library designed to handle event-based and asynchronous tasks.
The ReactiveX framework implements this library for Swift development to facilitate the reactive programming. It is known for the powerful operators and tools it provides to compose asynchronous, event-based code and also to facilitate functional programming.
Installation of RxSwift
You can use CocoaPods, Carthage, or Swift Package Manager to integrate RxSwift into your project.
Using Swift Package Manager
i) In Xcode, go to File – Swift Packages – Add Package Dependency.
ii) Enter the RxSwift GitHub repository URL: https://github.com/ReactiveX/RxSwift.git.
iii) Select and choose the version or branch you want to install.
iv) You can also add it to your Package.swift file:
// Add package to your Package.swift
dependencies: [.package(url: "<https://github.com/ReactiveX/RxSwift.git>", from: "6.1.0")],
targets: [.target(name: "Bugfender", dependencies: ["RxSwift", "RxCocoa"])]
v) After adding the dependency, run swift package update to fetch the library.
Using CocoaPods
# Podfile
target 'Bugfender' do
  use_frameworks!
  pod 'RxSwift', '~> 6.1'
end
After you add the dependency, you need to run pod install in your project directory.
Validation using RxSwift in Swift
Now let’s see a step-by-step guide to implement the validations in a clear form, using RxSwift.
First, import the RxSwift Framework:
//Import the Frameworks
import RxSwift
import RxCocoa
Now, prepare a ViewModel class for the Form Validation:
// Classs to validate login form
class LoginFormViewModel {
    let usernameStr = BehaviorRelay<String>(value: "")
    let passwordStr = BehaviorRelay<String>(value: "")
    let isFormValid: Observable<Bool>

    init() {
        isFormValid = Observable.combineLatest(usernameStr.asObservable(), passwordStr.asObservable())
            .map { usernameStr, passwordStr in
                return !usernameStr.isEmpty && passwordStr.count >= 6
            }
    }
}
Using this ViewModel in Swift:
let disposeBag = DisposeBag()
let viewModelLogin = LoginFormViewModel()
// Subscribe to changes in form validation
viewModelLogin.isFormValid
    .subscribe(onNext: { isValid in
        // Update the User about form validation
        print("Is form valid: \\(isValid)")
    })
    .disposed(by: disposeBag)
This is an example of a simple form validation using RxSwift in Swift. The LoginFormViewModel use the BehaviorRelay to create observable properties for the username and password values, while the combineLatest operator combines the latest data values of username & password and perform field validations.
Advanced features of Reactive Swift
Making Network Requests
Reactive Swift is very good at handling asynchronous tasks like making network requests in the project. Here are the steps needed to implement such a request.
Quick note: Here we are creating an observable for a network request using RxSwift and Alamofire. The fetchData function of this service class is returning an observable that emits the received response data back to the function calling this function.
Import the RxSwift and Alamofire Frameworks:
//Import the frameworks
import RxSwift
import RxCocoa
import Alamofire
Create the Network Service Class:
//Create the service class
struct NetworkServices {
    static func fetchData() -> Observable<Data> {
        return Observable.create { observer in
            let request = AF.request("<https://api.bugfender.com/data>")
						//Handle the response
            request.responseData { response in
                switch response.result {
                case .success(let data):
                    observer.onNext(data)
                    observer.onCompleted()
                case .failure(let error):
                    observer.onError(error)
                }
            }
            return Disposables.create {
                request.cancel()
            }
        }
    }
}
Start using the Service class in Swift Code:
//Use the FetchData subscription in class function.
let disposeBag = DisposeBag()
//Call the api and handle the async response
NetworkServices.fetchData()
    .subscribe(onNext: { data in
        // Process the fetched response
        print("Data: \\(data)")
    }, onError: { error in
        // Handle the error if any
        print("Error occured: \\(error.localizedDescription)")
    })
    .disposed(by: disposeBag)
As we can see in this Reactive Swift example, Rxswift simplifies the handling of any asynchronous event in your reactive app by using ReactiveSwift primitives. In this example, the NetworkServices.fetchData() function initiates a network request and returns an Observable. We then subscribe to this observable, where the onNext closure processes the fetched data stream, and the onError closure handles any errors that occur. This approach integrates seamlessly with Swift’s Combine framework, making it an excellent choice for modern iOS development.
State Management in a program
Reactive Swift is very handy for managing states with its observable properties. Here RxSwift is managing and observing state changes in the program currentState, a BehaviorSubject that emits the current state, while the updateState function updates the state and UI.
To import the RxSwift Framework:
//Import the framework
import RxSwift
To create the State Manager Class:
//Create the ManageState calss
class ManageState {
    let initialState = BehaviorSubject<String>(value: "InitialState")

    func updateState(newState: String) {
        currentState.onNext(newState)
    }
}
To use the StateManager in Swift code:
//use the created State manager in your program
let disposeBag = DisposeBag()
let stateManage = ManageState()

stateManage.currentState
    .subscribe(onNext: { state in
        // React to the changes
        print("Current State of item: \\(state)")
    })
    .disposed(by: disposeBag)
stateManage.updateState(newState: "Change the updates and UI")
Error Handling in RxSwift
Another key advantage of RxSwift is its ability to handle the errors in async tasks. Here, the errorObservable notifies and emit an error when it occurs, while the subscribe block handles the error. RxSwift has separate handlers onNext, onError, and onCompleted for different scenarios.
To import the RxSwift Framework:
//Import the framework
import RxSwift
To create the Observable with Error we can use a custom enum:
//Create Error enum
enum CustomErrors: Error {
    case responseError
}

let errObservable = Observable<String>.error(CustomError.responseError)
To use Error Handling in the Code:
//Use the Custom error
let disposeBag = DisposeBag()

errObservable
    .subscribe(onError: { error in
        // Handle the custom error here
        print("Error is: \\(error.localizedDescription)")
    })
    .disposed(by: disposeBag)
Reactive Swift best practices
Now we’ve gone over the top-line stuff, we’re going to round up some of the essential one-percenters that can transform your experience and maximize your productivity.
Use dispose bags for resource management
The DisposeBag automatically disposes of observers and subscriptions when they are no longer in use, and prevents memory leaks.
//Dispose Bag implementation
let disposeBag = DisposeBag()
observable
    .subscribe(onNext: { value in
        // Handle the value here
    })
    .disposed(by: disposeBag)
Avoid strong reference cycles
These cycles create the memory leaks. We should use [weak self] or [unowned self] in closures to avoid any strong reference cycles when capturing the self.
//Avoid reference cycles and memory leaks
observable
    .subscribe(onNext: { [weak self] value in
        // Use weak self to avoid memory leaks
    })
    .disposed(by: disposeBag)
Use the main scheduler and thread for UI Updates
Any UI update should happen on the main thread. .observeOn(MainScheduler.instance) is used to switch to the main thread.
//Execute on main thread
observable
    .observeOn(MainScheduler.instance)
    .subscribe(onNext: { value in
        // Update the UI here
    })
    .disposed(by: disposeBag)
Use the throttle and debounce for performance optimization
We should use throttle or debounce operators to control the rate of emissions. Here’s the code.
//Using throttle
textField.rx.text
    .throttle(.milliseconds(500), scheduler: MainScheduler.instance)
    .subscribe(onNext: { text in
        // Process the text after a 500ms delay here
    })
    .disposed(by: disposeBag)
We should prefer using .share() or .share(replay: 1) with shared observables to ensure only one subscription is made to the source observable.
//Create shared observable
let sharedObservable = observable.share()
Testing the Reactive code
We should use TestScheduler to handle RxSwift code and control the timing of events. The TestScheduler is a powerful tool provided by RxTest for testing RxSwift code that allows you to test RxSwift code within your XCTest-based tests.
//Using TestScheduler
let scheduler = TestScheduler(initialClock: 0)
let observable = scheduler.createHotObservable([.next(200, "X"), .next(250, "Y")])
Be sure to use XCTestExpectations or waitForExpectations(timeout:) to steer the asynchronous operations towards completion.
//Using the XCTestExpectation and waitForExpectations
let expectations = XCTestExpectation(description: "AsyncTasks")
observable
    .subscribe(onNext: { value in
        // Verify results
        expectations.fulfill()
    })
    .disposed(by: disposeBag)

waitForExpectations(timeout: 3, handler: nil)
Note: we can also test different error scenarios by creating observables to emit the errors and validate the error that is being handled.
//Error handling
let errObservable = Observable<String>.error(TestError.responseError)
Debugging the reactive code
We should use .debug() in the observable to log the events and debug their sequence.
//Using debug
observable
    .debug("Observables")
    .subscribe(onNext: { value in
        // Handle value here
    })
    .disposed(by: disposeBag)
Now we use print to print and debug the information.
//Use print statement
observable
    .subscribe(onNext: { value in
        print("Value: \\(value)")
    })
    .disposed(by: disposeBag)
We should use the breakpoints, as well as the Low Level Debugger, to handle and fix the issues with reactive code in detail.
// Set breakpoints
observable
    .subscribe(onNext: { value in
        // Set breakpoints here for debugging
    })
    .disposed(by: disposeBag)
To sum up
Reactive Swift is a great approach to handle and manage the ongoing changes in a program, and respond to asynchronous tasks. It uses the powerful RxSwift framework, along with solid reactive programming principles, to create maintainable, scalable, and responsive code.
As well as discussing the essential benefits of RxSwift, we have discussed a number of fundamental concepts like observables, subscribers, operators, streams, events, and schedulers. We have also covered key everyday facets of reactive programming like network requests, state management, and error handling, while addressing best practices such as the use of disposal bags.
Remember: good debugging is essential to identify and resolve the issues in reactive code. So if you want to see how Bugfender can help, please reach out to us.
Happy coding!
Expect The Unexpected!
Debug Faster With Bugfender

Sachin Siwal
Sachin is an accomplished iOS developer and seasoned technical manager, combining 12 years of mobile app expertise with a knack for leading and delivering innovative solutions. You can contact him on Linkedin