
22 Minutes
Mastering Data Persistence in iOS with SwiftData
Fix Bugs Faster! Log Collection Made Easy
Introduced in 2023, SwiftData is the latest addition to the range of database framework options in Swift, Apple’s primary programming language for iOS. Built on top of Core Data, two levels above SQLite, it’s great for simplifying our persistent stores and it allows us to use declarative code, which is a really useful time-saver.
However, for all its flexible functionality, SwiftData framework presents certain challenges for us devs, particularly if we’re migrating from other database tools. So here, we’re going to walk you through the basics of SwiftData, so you can jump-start your learning and feel confident whenever you use this amazing framework that simplifies data persistence and makes app development easier without the deep knowledge required to master Core Data.
Table of Contents
But first off, what are the benefits of using SwiftData?
Well, there are lots! But here some of the benefits that will really impact your day-to-day work.
- You can use SwiftData with minimal code, enabling you divert your creative energies to other aspects of your sprint.
- You can write the entire model layer (essentially, the business logic bit) of your app with just this one framework.
- There are no external file formats to worry about.
- It’s got SwiftUI integration baked in. In fact, it’s pretty much Swift-native.
- The syntax is easy to get to grips with.
So, basically, it’ll save you a lot of time and remove a lot of the pain-points you’ll find with other frameworks. Which means you can build clean, robust and reliable apps more quickly.
Ok, now let’s create a SwiftData database
In this article we’re going to look at how to build a SwiftData model database for a simplified version of a social media Post. For the purpose of this demonstration, we’ll need to persist (preserve data once the program has stopped) with just three objects: form our basic schema:
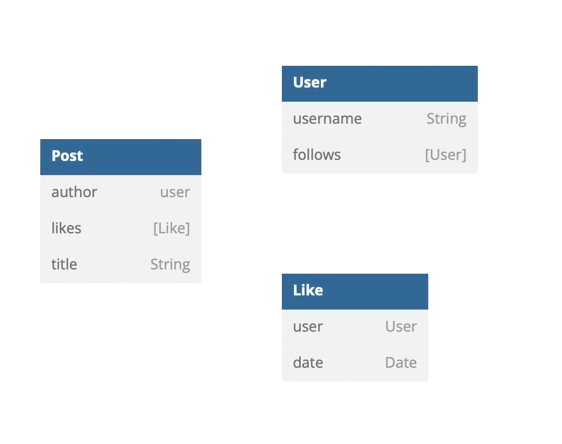
A Post that will have:
- A
title - An
author - A list of
likes.
A User that will:
- Have a
username - Follow other
Users.
Like objects that:
- Have a
date - Are associated with a
User.
Now, let’s set up SwiftData
Before SwiftData can persist the objects in our database, we’ll need to create we’ll need to create each object as the model class shown below::
struct Post {
    var author: User
    var likes: [Like]
    var title: String
}

struct User {
    var username: String
    var follows: [User]
}

struct Like {
    var user: User
    var date: Date
}
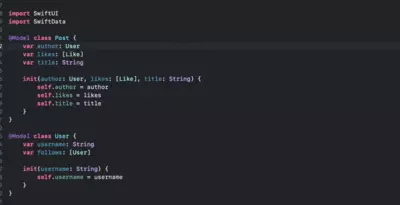
We’ve created the objects of our schema as Structs, but to make them SwiftData-compliant they’ll need to be considered SwiftData Objects. This means making them @Model objects, which is done by simply adding @Model , as you can see below:
@Model struct Post {
    var author: User
    var likes: [Like]
    var title: String
}

 @Model struct User {
    var username: String
    var follows: [User]
}

@Model struct Like {
    var user: User
    var date: Date
}
After we’ve added @Model the compiler will return the following error:
@Model requires an initializer be provided for 'Post'
@Model requires an initializer be provided for 'User'
@Model requires an initializer be provided for 'Like'
Don’t worry, this is expected behavior. @Model requires all structs have both implicit and explicit initializers associated with them, and we can solve the issue by adding an explicit initializer to our model type:
@Model struct Post {
    var author: User
    var likes: [Like]
    var title: String

    init(author: User, likes: [Like], title: String) {
        self.author = author
        self.likes = likes
        self.title = title
    }
}

@Model struct User {
    var username: String
    var follows: [User]

    init(username: String, follows: [User] = []) {
        self.username = username
				self.follows = follows
    }
}

@Model struct Like {
    var user: User
    var date: Date

    init(user: User, date: Date = Date.now) {
        self.user = user
        self.date = date
    }
}
The @Model we have used is one of the schema macros provided by SwiftData framework, these schema macros add functionality to our model classes without requiring the developer to code complex strategies.
Now the SwiftData model classes are ready, it’s time to prepare our app to store them by making the app a ModelContainer.
To do this, simply go to the root of the app and add the line below:
@main
struct SwiftDataApp: App {
    var body: some Scene {
        WindowGroup {
            ContentView()
        }
        .modelContainer (for: [Post.self, User.self, Like.self])
    }
}
Great! Now the app is a SwiftData modelContainer making our app a model container, which means it can store SwiftData objects and it’s a persistent store.
Next step: model macro functions
As the Swift Macro provides a convenient user interface, we don’t really need **to know what the @Model macro adds to our types. However, we can easily check by right-clicking the Macro and choosing expand Macro.
Basic database operations
Now our data models are configured, let’s see how can we use them to store, read and delete objects.
Adding to SwiftData
Having set up the modelContainer, we can access the modelContext in any view we choose. In this example, we’ll create a view with a button for adding users to our database:
import SwiftUI
import SwiftData

struct ContentView: View {
		@Environment(\.modelContext) private var modelContext

    var body: some View {
        VStack {
            Button {
                modelContext.insert(RandomGenerator.user())
            } label: {
                Text("Add user")
            }
        }
        .padding()
    }
}

#Preview {
    ContentView()
}

class RandomGenerator {
    static func user() -> User {
        let usernames = ["Quantum", "Giraffe", "Mystic", "Penguin", "Nebula", "Phoenix", "Zenith", "Whisper", "Radiant", "Tiger", "Lunar", "Cascade", "Celestial", "Breeze", "Ephemeral", "Dragon", "Cosmic", "Echo", "Enigma", "Sparrow"]

        let index1 = Int.random(in: 0...usernames.count - 1)
        let index2 = Int.random(in: 0...usernames.count - 1)

        return User(username: "\(usernames[index1])\(usernames[index2])")
    }
}
The most important elements here are the connection to our SwiftData Context, and the insertion of the object into this context.
		@Environment(\.modelContext) private var modelContext

...

		modelContext.insert(RandomGenerator.user())
We can check the button is working as it should by querying the data, which we’ll cover next.
Querying from SwiftData
Another of the great things about SwiftData is that we can see all users in our database simply by adding a List to our SwiftUI app view.
To do this, we simply modify our ContentView as follows:
import SwiftUI
import SwiftData

struct ContentView: View {
    @Environment(\.modelContext) private var modelContext
    @Query var users: [User]

    var body: some View {
        VStack {
            Button {
                modelContext.insert(RandomGenerator.user())
            } label: {
                Text("Add user")
            }

            List(users) { user in
                Text(user.username)
            }
        }
        .padding()
    }
}
By adding just four simple lines of code, we’re now able to query all users from our data model and get a full breakdown of them.
Deleting from SwiftData
So we’ve seen how to write and read data from our database. Now, let’s take the next natural step and look at how to delete.
We’ll need to make a small change to how we display our List to make it easier to add the onDelete modifier. Again, however, this is simple.
We just need to change:
List(users) { user in
   Text(user.username)
}
to:
List {
  ForEach(users, id: \.self) { user in
    Text(user.username)
  }
}
This will not change the overall functionality of our UI or app, but we can check everything still works by simply running the app.
Next we’ll add the onDelete modifier, after which our full List should look like the below:
List {
	ForEach(users, id: \.self) { user in
     Text(user.username)
  }
  .onDelete(perform: { offsets in
      modelContext.delete(users[offsets.first ?? 0])
  })
}
Now we can view, add and delete users in our app:

More advanced operations
Having mastered the creation of basic SwiftData operations using a User struct , we can now consider more complex examples such as bulk add/delete, search, and sort operations, using all our structures.
Generating more complex structures
If we want to make data available to demonstrate, we’ll first need to change our RandomGenerator class, so we can generate more complete and complex sets of data.
The new RandomGenerator class we’ll be using for these examples is as follows:
class RandomGenerator {
    static func user(thatFollows follows: [User] = []) -> User {
        let usernames = ["Quantum",
                         "Giraffe",
                         "Mystic",
                         "Penguin",
                         "Nebula",
                         "Phoenix",
                         "Zenith",
                         "Whisper",
                         "Radiant",
                         "Tiger",
                         "Lunar",
                         "Cascade",
                         "Celestial",
                         "Breeze",
                         "Ephemeral",
                         "Dragon",
                         "Cosmic",
                         "Echo",
                         "Enigma",
                         "Sparrow"]

        let index1 = Int.random(in: 0...usernames.count - 1)
        let index2 = Int.random(in: 0...usernames.count - 1)

        return User(username: "\(usernames[index1])\(usernames[index2])", follows: follows)
    }

    static func posts() -> [Post] {
        var oneHundredUsers: [User] = []

        for _ in 1...100 {
            let otherUsers = Int.random(in: 0...100)

            var follows: [User] = []

            for _ in 0...otherUsers {
                follows.append(RandomGenerator.user())
            }

            oneHundredUsers.append(RandomGenerator.user(
                thatFollows: follows
            ))
        }

        let blogpostTitleArray = [
            "Resilience",
            "Serendipity",
            "Thrive",
            "Wanderlust",
            "Illuminate",
            "Empower",
            "Unleash",
            "Harmonize",
            "Catalyst",
            "Flourish",
            "Zenith",
            "Enchant",
            "Pinnacle",
            "Catalyst",
            "Odyssey",
            "Quench",
            "Jubilant",
            "Synergy",
            "Revitalize",
            "Traverse"
        ]


        var fiveHundredPosts: [Post] = []

        for _ in 1...500 {
            let index1 = Int.random(in: 0...blogpostTitleArray.count - 1)
            let index2 = Int.random(in: 0...blogpostTitleArray.count - 1)

            fiveHundredPosts.append(Post(
                author: oneHundredUsers[Int.random(in: 0...oneHundredUsers.count - 1)],
                likes: RandomGenerator
                    .randomLikes(from: oneHundredUsers),
                title: "\(blogpostTitleArray[index1]) \(blogpostTitleArray[index2])"))
        }

        return fiveHundredPosts
    }

    static func randomLikes(from users: [User]) -> [Like] {
        let amountOfLikes = Int.random(in: 0...users.count - 1)

        var likes: [Like] = []

        for likeIndex in 0...amountOfLikes {
            likes.append(Like(user: users[likeIndex]))
        }

        return likes
    }
}
Now, rather than generating single users, we can generate multiple users, each with a list of other users they follow. In addition we can create as many as 500 posts at a time, each with authors, titles and a (random) number of likes.
Bulk add/delete operations
So, we’ve used our RandomGenerator to generate 500 posts and we now want to add them to our database.
We could just add them to our database individually, as we saw earlier:
let posts = RandomGenerator.posts()
for post in posts {
    modelContext.insert(post)
}
Or we can make this process more efficient by creating a transaction object, and simply saving the items to the database after the entire transaction is set.
We do this as follows:
let posts = RandomGenerator.posts()
                do {
                    try modelContext.transaction {
                        for post in posts {
                            modelContext.insert(post)
                        }
                        do {
                            try modelContext.save()
                        } catch {
                            // Handle your error here
                        }
                    }
                } catch {
                    // Handle your error here
                }
While the first method took 12 seconds to complete, the second only took nine seconds. That may seem like a marginal gain, but every little advantage helps when we’re sprinting towards a target.
Deleting follows the exact same process. We just need to replace:
modelContext.insert(...
with:
modelContext.delete(...
Sorting operations
Our base View, which shows us the Post, author and number of likes, will look like the one below:
struct ContentView: View {
    @Environment(\.modelContext) private var modelContext
    @Query var posts: [Post]

    var body: some View {
        VStack {
            Button {
                let posts = RandomGenerator.posts()
                do {
                    try modelContext.transaction {
                        for post in posts {
                            modelContext.insert(post)
                        }
                        do {
                            try modelContext.save()
                        } catch {
                            // Handle error
                        }
                    }
                } catch {
                    // Handle error
                }
            } label: {
                Text("Add posts")
            }

            List(posts) { post in
                VStack {
                    Text(post.title).font(.system(size: 24))
                    HStack {
                        Text(post.author.username)
                        Spacer()
                        Text(post.likes.count.description + " likes")
                    }
                }
            }
        }
        .padding()
    }
}
Sorting data
Now let’s look at some examples of queries to sort the data, which will be crucial as our app evolves and we need to extract specific information.
To sort by author/user, we can use a SortDescriptor and we’ll need to change our Query as follows:
@Query (sort: [SortDescriptor(\Post.author.username)])
var posts: [Post]
Now the Posts will be grouped by author/user when they are displayed.
Let’s say we only wanted to see posts created by the user called CascadeMystic. In this case, we would use a Predicate, as below:
@Query (filter: #Predicate<Post> { post in
        post.author.username == "CascadeMystic"
})
var posts: [Post]
Just FYI, we use SortDescriptors to sort by a specific keypath, and Predicates for filtering the objects we want to fetch.
To sum up
To use SwiftData in your app, you need to remember the following two crucial steps:
- Make the
Structs/Classesyou want to store conform to@Model. - Make your app a Container of your
@Modelswith.modelContainer (for: [MyModel.self]).
Once that’s done, you can use SwiftData in any View by adding a model context to it:@Environment(\.modelContext) private var modelContext
So now, you can read your saved types with a query:
@Query var myTypeArray: [MyModel]
Add new elements with an insert:
modelContext.insert(myElement)
And delete them:
modelContext.delete(myElement)
The more you practice and play around with this, the more you’ll see the benefits of SwiftData when adding and using local database capabilities in your apps. You can really get creative here, so let your imagination roam!
Expect The Unexpected!
Debug Faster With Bugfender