21 Minutes
Understanding Android In-App Purchases: A Developers’ Guide
Fix Bugs Faster! Log Collection Made Easy
What are Android in-app purchases?
In-app purchases, or IAPs, allow users to access certain features within our apps beyond the basic free tiers, while enabling us to monetize our products. Via the Google Play Store, we can sell a single product in all currencies, without creating a new one for each country.
Up until now, app-builders looking to revenue have tended to favor in-app ads (IAAs) over IAPs, because ad functionality is easier to implement. In fact, the latest research suggests that only 3-4% of developers currently use IAP functionality.
However, IAAs can detract from the user experience and may be less effect than regular IAPs, as they require users to see the ad, click the ad and make a purchase that’s unrelated to the mobile app itself.
As internet use continues to grow, we can expect Android in-app purchases to take a far bigger share of the e-commerce market and be a preferred strategy for app monetization.
Table of Contents
- What are Android in-app purchases?
- What are the different types of in-app purchase?
- And how do app-builders typically apply these models?
- Right, so that’s the ‘why’. Now, how do we utilize in-app purchases?
- Google Play Billing Setup
- Testing in-app purchases
- How do I manage in-app purchases on an ongoing basis?
- To sum up
What are the different types of in-app purchase?
There are three types of IAPs on Android.
- Consumables: A consumable purchase allows us to purchase extra items or benefits in the same product. For example, in a gaming app, a user needs to earn extra points to ‘live’ in the game.
- Non-consumable: A non-consumable purchase is one that is made to last a lifetime. For example, we can purchase premium features in the app.
- Subscription: There are two types of subscription features available in IAP.
- Auto-renewable: In this model, users are charged on a periodic basis until they cancel the subscription. For example, a monthly subscription to a music app.
- Non-renewing: In this model, users are charged once for a limited period. For example, they may be asked to make a one-time, six-month payment for an online magazine.
And how do app-builders typically apply these models?
Kotlin developers can apply in-app purchase models in a variety of different ways, depending on their specific audience, product category and revenue strategy.
Here are some of the most common examples:
- Freemium: These apps are free, but carry additional in-app purchase features. Most of today’s app developers use this technique.
- Paywalls: This restricts the user’s access to the app until the payment is successful, and it’s most commonly used by news app developers.
- Virtual currency: This is particularly common in gaming apps. Users purchase virtual currency using real cash and use it to buy features that provide success in the game, such as land or weapons.
Right, so that’s the ‘why’. Now, how do we utilize in-app purchases?
Before we can set up our Kotlin in-app purchases, we need to configure them in the Google Play Developer Console.
To kick things off, we need to check whether our country is supported. In other words, whether we can create an account for the app developer console as well as the merchant from our location. This will allow us to use the Google Play Billing Library in our apps. You can check your location using the “Supported Location for Developer and Merchant Registration” link.
Once we’ve passed this test, we need to create an app product in a Google Play Developer Console account. To do so, follow the steps below.
You can get access to the source code related to this article here: https://github.com/anupamsingh696/InAppPurchaseDemo
Log in to your developer account and select the app.
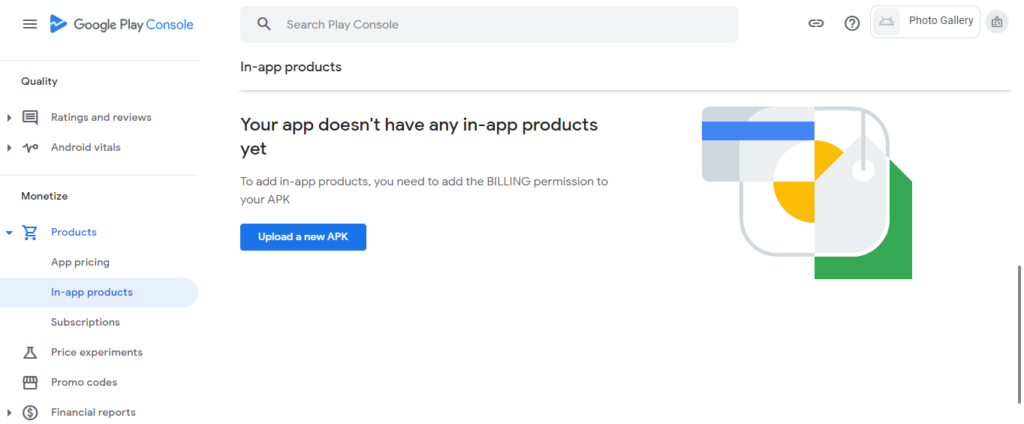
Select “In-App Products” from the left menu under Monetize -> Products -> In-App Products section. You will see the screen below.
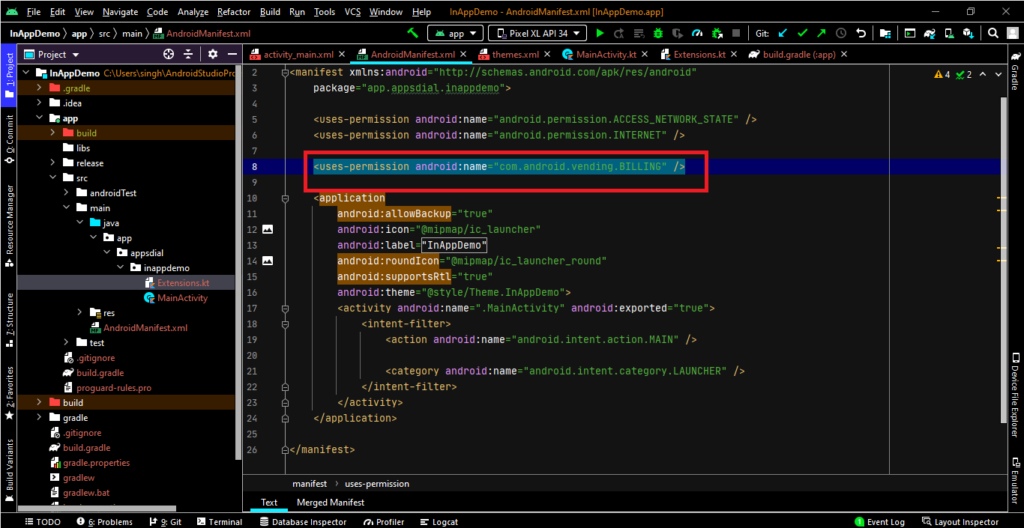
If you have not created the merchant account, no worries: you can create one using the “Create Merchant Account” link. If it has already been created, then ignore the Setup Merchant Account section (remember, without adding billing permissions to the manifest file, you can’t create an in-app product. To add billing permission, you need to simply add the below line in the manifest file).
<uses-permission android:name="com.android.vending.BILLING" />
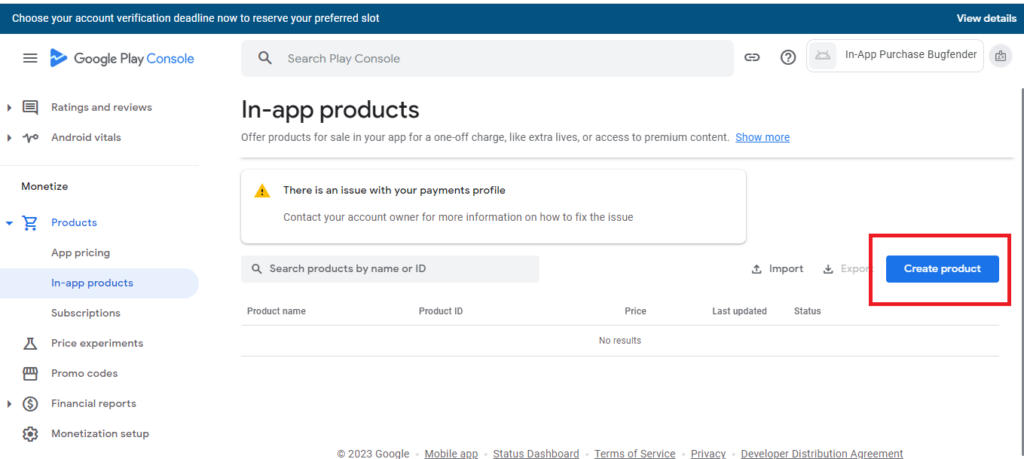
After adding the above permission to our app manifest file, we need to create a signed (.aab) file and upload it to the developer console. After uploading the (.aab) file, we will find the button Create product in the same section (App -> Monetize -> Products -> In-App Products). Now, we can create an in-app product.
Now, we need to fill out the form as per the instructions. Then we need to hit the save button. Once saved, we need to recheck properly before hitting the activate button.
After activating the product, we will find the product ID on the list. We need to use this product ID in our coding section. I’ve actually created a video on this very topic, which you can find below.
Google Play Billing Setup
Right, so we’ve made a start. We’ve handled the initial steps with the developer console account, such as merchant account setup and product creation.
Now we are going to discuss how to integrate the Google Play Billing Library SDK into our Kotlin Android app to start selling products.
Adding the library
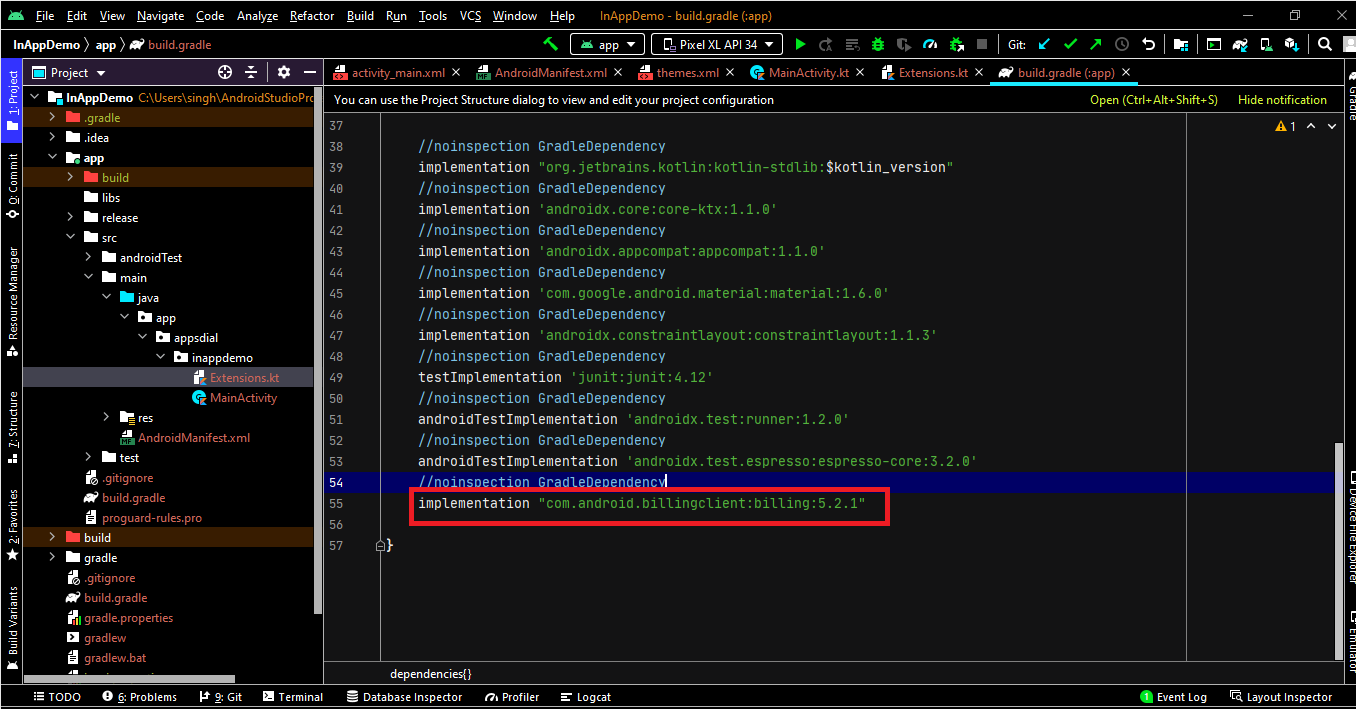
Let’s begin by examining how to add the Billing SDK to the build.gradle file. Thankfully, it’s pretty simple.
First, we go to project and click the “app” section. Under the “app” section, we will find the build.gradle file.
After clicking on the build.gradle file, we have to move the dependencies section. Under dependencies, we need to add the below line and sync the grade.
implementation("com.android.billingclient:billing:6.1.0")
If we are using Kotlin, then we can use the Kotlin extensions and Coroutines support library in the build.gradle file, as shown below.
implementation("com.android.billingclient:billing-ktx:6.1.0")implementation("com.android.billingclient:billing:5.2.1")
Listing the products
Now, we get to the more complex (and fun stuff): How to fetch the product from the Google Play developer console using the querySkuDetailsAsync(params) method and storing them in a collection to later use it.
Here’s some Kotlin code to help you:
private lateinit var mBillingClient: BillingClient
private val listOfSUKS = listOf("test_product_one", "test_product_two")

val params = SkuDetailsParams
            .newBuilder()
            .setSkusList(listOfSUKS)
            .setType(BillingClient.SkuType.INAPP)
            .build()
mBillingClient.querySkuDetailsAsync(params) { billingResult, skuDetailsList ->
            // Process the result.
            if (skuDetailsList != null) {
                if (billingResult.responseCode == BillingClient.BillingResponseCode.OK && skuDetailsList.isNotEmpty()) {
                    for (skuDetails in skuDetailsList) {
                           // fetch details from skuDetails and store in array and load in UI
                      }
                }
            }
            if (skuDetailsList != null) {
                logger(skuDetailsList[0].description)
            }

        }
After successfully connecting to Google Play, you are ready to show your products to your users within the app. However, to query in-app product details from the play console, you need to call the querySkuDetailsAsync() method with proper parameter details.
In the parameter details, you need to mention which type of product type you want to fetch using the setType() function. There are two types of products:ProductType.INAPP for one-type products and ProductType.SUBS for Subscription.
Again, we’ve got some code to help you.
setType(BillingClient.SkuType.INAPP)
You also need to pass the SKUS list in the setSkusList() function.
private val listOfSUKS = listOf("test_product_one", "test_product_two")
setSkusList(listOfSUKS)
To display a product in the app, you have to fetch SKUS details in the Async result and load the details in arrays using the for loop or foreach loop.
for (skuDetails in skuDetailsList) {
    // fetch details from skuDetails and store in array
  }
Implementing the purchase flow
To facilitate the purchase in the app, we need to call the launchBillingFlow() function in our app, as demonstrated in the code below. The function takes an instance of BillingFlowParams as a parameter.
// Launch the billing flow

private lateinit var mBillingClient: BillingClient
private val listOfSUKS = listOf("test_product_one", "test_product_two")

val billingFlowParams = BillingFlowParams
    .newBuilder()
    .setSkuDetails(listOfSUKS)
    .build()
mBillingClient.launchBillingFlow(this, billingFlowParams)
If you have already purchased an item and are going to purchase it again, you will see a screen such as the one below.
Processing Purchase
After successfully executing the launchBillingFlow() function, the app will display the product details screen to encourage users to buy or subscribe to the product. Once the user clicks on the button, the purchase flow will start.
The product details screen and upcoming all-screen will automatically appear as part of the step-by-step process that the user most undertake from the Google Play Billing SDK.
After successfully purchasing or subscribing to a product, you need to handle the response code on the onPurchaseUpdated() function. There are so many response codes in the SDK, but we need to handle a few of them, such as:
- USER_CANCELLED: When the user cancelled the purchase flow.
- OK: The user successfully purchased or subscribed to the product.
- ITEM_ALREADY_OWNED: Already purchased.
- SERVICE_TIMEOUT: The purchase time is greater than the default time.
- SERVICE_DISCONNECTED: The Internet connection failed during the purchase of the product.
Here’s some code to help you.
override fun onPurchasesUpdated(
        billingResult: BillingResult,
        purchases: MutableList<Purchase>?
    ) {
        if (billingResult.responseCode == BillingClient.BillingResponseCode.OK && purchases != null) {
            for (purchase in purchases) {
                acknowledgePurchaseDetails(purchase.purchaseToken)

            }
        } else if (billingResult.responseCode == BillingClient.BillingResponseCode.USER_CANCELED) {
            // Handle an error caused by a user cancelling the purchase flow.
            logger("User Cancelled")
            logger(billingResult.debugMessage)

        } else {
            logger(billingResult.debugMessage)
            // Handle any other error codes.
        }
    }
After a successful purchase, you need to permit Google Play to store the details for future use. Here’s some code to show you how.
// Acknowledge the Purchase to Google Play

private fun acknowledgePurchaseDetails(purchaseToken: String) {
        val params = AcknowledgePurchaseParams.newBuilder()
            .setPurchaseToken(purchaseToken)
            .build()
        mBillingClient.acknowledgePurchase(params) { billingResult ->
            val responseCode = billingResult.responseCode
            val debugMessage = billingResult.debugMessage
            logger(debugMessage)
            logger(responseCode)
        }
    }
Once you have purchased the item, you will receive an email like the following screen shot.
Testing in-app purchases
In this section, we are going to discuss how to test in-app purchase functionality in our app. To carry out this test, you need to create the app in the Google Play Console and put it live. We can’t test the debug build of our app.
Once the app has been created in Google Console, you need to create a signed bundle (.aab) file and upload it to the Play Console for Google review. Here is the full source code.
MainActivity.kt
import android.app.Activity
import android.os.Bundle
import android.widget.Button
import androidx.annotation.RequiresApi
import com.android.billingclient.api.*

class MainActivity : Activity(), PurchasesUpdatedListener {

    lateinit var btnBuyProduct: Button
    private lateinit var mBillingClient: BillingClient
    private val listOfSUKS = listOf("test_product_one", "test_product_two")

    override fun onCreate(savedInstanceState: Bundle?) {
        super.onCreate(savedInstanceState)
        setContentView(R.layout.activity_main)
        btnBuyProduct = findViewById(R.id.buttonBuyProduct)

        initBillingClient()

    }

    private fun initBillingClient() {
        mBillingClient = BillingClient.newBuilder(this)
            .enablePendingPurchases()
            .setListener(this)
            .build()
        mBillingClient.startConnection(object : BillingClientStateListener {
            @RequiresApi(31)
            override fun onBillingSetupFinished(billingResult: BillingResult) {
                if (billingResult.responseCode == BillingClient.BillingResponseCode.OK) {
                    // The BillingClient is ready. You can query purchases here.
                    logger("Setup Billing Successful")
                    loadAllSKUs()
                }
            }

            override fun onBillingServiceDisconnected() {
                // Try to restart the connection on the next request to
                // Google Play by calling the startConnection() method.
                logger("Setup Billing Failed")

            }
        })

    }

    @RequiresApi(31)
    private fun loadAllSKUs() = if (mBillingClient.isReady) {
        val params = SkuDetailsParams
            .newBuilder()
            .setSkusList(listOfSUKS)
            .setType(BillingClient.SkuType.INAPP)
            .build()
        mBillingClient.querySkuDetailsAsync(params) { billingResult, skuDetailsList ->
            // Process the result.
            if (skuDetailsList != null) {
                if (billingResult.responseCode == BillingClient.BillingResponseCode.OK && skuDetailsList.isNotEmpty()) {
                    for (skuDetails in skuDetailsList) {
                                if (skuDetails.sku == "test_product_two")
                                    btnBuyProduct.setOnClickListener {
                                        val billingFlowParams = BillingFlowParams
                                            .newBuilder()
                                            .setSkuDetails(skuDetails)
                                            .build()
                                        mBillingClient.launchBillingFlow(this, billingFlowParams)
                                    }
                            }
                }
            }
            if (skuDetailsList != null) {
                logger(skuDetailsList[0].description)
            }

        }

    } else {
        logger("Billing Client is not ready")
    }

    private fun acknowledgePurchaseDetails(purchaseToken: String) {
        val params = AcknowledgePurchaseParams.newBuilder()
            .setPurchaseToken(purchaseToken)
            .build()
        mBillingClient.acknowledgePurchase(params) { billingResult ->
            val responseCode = billingResult.responseCode
            val debugMessage = billingResult.debugMessage
            logger(debugMessage)
            logger(responseCode)
        }
    }

    override fun onPurchasesUpdated(
        billingResult: BillingResult,
        purchases: MutableList<Purchase>?
    ) {
        if (billingResult.responseCode == BillingClient.BillingResponseCode.OK && purchases != null) {
            for (purchase in purchases) {
                acknowledgePurchaseDetails(purchase.purchaseToken)

            }
        } else if (billingResult.responseCode == BillingClient.BillingResponseCode.USER_CANCELED) {
            // Handle an error caused by a user cancelling the purchase flow.
            logger("User Cancelled")
            logger(billingResult.debugMessage)

        } else {
            logger(billingResult.debugMessage)
            // Handle any other error codes.
        }
    }

}
Extensions.kt
import android.app.Activity
import android.util.Log

internal fun Activity.logger(message: String) {
    Log.d(this.localClassName, message)
}

internal fun Activity.logger(message: Int) {
    Log.d(this.localClassName, message.toString())
}
activity_main.xml
<?xml version="1.0" encoding="utf-8"?>
<androidx.constraintlayout.widget.ConstraintLayout xmlns:android="<http://schemas.android.com/apk/res/android>"
    xmlns:app="<http://schemas.android.com/apk/res-auto>"
    xmlns:tools="<http://schemas.android.com/tools>"
    android:layout_width="match_parent"
    android:layout_height="match_parent"
    tools:context=".MainActivity">

    <Button
        android:layout_width="wrap_content"
        android:layout_height="wrap_content"
        android:id="@+id/buttonBuyProduct"
        android:text="Buy Product"
        app:layout_constraintBottom_toBottomOf="parent"
        app:layout_constraintLeft_toLeftOf="parent"
        app:layout_constraintRight_toRightOf="parent"
        app:layout_constraintTop_toTopOf="parent" />

</androidx.constraintlayout.widget.ConstraintLayout>
AndroidManifest.xml
    <uses-permission android:name="android.permission.ACCESS_NETWORK_STATE" />
    <uses-permission android:name="android.permission.INTERNET" />
    <uses-permission android:name="com.android.vending.BILLING" />

    <application
        android:allowBackup="true"
        android:icon="@mipmap/ic_launcher"
        android:label="@string/app_name"
        android:roundIcon="@mipmap/ic_launcher_round"
        android:supportsRtl="true"
        android:theme="@style/Theme.InAppDemo">
        <activity android:name=".MainActivity" android:exported="true">
            <intent-filter>
                <action android:name="android.intent.action.MAIN" />

                <category android:name="android.intent.category.LAUNCHER" />
            </intent-filter>
        </activity>
    </application>
Got any more queries? Then please check the below video, where I explain the process in detail.
Right. But how do I test in the app-purchase code?
So now you’ve set up the code in Android Studio and are trying to run it on a simulator. But you don’t see the output, right?
If not, no worries. You can test the code internally in an Android device before launching it on Google Play. Let’s start by learning how to test an .apk or.aab file using internal testing.
Login to your Developer Play Console > Select App

Select Release from the left-hand side menu > Testing > Internal Testing > Testers > Click License Tester arrow
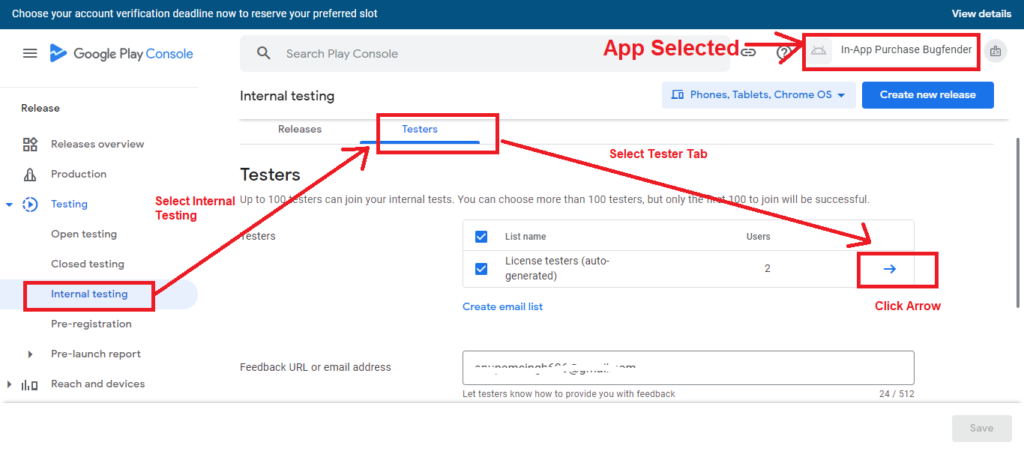
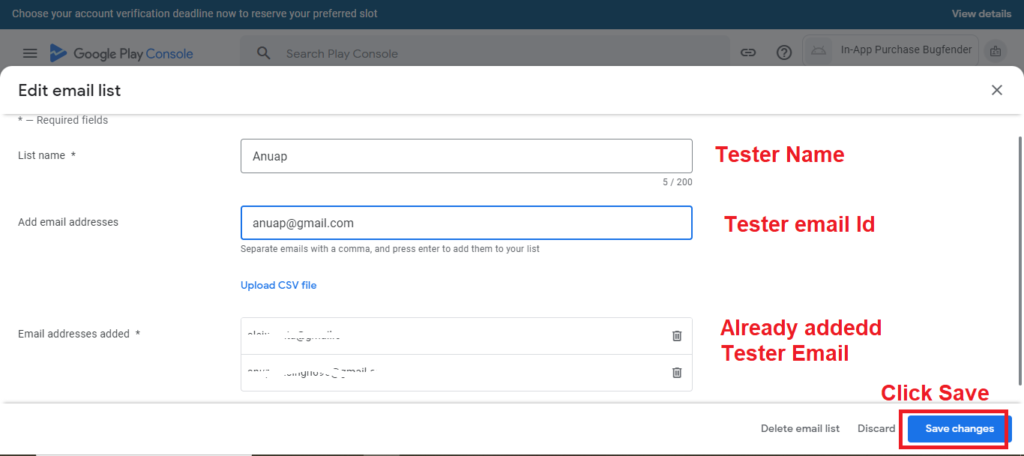
Fill out the form and click Save Changes. If you need more than one email, then press enter.
After adding the tester, copy the link address and share it with the tester.

The tester will need to accept the terms and conditions before clicking on the download button.
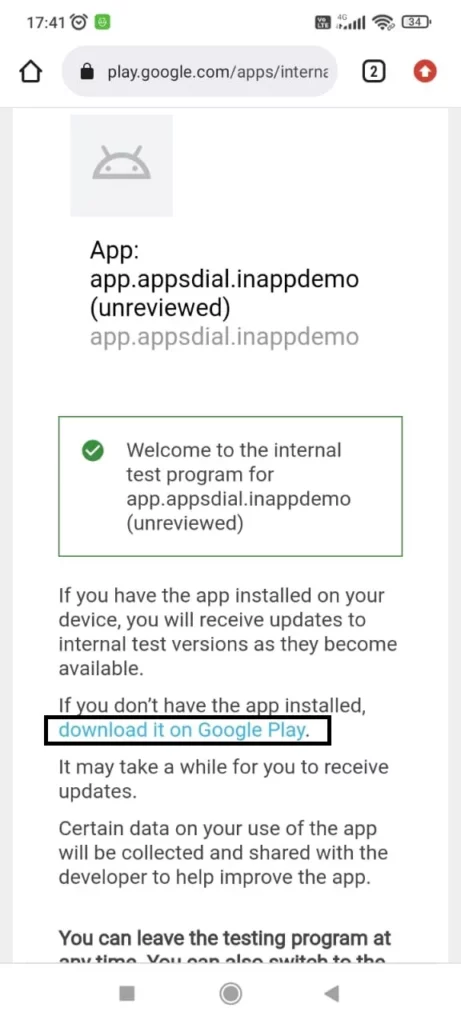
Now the tester is ready to test, and the they will receive the exact same output shown above.
How do I manage in-app purchases on an ongoing basis?
This is crucial. In-app purchases can throw up all kinds of edge cases, so we need to ready.
Thankfully, there are lots of products we can use here. Let’s look at some of them.
RevenueCat
This provides an easy and beautiful backend interface to manage and optimize in-app purchases and subscriptions on iOS, Android, and Web apps. It also provides an SDK for developers to integrate into Android apps.
To implement the SDK, developers need to write the following line in the build.gradle file under dependency.
implementation 'com.revenuecat.purchases:purchases:7.0.0'
For more detail on the integration process, click here.
Adapty
Like RevenueCat, Adapty is an alternative product to handle in-app purchases on Android. By using their SDK, developers need integrate only five methods: makePurchase(), restorePurchase(), identify(), updateProfile(), and updateAttribution().
To implement the SDK, developers need to write the following line in the build.gradle file under dependency.
implementation 'io.adapty:android-sdk:2.9.0'
For more detail on how to integrate an Android app, click here.
Qonversion
The Qonversion SDK is available for iOS, Android, React Native, Flutter, Unity and Web. No server code is required to implement this SDK.
To implement an Android app, developers need to add the below line in the build.gradle file under dependency.
implementation 'io.qonversion.android.sdk:sdk:6.+'
For more detail on how to integrate an Android app, click here.
Glassfy.io
Glassfy.io is an open-source SDK that provides real-time subscription and in-app purchase event implementation on Android apps, as well as out-of-the-box monetization.
To sum up
Android in-app purchases are one of the most important aspects in planning your app monetization. They allow developers to add new income streams offering additional features, content, and services within their apps, while users can enhance their experience and unlock premium features all within his mobile device.
Using Google Play Billing, developers can choose from different in-app purchase models like one-time purchases, subscriptions, and consumable products. Using Android features, as a developer you can create a very convenient purchase flow, allowing the user to make the purchases without leaving the app, increasing the likelihood of successful purchases.
But remember, If you are planning to generate huge money through in-app purchases, then you should take special care on security, bug-freeness, smoothness, and unique features in your app.
Expect The Unexpected!
Debug Faster With Bugfender

Anupam Singh
Anupam Singh is a Native Android Developer as well as Hybrid Mobile App Developer. More than 10 years of experience in Developing Mobile Apps. He is a technology blogger. Follow him on Linkedin to stay connected.