28 Minutes
iOS Core Data Explained: Storing data using Swift
Fix Bugs Faster! Log Collection Made Easy
Core Data enables us to manage the model layer of an Apple application. This layer is a crucial part of our app’s engine room, allowing the pretty bits at the front end to interact with the data and business logic at the back.
We love Core Data because it provides a powerful database technology framework, and it’s built on top of the SQLite management system, which requires zero configuration or external storage space. It also runs on an Object Oriented interface, which is great for re-usable code.
Like all frameworks, however, Core Data framework takes some time to master. So in this post, we’re going to give you the building blocks of your knowledge, looking at specific themes such as how to manage data, how to set up entities and how to add, delete, and modify data.
This piece on Core Data is part of our comprehensive iOS Data Persistence series, which delves into the various data storage options accessible to iOS developers on mobile devices. Our series also explores Swift Data, Realm, and other relevant technologies in detail.
Table of Contents
First, what are the benefits of Core Data?
There’s a whole bunch of stuff we could prise open here, but this is a tutorial, not a pitch. So we’ll just give you a few top-line advantages that you’ll find when you bring Core Data into your life.
- Abstraction: As
Core Dataabstracts the underlyingData Model, developers are able to work with high-level object-oriented representation of the data - Storage and Retrieval:
Core Dataallows for efficient data storage and retrieval, particularly when dealing with large datasets. - Relationship Management:
Core Dataprovides a simple way of handling relationships between entities in aData Model. - Querying and Filtering:
Core Data‘s querying and filtering mechanism uses theNSPredicateclass, allowing developers to easily filter and fetch data from the persistent store.
Plus all the benefits we mentioned at the top. So it’s pretty useful, really.
Now, let’s get started on setting up Core Data
To set up Core Data, we’ll first need our model, which we’ll create following the steps below:
- In
Xcode, click onFile, then chooseNew, andFile. - There, choose
Data Modelunder theCore Datasection. - Name the
Data Model, and click create.
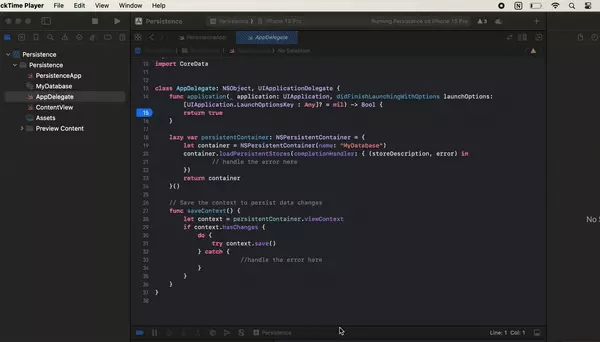
This video demonstrates the process:

Simple, right? Now we have our Core Data model.
Creating our Core Data Stack
In this article we’ll be using SwiftUI, the first language of modern Apple development. So let’s have a look at setting up our Core Data stack.
First we’ll create a new file (File > New > File > Swift File) called DataController. Once we’ve created the DataController, the code should be as follows:
import CoreData

class DataController: ObservableObject {
    let container = NSPersistentContainer(name: "MyDatabase")

    init() {
        container.loadPersistentStores { description, error in
            if let error = error {
                print("Core Data failed to load: \(error.localizedDescription)")
            }
        }
    }
}
Next, we’ll head to the root of our app and add the following code to the launch:
struct PersistenceApp: App {
    @StateObject private var dataController = DataController()

    var body: some Scene {
        WindowGroup {
            ContentView()
                .environment(\.managedObjectContext,
															dataController.container.viewContext)
        }
    }
}
This is pretty much ‘boilerplate’ code, and it won’t change much when we use different Core Data models (in other models, we’d simply need to change the MyDatabase to match the name of the respective model).
So we now have our Core Data stack to use throughout our app.
Creating our database, entities and models
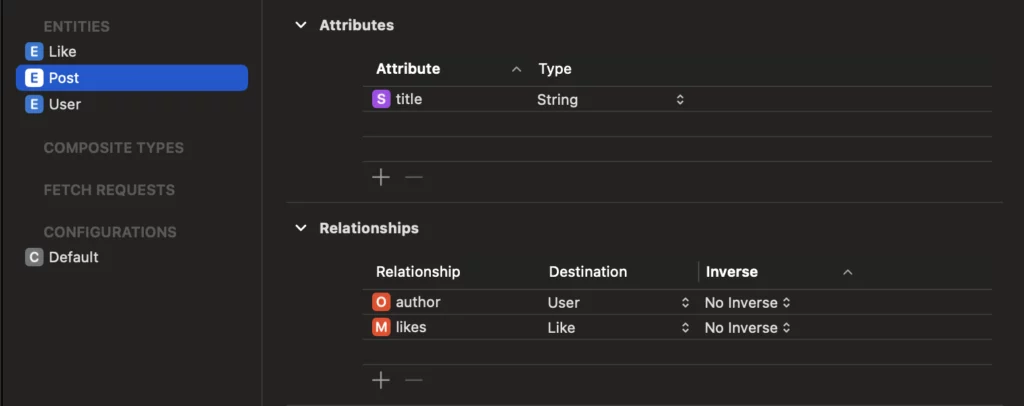
Now we’ve created the stack, we can create our database. This is what it will look like:
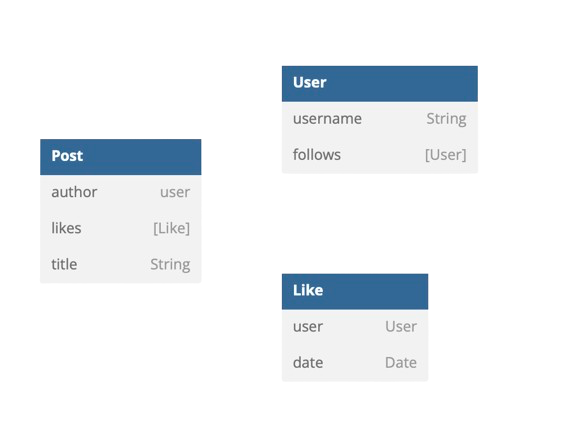
It’s a simplified version of a social media Post on a social app and we’ll be persisting three objects:
- A
Postthat will have atitle,author, and a list oflikes. - A
Userthat will have ausername, and follow otherUsers. - A
Like, that has a certain likedateand is associated with aUser.
Creating our entities
Now we know what our entities will look like, we can get to the business end and start creating them on our database.
We’ll start by selecting the MyDatabase file we created earlier and, once selected, we’ll have the Add Entity button available.
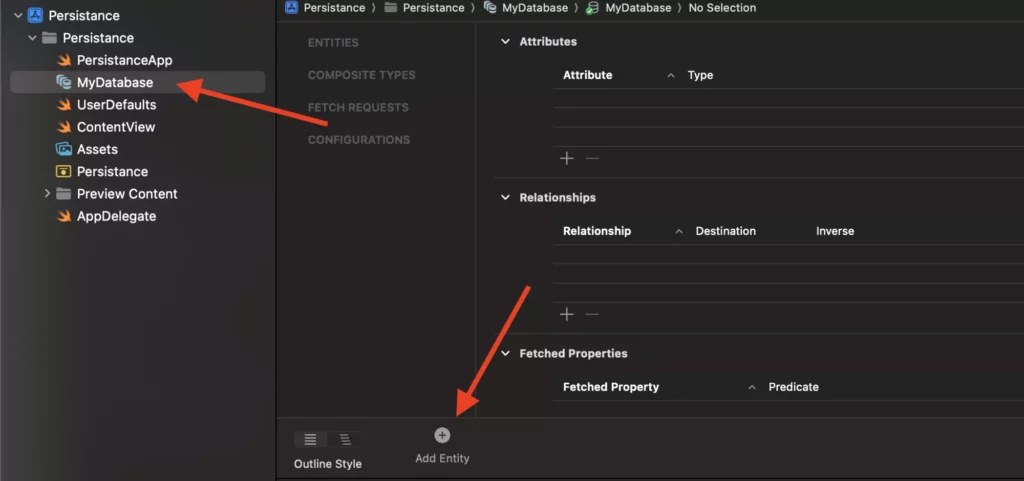
We can now go ahead and create the entities we mentioned earlier.
Let’s start with the User. The user will have one Attribute (the username), and a one-to-many relationship with the User entity.
This is how we add a user and set the respective attributes and relationships:
Now, we can do the same for the other two entities:
Like will have one attribute date, and a one-to-one relationship with the User:
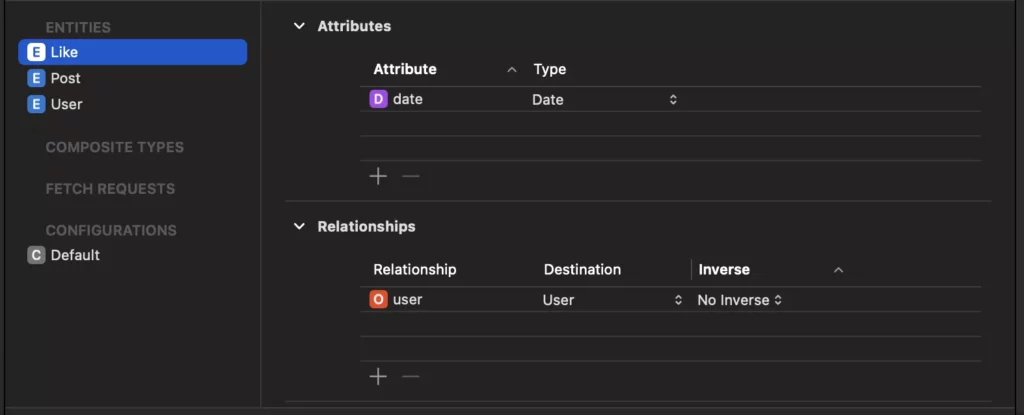
Post, will have one attribute title, and two relationships:
- Author: a one-to-one relationship with
User. - Likes: one-to-many relationship with
Like.
So, all our entities are now set up and ready to use. And here’s the fun part: now we get to create the models to use with them, so there’s no need to be worried about creating managed objects anymore, Xcode will do it for us.
Creating our models
We could create our models manually. However, that’s not necessary, because Xcode has the functionality to create them for us with all the necessary Core Data stack, so there’s no need to be worried about creating managed objects anymore.
We simply need to select our database, then select Editor on the top navigation bar and Create NSManagedObject Subclass. Then just follow the steps provided by Xcode:
That’s it! We have created a Core Data entity for each of our models. We know, from the questions we get at Bugfender, that a lot of readers get het up about Core Data and worry about its complexity. But actually, as you’ll see, most of the foundations are pretty straightforward.
Let’s take a look at some basic Core Data operations
Now we’ve set up our stack and models, we can start looking at how we can use them to store, read and delete data. This is another part of the process you’ll really enjoy.
Adding data to Core Data
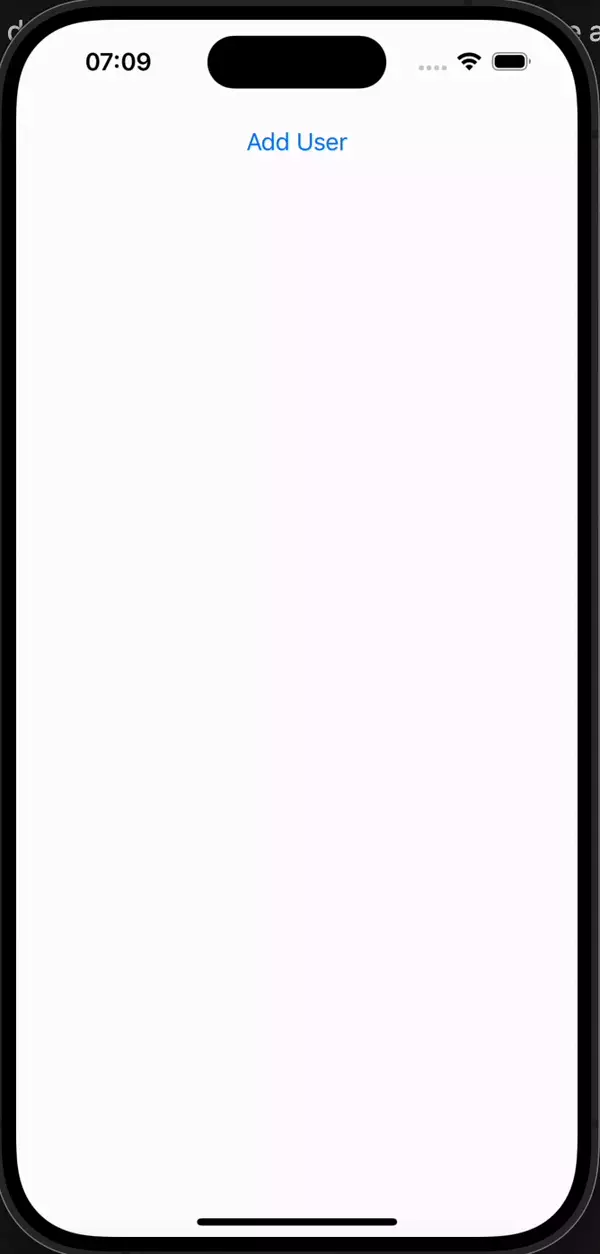
We’ll see a simple screen with a button on top. This button will create a random User and save it in our Core Data database.
To do this, our View needs to access the Core Data managed object context (which is provided through an environment var), and add an element to our context, saving it afterwards.
We’ll use the following class to provide us with randomly generated usernames:
class RandomGenerator {
    static func username() -> String {
        let usernames = ["Quantum", "Giraffe", "Mystic", "Penguin", "Nebula", "Phoenix", "Zenith", "Whisper", "Radiant", "Tiger", "Lunar", "Cascade", "Celestial", "Breeze", "Ephemeral", "Dragon", "Cosmic", "Echo", "Enigma", "Sparrow"]

        let index1 = Int.random(in: 0...usernames.count - 1)
        let index2 = Int.random(in: 0...usernames.count - 1)

        return  "\(usernames[index1])\(usernames[index2])"
    }
}
Now that we can generate the usernames, our View will look like this:
import SwiftUI
import CoreData

struct ContentView: View {
    @Environment(\.managedObjectContext)
    var context
		// Here we access the Environment variable that provides us the Core Data Context

    var body: some View {
        VStack {
            Button(action: {
                let user = User(context: context)
								// We create a user in the given context
                user.username = RandomGenerator.username()
                try? context.save()
								// It can now be saved with our new user
            }, label:{
                Text("Add User")
            })
        }
        .padding()
    }
}

#Preview {
    ContentView()
}
Each button tap will add a random user, but we’ll need to add a way to read the data to check whether it’s working.
Reading data from Core Data
To read the data, we’ll add a FetchRequest(to fetch data for us), and a List that shows all available users. This is what we add to our View:
import SwiftUI
import CoreData

struct ContentView: View {
    @Environment(\.managedObjectContext)
    var context

    @FetchRequest(sortDescriptors: [])
    var users: FetchedResults<User>
		// Our Fetch Request, that simply fetches all our Users

    var body: some View {
        VStack {
            Button(action: {
                let user = User(context: context)
                user.username = RandomGenerator.username()
                try? context.save()
            }, label:{
                Text("Add User")
            })

						List {
              ForEach(users, id: \.self) { user in
                  Text(user.username ?? "")
              }
            }
						// The list that will show all available users
        }
        .padding()
    }
}

#Preview {
    ContentView()
}
We can now add users and read them, so the only basic operation we haven’t covered is deleting.
Deleting data from Core Data
To delete data from our Database, we just need to use a .delete:
ourContext.delete(ourObject)
To illustrate the process, let’s add a way to show a delete button on our list, and then delete the appropriate object:
List {
  ForEach(users, id: \.self) { user in
      Text(user.username ?? "")
  }
  .onDelete(perform: { offsets in
      context.delete(users[offsets.first ?? 0])
   })
}
And that’s the coding done! We now know how to set up basic operations, another major brick in the wall.
Testing our operations and app
We should now be able to add users, see the user list, and delete users from the list by dragging to the left, as shown below:
Now for some more advanced Core Data operations
Let’s have a look at some operations on a slightly more complex scale (if we’re going a bit too fast and you have questions, then you can always contact us with your query. [email protected]. Just so you know :)).
Generating data
First we’ll need to generate data for use in our demonstration examples, and for this we’ll need to completely change our RandomGenerator so it can generate more complex example structures.
Our new RandomGenerator will be:
class RandomGenerator {
    static func user(in context: NSManagedObjectContext, thatFollows follows: [User] = []) -> User {
        let usernames = ["Quantum",
                         "Giraffe",
                         "Mystic",
                         "Penguin",
                         "Nebula",
                         "Phoenix",
                         "Zenith",
                         "Whisper",
                         "Radiant",
                         "Tiger",
                         "Lunar",
                         "Cascade",
                         "Celestial",
                         "Breeze",
                         "Ephemeral",
                         "Dragon",
                         "Cosmic",
                         "Echo",
                         "Enigma",
                         "Sparrow"]

        let index1 = Int.random(in: 0...usernames.count - 1)
        let index2 = Int.random(in: 0...usernames.count - 1)

        let user = User(context: context)
        user.username = "\(usernames[index1])\(usernames[index2])"

        follows.forEach({
            user.addToFollows($0)
        })

        return user
    }

    static func posts(in context: NSManagedObjectContext) -> [Post] {
        var oneHundredUsers: [User] = []

        for _ in 1...100 {
            let otherUsers = Int.random(in: 0...100)

            var follows: [User] = []

            for _ in 0...otherUsers {
                follows.append(RandomGenerator.user(in: context))
            }

            oneHundredUsers.append(RandomGenerator.user(
                in: context,
                thatFollows: follows
            ))
        }

        let blogpostTitleArray = [
            "Resilience",
            "Serendipity",
            "Thrive",
            "Wanderlust",
            "Illuminate",
            "Empower",
            "Unleash",
            "Harmonize",
            "Catalyst",
            "Flourish",
            "Zenith",
            "Enchant",
            "Pinnacle",
            "Catalyst",
            "Odyssey",
            "Quench",
            "Jubilant",
            "Synergy",
            "Revitalize",
            "Traverse"
        ]

        var fiveHundredPosts: [Post] = []

        for _ in 1...500 {
            let index1 = Int.random(in: 0...blogpostTitleArray.count - 1)
            let index2 = Int.random(in: 0...blogpostTitleArray.count - 1)

            let post = Post(context: context)

            post.author = oneHundredUsers[Int.random(in: 0...oneHundredUsers.count - 1)]
            RandomGenerator.randomLikes(in: context,
                                        from: oneHundredUsers).forEach({
                post.addToLikes($0)
            })

            post.title = "\(blogpostTitleArray[index1])\(blogpostTitleArray[index2])"

            fiveHundredPosts.append(post)
        }

        return fiveHundredPosts
    }

    static func randomLikes(in context: NSManagedObjectContext, from users: [User]) -> [Like] {
        let amountOfLikes = Int.random(in: 0...users.count - 1)

        var likes: [Like] = []

        for likeIndex in 0...amountOfLikes {
            let like = Like(context: context)
            like.user = users[likeIndex]
            likes.append(like)
        }

        return likes
    }
}
Bulk adding data
Our new RandomGenerator can generate 500 posts at once and we can add all those objects to our database in bulk, like this:
let posts = RandomGenerator.posts()

posts.forEach({ element in
    context.insert(element)
})

try? context.save()
The process is similar to adding a single item. The key difference is that when adding a single item, we save the context after, but when adding in bulk we add them all to the context first, and only after they’ve all been added do we save the context.
More complex queries
Now let’s create some more complex queries. To do this our base View (which will show us the Post name, author name, and amount of likes), will be as follows:
struct ContentView: View {
    @Environment(\.managedObjectContext)
    var context

    @FetchRequest(sortDescriptors: [])
    var posts: FetchedResults<Post>


    var body: some View {
        VStack {
            Button {

                let posts = RandomGenerator.posts(in: context)
                posts.forEach({ element in
                    context.insert(element)
                })
                try? context.save()

            } label: {
                Text("Add 500 posts")
            }

            List {
                ForEach(posts, id: \.self) { post in
                    VStack {
                        Text(post.title ?? "").font(.system(size: 24))
                        HStack {
                            Text(post.author?.username ?? "")
                            Spacer()
                            Text((post.likes?.count.description ?? "") + " likes")
                        }
                    }                }
            }
        }
        .padding()
    }
}

#Preview {
    ContentView()
}
Right, we’re really on a roll now. So let’s look at some examples of how we can change our queries to better suit our needs:
Sorting data
First, let’s look at sorting the data by author and alphabetically. To do this we’ll use a sort on our list, which means changing our FetchRequest as follows:
@FetchRequest(sortDescriptors: [
        NSSortDescriptor(key: "author.username", ascending: true)
    ])
    var posts: FetchedResults<Post>
We should now see our Posts grouped by user and in alphabetical order.
Filtering data
If we wanted to filter the data (e.g. so we only see posts from ‘EchoLunar’), we can use a Predicate to specify what data we would like to fetch, like this:
@FetchRequest(predicate: NSPredicate(
													format: "author.username == %@", "EchoLunar")
							)
var posts: FetchedResults<Post>
We can use SortDescriptors to sort by a specific keypath, Predicate clauses for filtering the objects we want to fetch, or even combine the two for greater flexibility.
Bulk deleting data
Ok, now let’s say we wanted to delete all posts with a specific title. For this, we’d change our .onDelete modifier to the following:
.onDelete { indexSet in
                    posts.filter {
                        $0.title == posts[indexSet.first ?? 0].title
                    }.forEach {
                        context.delete($0)
                    }
                    try? context.save()
                }
Now, we can delete all posts with the same title with one click.
Our final View
Now we’re at the final stage in the funnel. We hope it’s been a fun tour!
To take a look at our final View, we can:
- Add 500 posts with one click of a button
- Filter to only shows posts by ‘EchoLunar’
- Order alphabetically by author
- Bulk delete every post with the same title
struct ContentView: View {
    @Environment(\.managedObjectContext)
    var context

    @FetchRequest(sortDescriptors: [
        NSSortDescriptor(key: "author.username", ascending: true)
    ], predicate: NSPredicate(
        format: "author.username == %@", "EchoLunar")
    )
    var posts: FetchedResults<Post>


    var body: some View {
        VStack {
            Button {

                let posts = RandomGenerator.posts(in: context)
                posts.forEach({ element in
                    context.insert(element)
                })
                try? context.save()

            } label: {
                Text("Add 500 posts")
            }

            List {
                ForEach(posts, id: \.self) { post in
                    VStack {
                        Text(post.title ?? "").font(.system(size: 24))
                        HStack {
                            Text(post.author?.username ?? "")
                            Spacer()
                            Text((post.likes?.count.description ?? "") + " likes")
                        }
                    }
                }.onDelete { indexSet in
                    posts.filter {
                        $0.title == posts[indexSet.first ?? 0].title
                    }.forEach {
                        context.delete($0)
                    }
                    try? context.save()
                }
            }
        }
        .padding()
    }
}

#Preview {
    ContentView()
}
To sum up
Core Data is a database framework built on top of SQLite, which provides an Object Oriented interface to manage data. And it’s awesome, for all the reasons we mentioned at the top.
To use Core Data in an app, we should:
- Create/add a
Data Model(File > New > File > Data Model). - Add entities to the
Data Modelthat match the objects we’d like to use. - Create
NSManagedObjectsubclasses for our entities. - Create a
DataControllerclass that provides am environmental context anywhere in the app.
Now we can:
- Use our database context anywhere:
@Environment(\.managedObjectContext)

var contex- Read the records for any
Viewwith aFetchRequest:
@FetchRequest var myCollection: FetchedResults<MyType>(using myCollection now fetches all records of a given type)
- Add elements to (or delete them from) our context:
context.insert(myElement)

context.delete(myElement)- Save our context to make sure everything is persisted:
try? context.save()- Sort our
FetchRequestswithSortDescriptors, or filter them withPredicates, for more complex operations.
While it may be more complex than SwiftData, Core Data is a great database solution to use. It’s been around for longer and is tried and tested on thousands of apps, so you know it’s going to stand up to anything. Have fun using it!
Expect The Unexpected!
Debug Faster With Bugfender