Introduced in iOS 14, App Clips allow users to quickly access a specific feature within an application (e.g. paying for parking or ordering a coffee) without downloading the full app. So they allow our users to interact with our apps on their terms, creating more targeted interactions that benefit us as well as them.
Despite being around for over three years, App Clips is still relatively unknown among developers, which is surprising given its potential for transforming the way businesses engage with customers.
So in this article, we’re going to create an App Clip for a fictitious coffeehouse chain called Costra Coffee, then use the clip to showcase the key features and functionality that you can incorporate into your own app.
Table of Contents
But first, what exactly are iOS App Clips?
App Clips provide a scaled-back version of an iPhone app that focuses purely on the part that user needs, providing a convenient way to quickly and efficiently interact with an app’s core capabilities.
How are they accessed?
App Clips can be discovered and used via Safari, Maps and by invitation through messages. In addition, when users are out in the real world, App Clips can be accessed by scanning a QR code, NFC tag, or App Clip Code (this might be the easiest way, as its unique design makes it easy to recognize).
What are the benefits?
App Clips can increase app discoverability and boost user goodwill, showing them that our apps are quick, sleek and adaptable to our audience.
By providing a lightweight version of the app, users can quickly access the specific features they need without having to download and install the entire app, saving storage space and bypassing the traditional app installation process.
iOS 17 updates for App Clips
Apple’s iOS 17 update added more accessibility features for App Clips, enabling users to access App Clips by simply swiping left from their home screen and finding the corresponding App Clip card in the App Library. This eliminated the need to scan QR codes, NFC tags or App Clip Codes.
Another new addition, App Clip Suggestions, uses machine learning to predict which App Clips users are most likely to need in a certain context, then displays these suggestions on the lock screen or in the Siri suggestions widget.
Apple has continued to prioritize user convenience and accessibility with subsequent iOS 17 updates, including:
- New size limit – Increasing the maximum file size for an App Clip to 50MB when accessed digitally, and 15MB when accessed physically (i.e. with a QR code, NFC tag or App Clip Code).
- Default app links – Enabling App Clips to be launched by visiting a URL, which is created automatically when App Clip experiences are built in App Store Connect.
https://appclip.apple.com/id?p=<bundle_id>&key=value - Launch App Clips from any app – The addition of an API that can create a tappable App Clip preview for invocation. After retrieving metadata from
LPMetadataProvider, the API provides the data toLPLinkViewto render a preview, as shown in the example below:
let lpProvider = LPMetadataProvider()

lpProvider.startFetchingMetadata(for: url) { (metadata, error) in
    guard let metadata = metadata else {
        return
    }

    DispatchQueue.main.async {
        lpView.metadata = metadata
    }
}
- Launch App Clips from SwiftUI – The ability to launch an App Clip from SwiftUI by creating the URL with your bundle identifier, and adding the URL to a Link() in your SwiftUI, as follows:
var body: some View {
    let url = URL(
        string: "<https://appclip.apple.com/id?p=com.bugfender.costracoffee.CostraCoffee.clip>"
    )!

    Link("Backyard Birds", destination: url)
}
- Launch app clip from
UIApplication– Enabling us to launch an App Clip from any UIKit-based app, like this:
func launchAppClip() {
    let url = URL(
        string: "<https://appclip.apple.com/id?p=com.bugfender.costracoffee.CostraCoffee.clip>"
    )!

    UIApplication.shared.open(url)
}
Right, now let’s start creating an iOS App Clip
First, before jumping on the Xcode, let’s familiarise ourselves with App Clip’s basic architecture and lifecycle.
The full source code of this tutorial is available here: https://github.com/bugfender-contrib/costra-coffee
Architecture
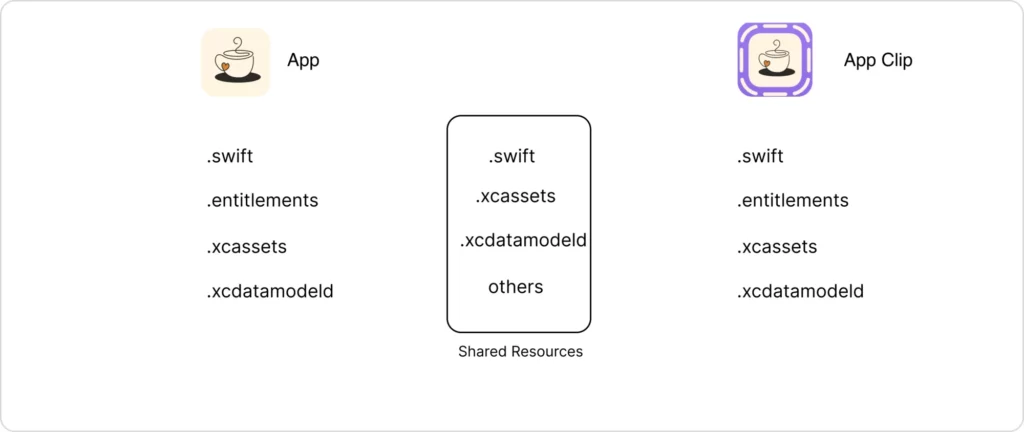
- App Clip bundle – This standalone bundle contains the necessary assets, code, and resources for the App Clip to perform its specific function. Only components essential for the App Clip’s purpose are included, minimizing the storage required.
- App Clip entitlements – The specific capabilities granted to the App Clip (such as access to location services or Apple Pay), required to support its functionality.
- App Clip identifier – A unique identifier that distinguishes it from other App Clips, allowing users to trigger its launch.
- App Clip target – A target within an Xcode project that contains the specific code and resources necessary for the App Clip. This is kept separate from the main app target so the clip stays lightweight.
- App Clip link – A deep link that directs users to the App Clip when clicked. It can be shared via messages, social media, or other channels.
- On-Demand resources – App Clips can utilize on-demand resources to load additional content dynamically when needed, minimizing the initial download size.
Lifecycle
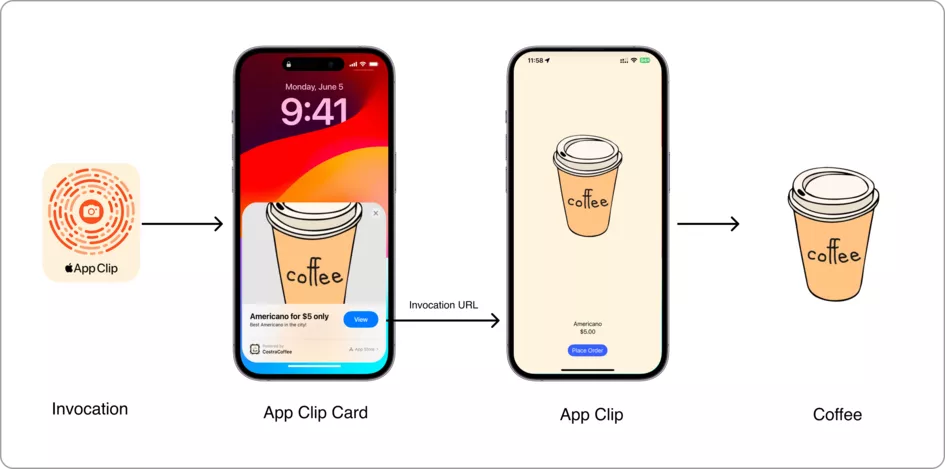
The App Clip’s lifecycle is designed to create a clear user journey, encouraging them to progress to the full app.
- Invocation – The method by which the App Clip is triggered (e.g. scanning an NFC tag or clicking a link), starting the App Clip lifecycle.
- App Clip card – When triggered, the system quickly launches the App Clip from the App Clip card, giving the user immediate access to its features.
- App Clip interface – The App Clip interface is presented after launch and is usually simple and focused on its function.
- Performing the function – The user triggers the App Clip to complete the function.
- Transitioning to the full app – If the user wants to access additional features or content beyond the App Clip’s possibilities, they can choose to transition to the full app. This transition is seamless, allowing users to continue their journey without interruption.
- Exiting the App Clip – Once the user completes (or abandons) their task and decides to exit the App Clip, the interface is dismissed. The system manages the clean-up procedure, releasing all resources.
- Background refresh – In some cases, App Clips may continue running in the background to support features like location updates or push notifications.
- Deactivation and termination – If the App Clip hasn’t been used for a long time or if system resources get low, the system may switch itself off or terminate the clip to make room for other jobs.
Beginning the build
As we mentioned, we’ll be using a fictional coffee house chain.
Before we start, we’ll need to create an iOS app for Costra Coffee, after which we’ll be able to add our App Clip as a target. We won’t go into detail on the creation of the iOS app, but the source code for both the app and the App Clip can be found at the end of the article.
App section
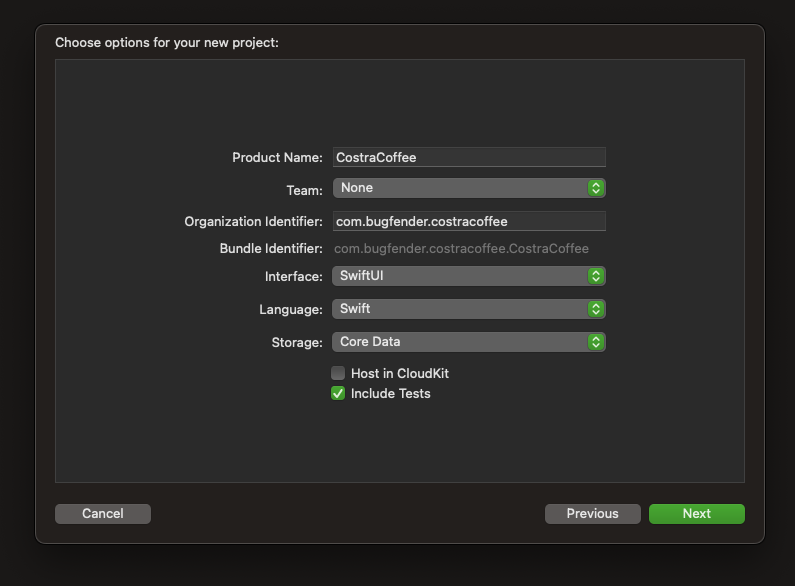
Just open the Xcode, create an app, and choose your name for the project – in our case CostraCoffee. We chose SwiftUI and Swift for our project (rather than other Apple programming languages) as they offer a contemporary and effective way to construct user interfaces.
Next we’ll add a new target to the project and select the App Clip, as follows:
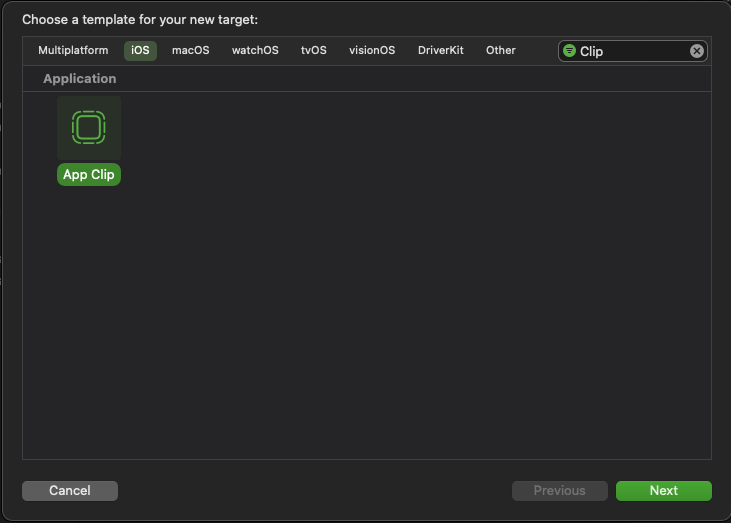
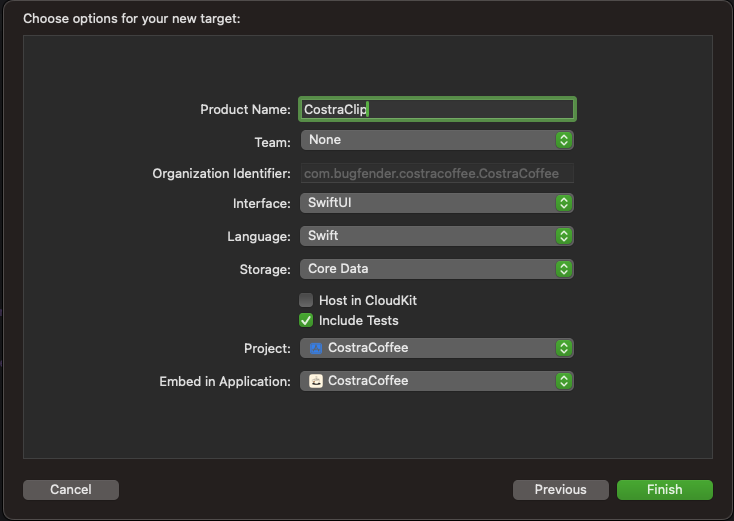
Our project structure should now look like this:
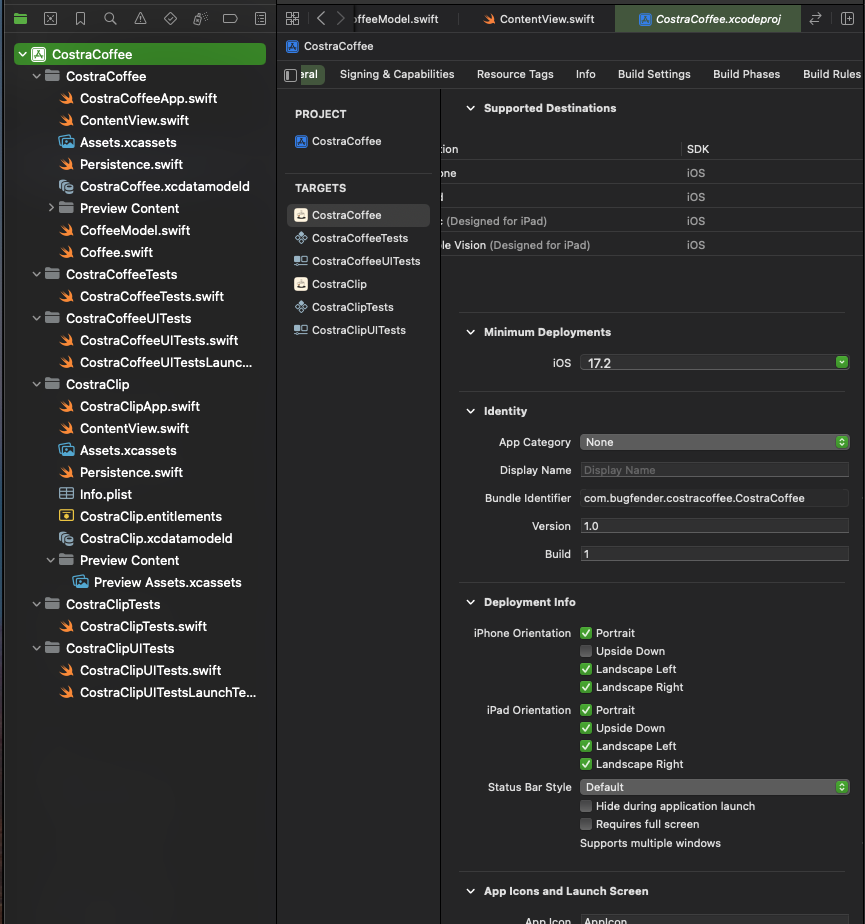
SwiftUI follows MVVM (Model, View, and View-Model) architecture and Xcode has a default view built in (ContentView), which is enough for us. Now, we’re going to create Coffee.swift (Model) and CoffeeModel.swift (ViewModel).
Coffee.swift has the struct Coffee, which conforms to the identifiable protocol (used to identify between different instances of a type. The confirming type often contains a unique ID).
We’ve also created an extension of the coffee struct, which returns a static list of coffee we need for our List.
Great! So we’ve completed our Model and next we’ll create our ViewModel.
import Foundation

struct Coffee: Identifiable {
    var id: String
    var name: String
    var price: Double
    var image: String
}

extension Coffee {
    static func list() -> [Coffee] {
        return [Coffee(id: "1", name: "Americano", price: 5.00, image: "coffee"), Coffee(id: "2", name: "Latte", price: 7.50, image: "coffee"),
                Coffee(id: "3", name: "Frappuccino", price: 8.00, image: "coffee"), Coffee(id: "4", name: "Iced Coffee", price: 7.99, image: "coffee")
        ]
    }
}
Our ViewModel class, CoffeeModel, publishes two variables whenever updated. These are:
- Function
fetchCoffeeupdates the list variable with a static coffee list from the Coffee model. - Function
findCoffeeByIdupdates theselectedItemvariable with a Coffee object. It finds the object using its id.
final class CoffeeModel: ObservableObject {
    @Published public var list: [Coffee] = [Coffee]()
    @Published public var selectedItem: Coffee?

    public func fetchCoffee() {
        list = Coffee.list()
    }

    public func findCoffeeById(id: String) {
        let coffee = Coffee.list().filter { $0.id == id }
        selectedItem = coffee[0]
    }
}
Our List now displays coffee items fetched from CoffeeModel.
The most important part here is our model variable. This is a property wrapper which indicates that the view observes changes to the CoffeeModel instance and updates the View when the model changes.
import SwiftUI
import CoreData

struct ContentView: View {
    @ObservedObject private var model: CoffeeModel = CoffeeModel()

    var body: some View {
        VStack {
            Spacer()
            Image("costra_logo")
                .resizable()
                .frame(width:280, height: 106)
            List (self.model.list, id: \.id) { item in
                HStack {
                    Image("coffee")
                        .resizable()
                        .frame(width: 50.0, height: 50.0)
                    VStack (alignment: .leading){
                        Text(item.name)
                        Text("\(item.price, specifier: "$%.2f")")
                    }
                }
                .frame(height: 80)
                .listRowBackground(
                    RoundedRectangle(cornerRadius: 8)
                        .background(Color.clear)
                        .foregroundColor(Color("list_item_bg"))
                        .padding(
                            EdgeInsets(
                                top: 5,
                                leading: 5,
                                bottom: 5,
                                trailing: 5
                            )
                        )
                )
                .listRowSeparator(.hidden)
            }
            .scrollContentBackground(.hidden)
            .background(Color("body"))
            .onAppear(perform: {
                model.fetchCoffee()
            })
        }
        .background(Color("body"))
    }

}
Now we can select the CostraCoffee scheme and run the project on a simulator or device to see the changes.
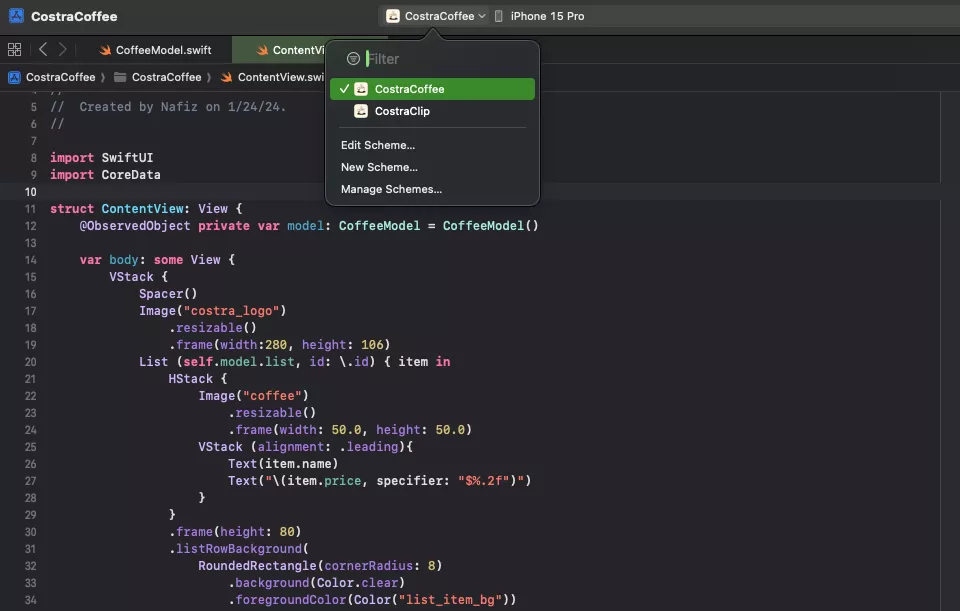
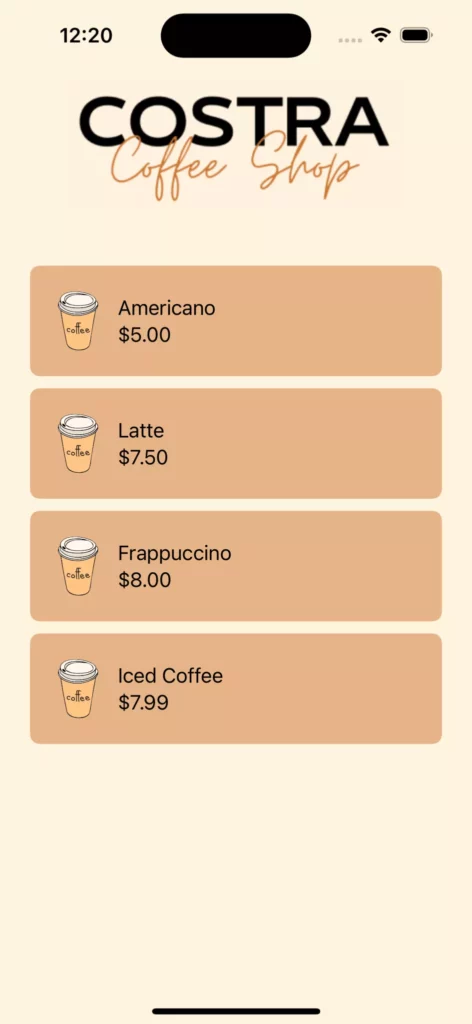
Awesome! We should now see our list of coffees. But if something’s not right, no worries: we can check the console for any errors and resolve them.
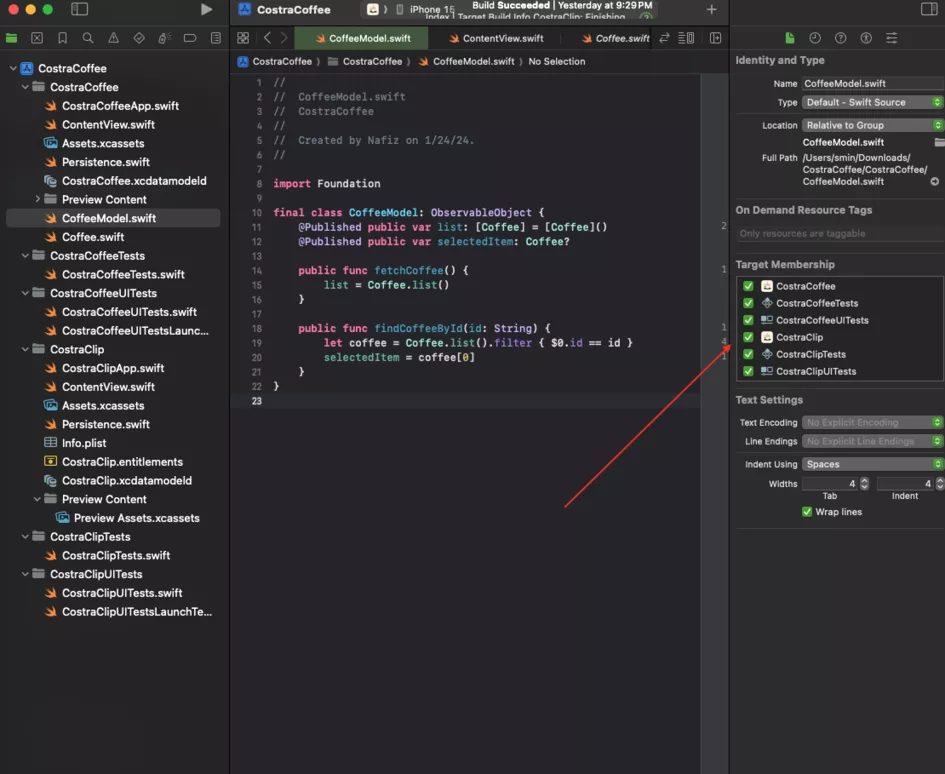
Next we need to share our Model and ViewModel with our App Clip, and to do so we’ll need to update both files’ target membership to CostraClip.
This ensures both the Model and ViewModel are accessible to the App Clip and can be shared in both.
Once the target membership is updated, we can proceed with integrating the Model and ViewModel into our App Clip.
App Clip section
In the App Clip section, the swift file CostraClipApp.swift is the main entry point of our App Clip target. We’re using the same model we previously shared with our app and on line 12, we declared @StateObject private var model = CoffeeModel().
We’ll also share this variable with ContentView’s environmentObject modifier.
ContentView registers the onContinueUserActivity function. This is where we get the user activity the App Clip receives, such as the invocation URL.
import SwiftUI

@main
struct CostraClipApp: App {
    @StateObject private var model = CoffeeModel()

    var body: some Scene {
        WindowGroup {
            ContentView()
            .environmentObject(model)
            .onContinueUserActivity(NSUserActivityTypeBrowsingWeb, perform: handleUserActivity)
        }
    }

    func handleUserActivity(_ userActivity: NSUserActivity) {
        if let webpage = userActivity.webpageURL {
            let coffeeId = webpage.lastPathComponent
            if !coffeeId.isEmpty {
                print("new coffee id: \(coffeeId)")
                model.findCoffeeById(id: coffeeId)
            }
        }
    }
}
The function handleUserActivity checks whether we have received a URL https://costracoffee.com/1, and whether it includes our coffee ID. If our model finds the coffee by its ID, our ContentView will display the coffee, the price and a Button to place an order.
import SwiftUI

struct ContentView: View {
    @EnvironmentObject private var model: CoffeeModel

    var body: some View {
        VStack {
            Spacer()
            Image("coffee")
                .resizable()
                .scaledToFit()
                .frame(maxHeight: 300)
            Spacer()
            Text(model.selectedItem?.name ?? "Coffee not found")
            Text("\(model.selectedItem?.price ?? 0.0, specifier: "$%.2f")")
            Button("Place Order") {}
                    .buttonStyle(.borderedProminent)
                    .tint(Color("button_bg"))
                    .controlSize(.regular)
                    .cornerRadius(40, antialiased: true)
                    .padding()
        }

        .frame(
              minWidth: 0,
              maxWidth: .infinity,
              minHeight: 0,
              maxHeight: .infinity,
              alignment: .center
        )
        .ignoresSafeArea(.container, edges:.top)
        .background(Color("body"))
    }
}
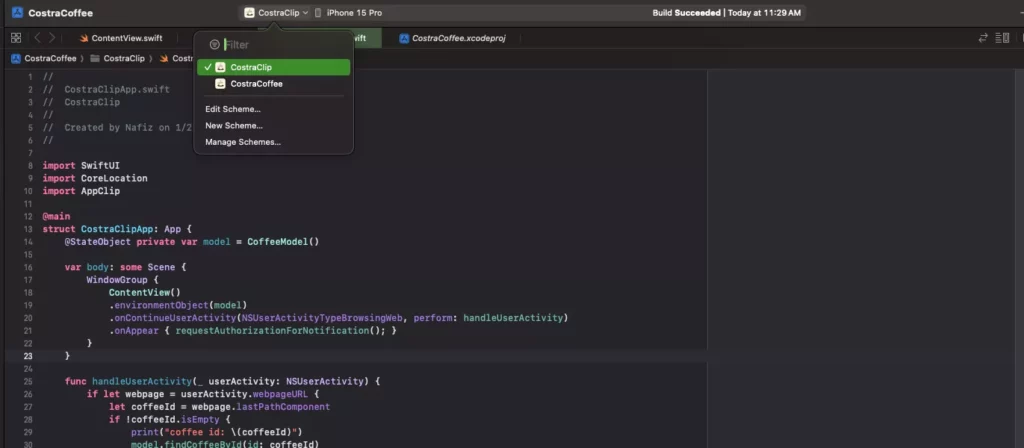
Before running the App Clip, we’ll need to set an invocation URL in our scheme. To do this we’ll select the App Clip scheme and set the invocation URL https://costracoffee.com/1 under the Arguments tab.
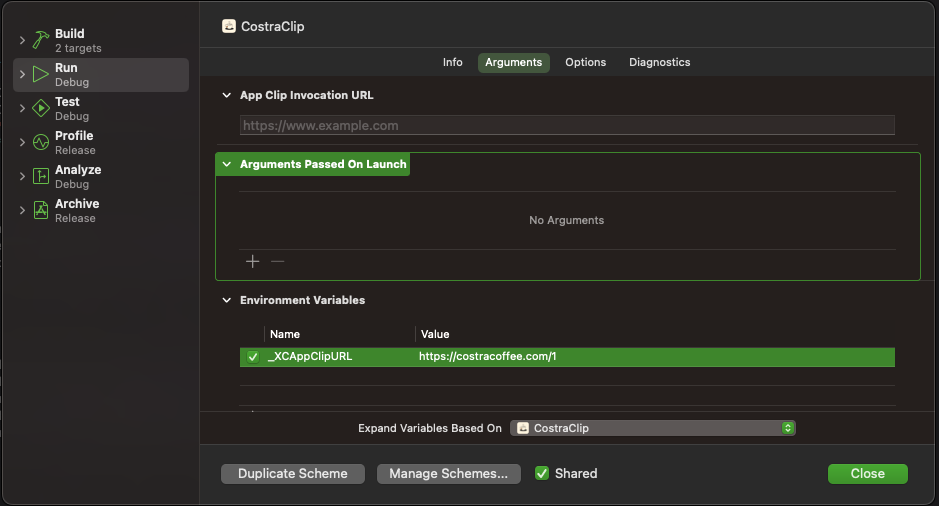
Now we just select the CostraClip scheme to run the App Clip.
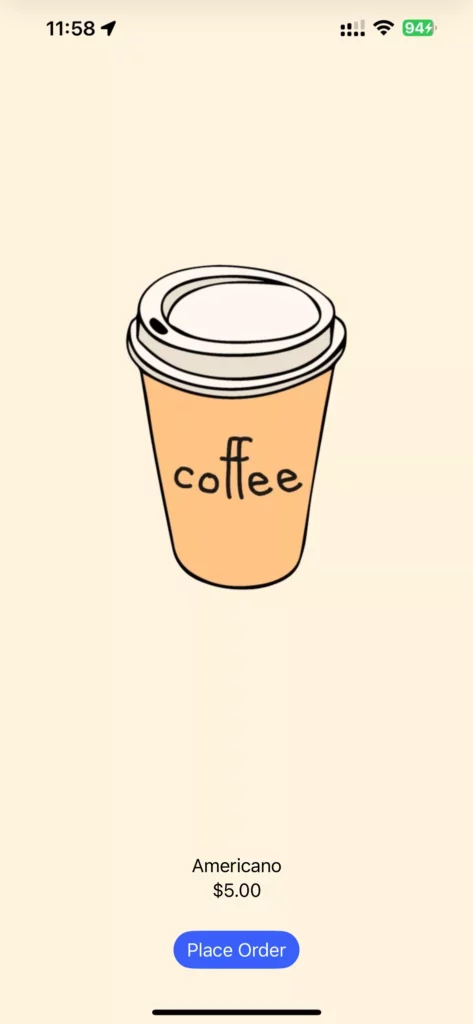
That’s it! We’ve created our Costra Coffee app and App Clip.
Next let’s look at how our App Clip is launched
As we know, App Clips can be initiated through QR codes, NFC tags and App Clip Codes as well as by web association.
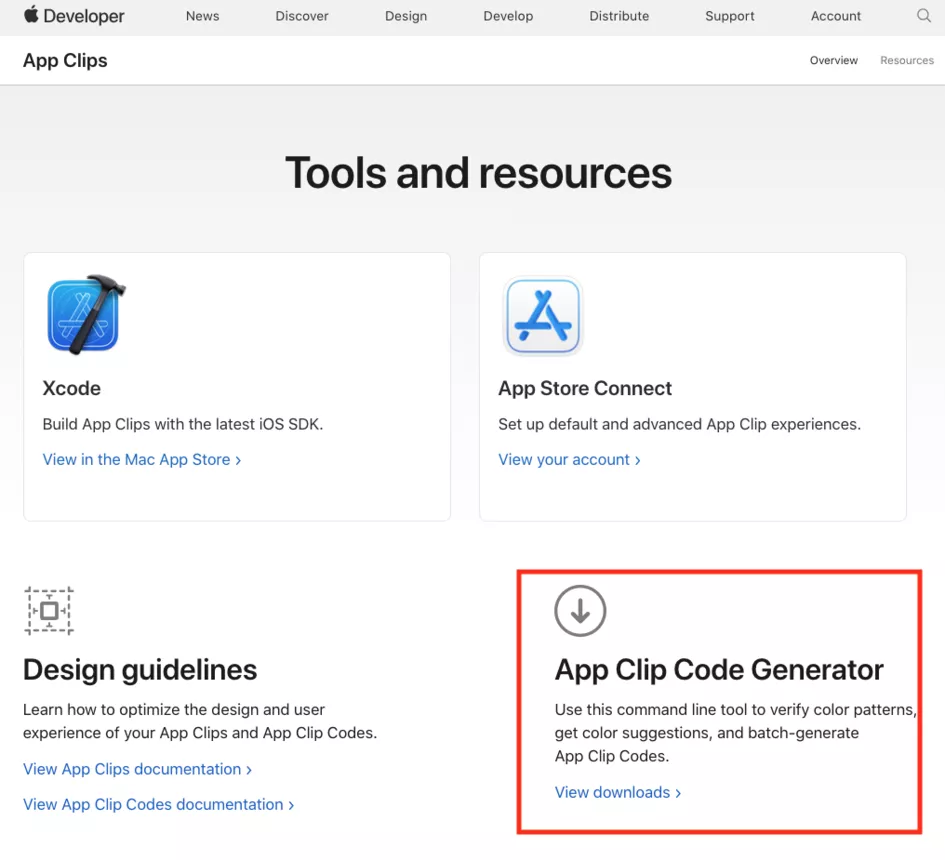
We can generate an App Clip Code or NFC by using the AppClipGenerator tool, which is available from the Apple Developer Resources site (https://developer.apple.com/app-clips/resources/).
App Clip Codes
To generate an App Clip Code, we’ll need to encode our URL (https://costracoffee.com/1) by running the following command on our terminal and saving the App Clip .svg file in the Downloads directory.
AppClipCodeGenerator generate --url https://costracoffee.com/1 --foreground FF5500 --background FEF3DE --output ~/Downloads/americano.svg
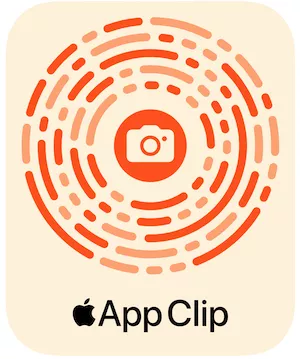
The video below shows how to launch the App Clip on a real device by opening the camera and capturing the App Clip Code generated in the Downloads directory.
For NFC Tags, simply encode the same URL to create the tag. Here’s how:
AppClipCodeGenerator generate --url https://costracoffee.com/1 --foreground FF5500 --background FEF3DE --type nfc --output ~/Downloads/americanonfc.svgWeb association
Invocation URLs
These work differently to App Clip Codes and NFC Tags and check the invocation URL against your website and the App Clip’s code signature for an Associated Domains Entitlement. The system checks that the domain server agrees to run the App Clip by referencing it in an Apple App Site Association (AASA) file.
Associated Domains’ entitlement
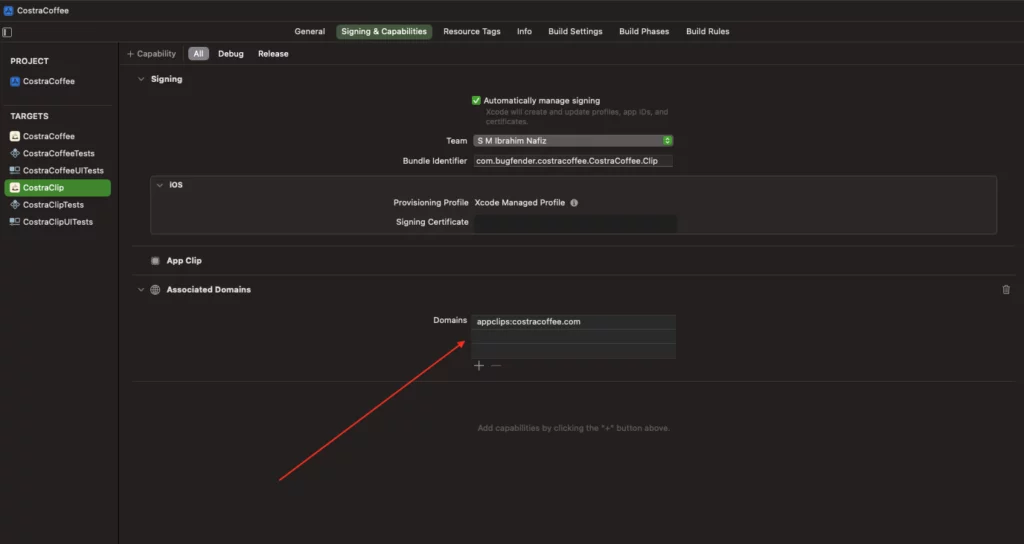
To associate our App Clip with our website, we’ll need to add the Associated Domains Entitlement to the app and App Clip targets. This entitlement allows the app and App Clip to communicate with the server hosting the AASA file.
To do this, we open our project in Xcode, then in Project Settings we enable the Associated Domains capability and add the Associated Domains Entitlement.
Server connectivity
We’ll need to make changes to our server so our App Clip can connect to it and the system can check the URL that calls it. To make an AASA file, we’ll use the appclips key to add an App Clip entry.
In this example, we’ll place an AASA file in the .well-known directories for each URL’s domain in our server root directory.
{
    "appclips": {
        "apps": ["ABCDE12345.com.bugfender.costracoffee.CostraCoffee.Clip"]
    }
}
Great! Now we know how to set up access to our App Clip.
Let’s look at some more advanced App Clip techniques
Notifications
Some App Clips may need to schedule or receive notifications (e.g. upcoming coffee order deliveries) to optimise user experience.
To enable notifications, create the key ‘Requests ephemeral user notifications’ in your App Clip’s Info.plist file and set its value to ‘YES’.
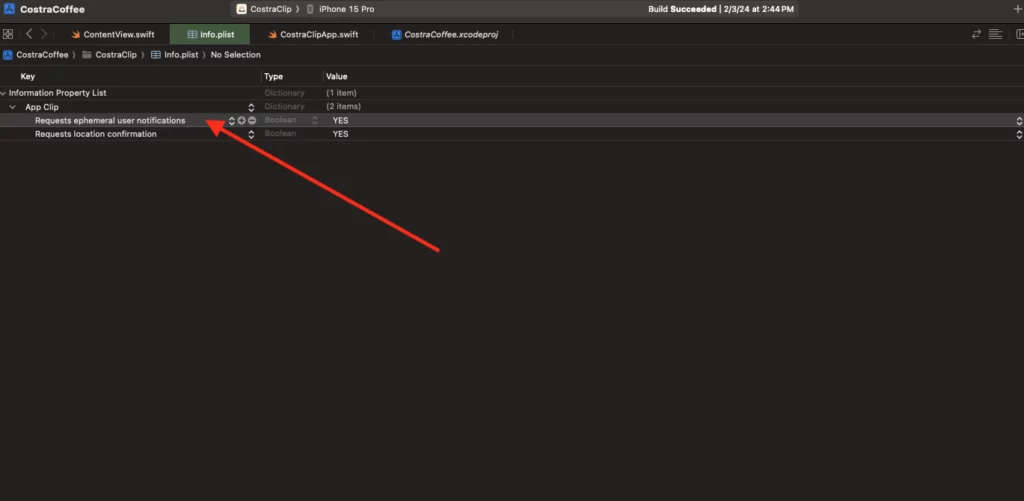
Now we’ll write a simple function to verify whether the App Clip can schedule and receive notifications, and whether the user has granted short-term notification permission. Add the below code to your CostraClipApp:
 func requestAuthorizationForNotification() {
      let nc = UNUserNotificationCenter.current()
        nc.getNotificationSettings { setting in

        if setting.authorizationStatus == .ephemeral {
            print("permsission")
            return
        }

        nc.requestAuthorization(options: .alert) { result, error  in
              print("Result: \(result)  \(String(describing: error))")
        }
      }
    }
Location verification
To enable location in our App Clip, we need to modify the Info.plist file and set key ‘Requests location confirmation’, like this:
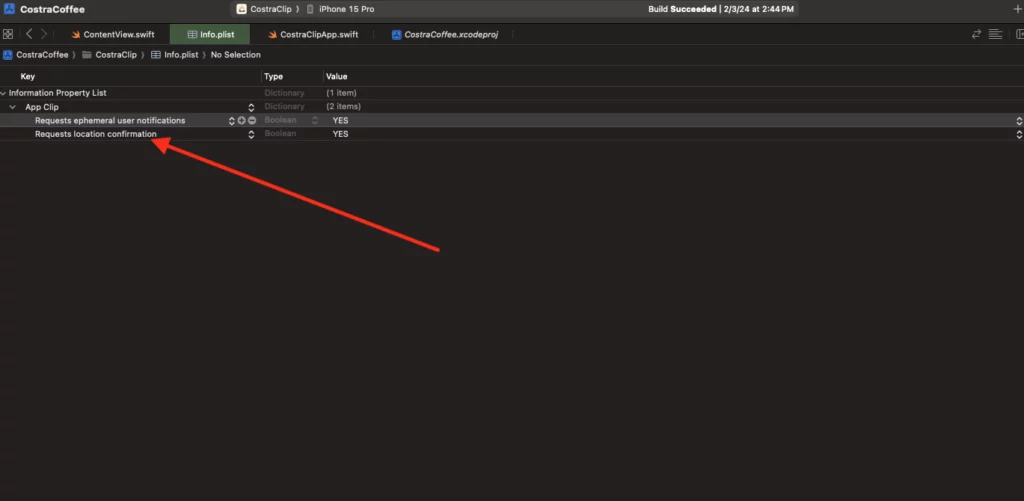
After we’ve modified the Info.plist file, we can add code to provide the expected physical location information to the App Clip.
To retrieve this information, we’ll encode an identifier in the URL that launches the App Clip, and use the identifier to look up the location information for a business in our database.
Upon launch, access the location information and use it to create a CLCircularRegion object with a radius of up to 100 meters and pass it to the confirmAcquired(in:completionHandler:) function.
Good stuff! Now, when a user opens the App Clip, this code will check to see where they are.
guard
            let incomingURL = userActivity.webpageURL,
            let components = NSURLComponents(url: incomingURL, resolvingAgainstBaseURL: true),
            let queryItems = components.queryItems
        else {
            return
        }

        guard
            let payload = userActivity.appClipActivationPayload,
            let latitudeValue = queryItems.first(where: { $0.name == "latitude" })?.value,
            let longitudeValue = queryItems.first(where: { $0.name == "longitude" })?.value,
            let latitude = Double(latitudeValue),
            let longitude = Double(longitudeValue)
        else {
            return
        }

        let c = CLLocationCoordinate2D(latitude: latitude, longitude: longitude)
        let r = CLCircularRegion(center: c, radius: 100, identifier: "coffee_location")

        payload.confirmAcquired(in: r) { region, error in
            if let error = error {
                print(error.localizedDescription)
                return
            }

            DispatchQueue.main.async {
                // Do something
            }
}Another great thing about App Clips is that they can be shared with friends and family using a special link, making it easier for users to recommend a business to others, increasing its potential customer base.
To launch the App Clip from any view in SwiftUI:
var body: some View {
    let appClipURL = URL(
        string: "https://appclip.apple.com/id?p=com.bugfender.costracoffee.CostraCoffee.Clip"
    )!

    Link("CostraCoffee", destination: appClipURL)
}
Now we can create App Clips that perform some pretty complex functions. But how can we make sure they work as they should?
Testing App Clips
We can test our App Clip on both a simulator and a real device to be sure it functions properly in different environments.
Testing invocation on a simulator with the _XCAppClipURL environment variable
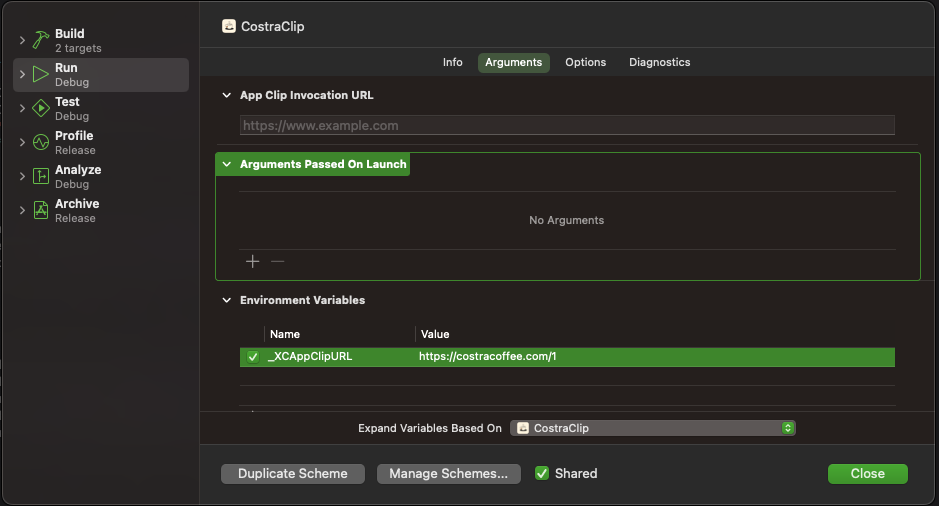
We want our App Clip to launch without a hitch so we need to make sure we have a functional invocation URL. It’s essential we test the code thoroughly, including debugging the invocation URL in Xcode.
Here’s how to configure an invocation URL, https://costracoffee.com/2 which launches our Costra Coffee App Clip showing the Coffee for which the ID is 2:
- Modify the scheme for our App Clip in Xcode, by navigating to Product > Scheme > Edit Scheme
- Verify that the
_XCAppClipURLenvironment variable is present in the Arguments tab - Add the URL of the invocation we want to test into the environment variable
- Put a checkmark next to the variable to make it active
- Run the App Clip on Xcode – the simulator should display our App Clip
Testing invocation with a local experience on a real device
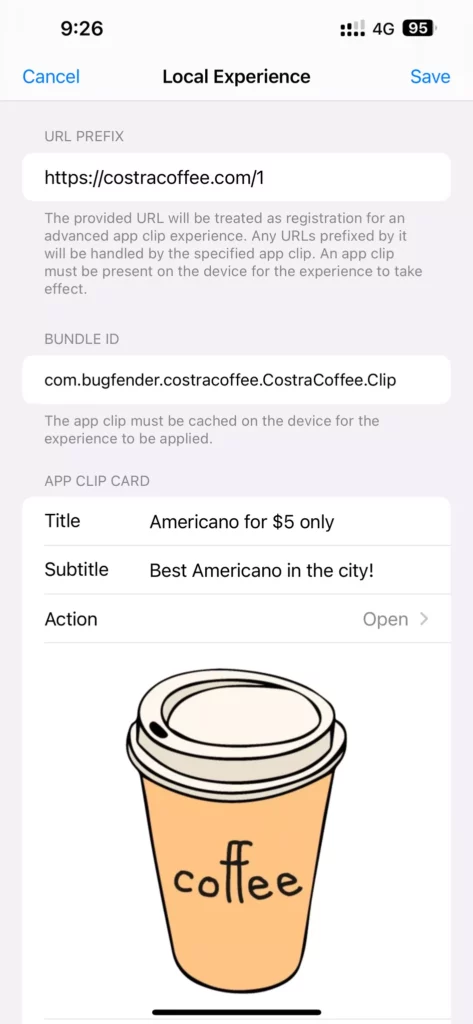
We can also test invocations and investigate our App Clip during development by configuring a local experience on a real device. Here’s how:
- Build and run our App Clip on a test device to make sure it’s cached. We’ll need t run the CostraCoffee App Clip first
- On the test device, open Settings and navigate to the iOS developer settings by choosing Developer > Local Experiences, then select ‘Register Local Experience’
- Enter the invocation URL we want to test – in our case:
https://costracoffee.com/1 - Enter the bundle ID of the App Clip
- Provide a title and a subtitle
- Select an Action; for example
Open
- Use the camera on the test device to scan the App Clip Code and click the title to launch the App Clip.
To sum up
Although they’ve been around for a while, App Clips are among the least understood and underused features in iOS and offer huge potential for businesses to transform the way they engage with their customers.
- App Clips are a small part of an app focused on completing one task quickly without the need to download the full app
- They can be accessed by scanning QR codes, NFC Tags, dedicated App Clip Codes or by web association via an invocation URL
- As they are part of an app they are created in the same Xcode project as the full app – we recommended using SwiftUI and Swift
- App Clips can perform a range of functions, from basic transactions to more complex location and notification-based services
- App Clips can be tested in both simulators and test devices to ensure they perform properly in different environments
The more you experiment with App Clips the better you’ll understand their capabilities and be able to exploit their full potential.
