23 Minutes
Integrating Realm Swift into Your iOS Projects: A Comprehensive Guide
Fix Bugs Faster! Log Collection Made Easy
If you’re building for mobile apps, you need Realm in your life. It’s specifically designed for mobile devs and even though it’s available on multiple platforms, it’s typically used to develop iOS apps, using Swift.
Built on top of SQLite Realm Swift is a very high-level abstraction layer that simplifies database operations for the developer. Today we’re going to unpack it, with a guide that drills so far down into the subject, it’s practically in Australia.
💡 It’s important to note that MongoDB has rebranded Realm to Atlas Device Sync. For the purpose of this article, we will continue to refer to it as Realm since the newer name remains unfamiliar to many mobile developers and the SDK is still being called Realm.
Table of Contents
First, let’s look at some benefits of Realm
Realm Swift offers iOS developers several benefits when compared to other data persistence solutions:
- Performance: Realm is faster and often outperforms other databases, such as
SQLite-based solutions. - Ease of use: Realm’s easy-to-use API simplifies data manipulation, taking care of the underlying operations so developers can work with
Swiftobjects directly. Using Realm Swift is notably simpler than working with the Core Data framework. - Cross-platform support: Realm can be used as a consistent data storage solution across multiple platforms including iOS, Android, and React Native.
- Encryption: Realm’s built-in data encryption adds an extra layer of security, making it ideal for apps handling sensitive user information.
- Cloud Sync: Realm framework has a built-in Realm cloud sync feature that helps developers to sync data across multiple devices.
- Realm Studio: It’s a visual tool that offer useful features to mobile developers, working with the Realm database and Realm sync features.
Now let’s take a look at our database
This is a simplified version of a social media Post on a social iOS app. We’ll be persisting three objects, with certain relationships between them:
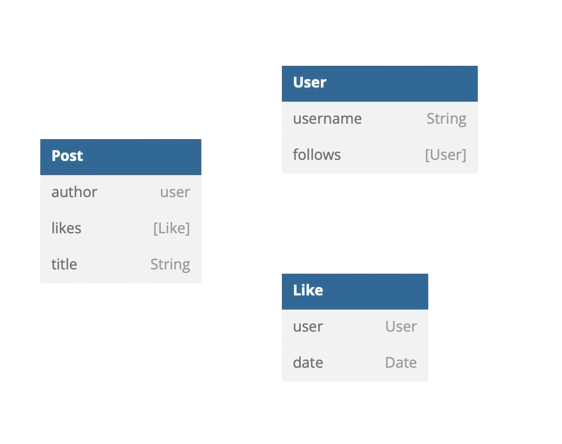
- A
Postthat will have atitle,author, and a list oflikes. - A
Userthat will have ausername, and follow otherUsers. - A
Like, that has a certain likedateand is associated with aUser.
Pretty straightforward, don’t you think?
Ok, enough preamble. Let’s get Realm set up.
Installing Realm Swift
There are several options for installing Realm SDK, including:
- Swift Package Manager
- CocoaPods
- Carthage
- Static Framework
We’ll be installing it step-by-step using Swift Package Manager, but if you’d prefer to install it another way, you’ll find the documentation here.
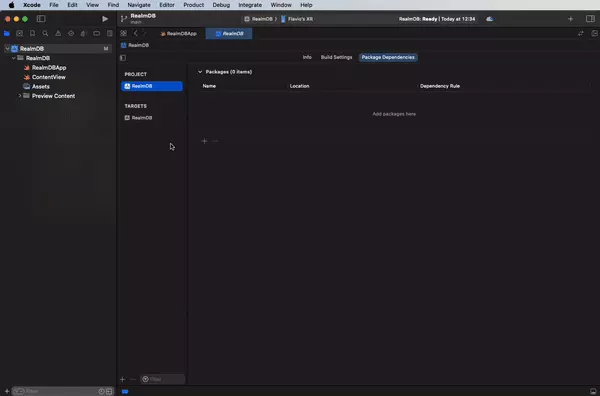
Now let’s get Realm installed by following the steps below:
- On Xcode, go to
File. - Choose
Add Package Dependencies… - Once on the ‘Dependencies’ screen, paste the following URL:
https://github.com/realm/realm-swift.git - Then select
Up to Next Major Versionas aDependency Ruleand set the version as10.0.0. This ensures that our dependencies will be updated whenever a new Major Version of Realm is released. - Select
Add Packageto add Realm and RealmDatabase as Swift Packages.
You can see all the steps here:
Setting up the Realm stack
Before we can set up Realm to persist the objects in our database, we’ll first need to create those objects as the Swift classes you see below:
class Post {
    var author: User?
    var likes: [Like]
    var title: String
}

class User {
    var username: String
    var follows: [User]
}

class Like {
    var user: User?
    var date: Date
}
This is what our objects would usually look like in Swift. But when we use Realm database to persist the objects, we need to make the following changes:
- They need to inherit from Realm
Object. - Arrays don’t exist in Realm – a list of
List<MyType>is used instead. - The persisted properties need to have the
@Persistedkeyword associated with them.
Once we’ve made those changes, our models should look like this:
import RealmSwift

class Post: Object {
    @Persisted var author: User?
    @Persisted var likes: List<Like>
    @Persisted var title: String
}

class User: Object {
    @Persisted var username: String
    @Persisted var follows: List<User>
}

class Like: Object {
    @Persisted var user: User?
    @Persisted var date: Date
}
Great! We’ve now configured our database.
Basic Realm database operations
Now our database is ready to use, let’s really get stuck into it by looking at how we can store, read and delete objects.
Data generation
First, we’ll need to randomly generate usernames for the users in our database. We’ll do this using the following RandomGenerator function:
class RandomGenerator {
    static func username() -> String {
        let usernames = ["Quantum", "Giraffe", "Mystic", "Penguin", "Nebula", "Phoenix", "Zenith", "Whisper", "Radiant", "Tiger", "Lunar", "Cascade", "Celestial", "Breeze", "Ephemeral", "Dragon", "Cosmic", "Echo", "Enigma", "Sparrow"]

        let index1 = Int.random(in: 0...usernames.count - 1)
        let index2 = Int.random(in: 0...usernames.count - 1)


        return "\(usernames[index1])\(usernames[index2])"
    }
}
Adding to Realm
Once we’ve got the usernames done, we can create a view with a SwiftUI button that adds a User (with a username provided by the RandomGenerator we added) to our database:
import SwiftUI
import RealmSwift

struct ContentView: View {
    var body: some View {
        VStack {
            Button {
                var user = User()
                user.username = RandomGenerator.username()

                        // Get the default Realm instance
                        let realm = try? Realm()

                        // Persist our data with a write
                        try? realm?.write {
                        realm?.add(user)
                        }

            } label: {
                Text("Add user")
            }
        }
        .padding()
    }
}

#Preview {
    ContentView()
}
Querying from Realm
We can now add users to our database. But to view those users, we’ll need to add a List to our view. This will show all the users we have added previously, and any new users as they’re added.
To add a List, we’ll need to modify our ContentView in the following way:
import SwiftUI
import RealmSwift

struct ContentView: View {
    // We create an observer that will read all our users
    @ObservedResults(User.self) var users

    var body: some View {
        VStack {
            Button {
                var user = User()
                user.username = RandomGenerator.username()

                let realm = try? Realm()

                try? realm?.write {
                    realm?.add(user)
                }

            } label: {
                Text("Add user")
            }

            // We create a List that will show all our observed users
            List {
                ForEach(users, id: \.self) { user in
                    Text(user.username)
                }
            }
        }
        .padding()
    }
}

#Preview {
    ContentView()
}
But wait just a second there!
After we modified our ContentView , our app stopped compiling. Have we hit a roadblock?
Actually no, it’s totally cool. For us to be able to use User.self as @ObservedResults, we need our User to conform to Identifiable.
To solve this issue, we need to add Identifiable conformance to all our models, like this:
class Post: Object, Identifiable {
    @Persisted var author: User?
    @Persisted var likes: List<Like>
    @Persisted var title: String
}

class User: Object, Identifiable {
    @Persisted var username: String
    @Persisted var follows: List<User>
}

class Like: Object, Identifiable {
    @Persisted var user: User?
    @Persisted var date: Date
}
Simple! Now if we run the app, we can see the list of previously added users, and any new users we add will appear immediately.
Now let’s change how we save our data in Realm, so we can take full advantage of its capabilities. Let’s change how we add elements, from:
// Get the default Realm instance
let realm = try? Realm()

// Persist our data with a write
try? realm?.write {
  realm?.add(user)
}
to:
$users.append(user)
Easy as that! We keep the exact same functionality, but now it’s much simpler,
Deleting from Realm
Deleting data from Realm is pretty straightforward. We simply need to remove a user from our observed users and that user will be removed from our database.
We’ll add that to the onDelete modifier of our List, and our full List will look like this:
List {
	ForEach(users, id: \.self) { user in
     Text(user.username)
  }
  .onDelete(perform:
      $users.remove
  )
}
Brilliant! We can now add users and delete them when we run our app:

More advanced operations
Ok, now we can perform all the basic operations needed in a database by using our User struct . So we can now look at more complex Realm operations and tasks (such as bulk adding and deleting, and fetching specific objects) using all our structures.
Generating more complex structures
To make data available for our demonstration, we first need to change our RandomGenerator class so we can generate more complete, and complex, sets of data.
Our new RandomGenerator class will be as follows:
class RandomGenerator {
    static func user(thatFollows follows: [User] = []) -> User {
        let usernames = ["Quantum",
                         "Giraffe",
                         "Mystic",
                         "Penguin",
                         "Nebula",
                         "Phoenix",
                         "Zenith",
                         "Whisper",
                         "Radiant",
                         "Tiger",
                         "Lunar",
                         "Cascade",
                         "Celestial",
                         "Breeze",
                         "Ephemeral",
                         "Dragon",
                         "Cosmic",
                         "Echo",
                         "Enigma",
                         "Sparrow"]

        let index1 = Int.random(in: 0...usernames.count - 1)
        let index2 = Int.random(in: 0...usernames.count - 1)

        var user = User()
        user.username = "\(usernames[index1])\(usernames[index2])"
        follows.forEach({user.follows.append($0)})

        return user
    }

    static func posts() -> [Post] {
        var oneHundredUsers: [User] = []

        for _ in 1...100 {
            let otherUsers = Int.random(in: 0...100)

            var follows: [User] = []

            for _ in 0...otherUsers {
                follows.append(RandomGenerator.user())
            }

            oneHundredUsers.append(RandomGenerator.user(
                thatFollows: follows
            ))
        }

        let blogpostTitleArray = [
            "Resilience",
            "Serendipity",
            "Thrive",
            "Wanderlust",
            "Illuminate",
            "Empower",
            "Unleash",
            "Harmonize",
            "Catalyst",
            "Flourish",
            "Zenith",
            "Enchant",
            "Pinnacle",
            "Catalyst",
            "Odyssey",
            "Quench",
            "Jubilant",
            "Synergy",
            "Revitalize",
            "Traverse"
        ]

        var fiveHundredPosts: [Post] = []

        for _ in 1...500 {
            let index1 = Int.random(in: 0...blogpostTitleArray.count - 1)
            let index2 = Int.random(in: 0...blogpostTitleArray.count - 1)

            var post = Post()

            post.author = oneHundredUsers[Int.random(in: 0...oneHundredUsers.count - 1)]
            RandomGenerator.randomLikes(from: oneHundredUsers).forEach({
                post.likes.append($0)
            })

            post.title = "\(blogpostTitleArray[index1]) \(blogpostTitleArray[index2])"

            fiveHundredPosts.append(post)
        }

        return fiveHundredPosts
    }

    static func randomLikes(from users: [User]) -> [Like] {
        let amountOfLikes = Int.random(in: 0...users.count - 1)

        var likes: [Like] = []

        for likeIndex in 0...amountOfLikes {
            var like = Like()
            like.user = users[likeIndex]
            likes.append(like)
        }

        return likes
    }
}
Instead of just generating random single users, we can now generate multiple users, each with a list of users they follow. On top of that, we can generate up to 500 posts at a time, each with authors, titles and a (random) number of likes.
In the provided code snippet, you can see how Swift closures can be utilized efficiently to iterate over collections and execute actions on individual elements.
Bulk add/delete operations
So we’ve used our RandomGenerator to generate 500 posts and now we want to add them to our database.
We could add them one at a time as we saw earlier:
let posts = RandomGenerator.posts()

let realm = try? Realm()

// Persist our data with a write
posts.forEach({ post in
    try? realm?.write {
        realm?.add(post)
    }
})
Or, if we’re using @ObservedResults for a list of posts:
let posts = RandomGenerator.posts()

posts.forEach({ post in
   $posts.append(post)
})
But that’s not efficient at all, right? When we’re sprinting to finish a project, it’s going to really hold us back.
So we can make the process much more efficient with a writing operation that will add all the objects at once.
We do this as follows:
let posts = RandomGenerator.posts()

let realm = try? Realm()

realm?.beginWrite()
realm?.add(posts)

try? realm?.commitWrite(withoutNotifying: [])
Deleting follows a very similar process, we simply change our onDelete modifier for the following:
.onDelete(perform: { indexSet in
		// Open our Realm instance
    let realm = try? Realm()

		// Get the title we are aiming for
    let title = posts[indexSet.first ?? 0].title

    // Query the objects we want to delete filtering by title
    let objectsToDelete = realm?.objects(Post.self).filter({
        $0.title == title
    })

    do {
        if let objects = objectsToDelete {
            try realm?.write {
								// Add all the delete operations to our write queue
                realm?.delete(objects)
            }
        }
    } catch {
        // Handle the error here
    }
})
Sorting operations
Our base View, which will show us the Post, author and number of likes, will be as below:
struct ContentView: View {
    @ObservedResults(Post.self) var posts

    var body: some View {
        VStack {
            Button {

                let posts = RandomGenerator.posts()
                let realm = try? Realm()

                realm?.beginWrite()
                realm?.add(posts)

                try? realm?.commitWrite(withoutNotifying: [])

            } label: {
                Text("Add 500 posts")
            }

            List {
                ForEach(posts, id: \.self) { post in
                    VStack {
                        Text(post.title).font(.system(size: 24))
                        HStack {
                            Text(post.author?.username ?? "")
                            Spacer()
                            Text(post.likes.count.description + " likes")
                        }
                    }                }
            }
        }
        .padding()
    }
}

#Preview {
    ContentView()
}
Now let’s look at some examples of queries to sort the data. These will be seriously important when we need to extract specific information as our app evolves.
To sort by author/user, we’ll need to change our @ObservedResults as below:
@ObservedResults(Post.self,
	sortDescriptor: SortDescriptor(keyPath: "author.username",
	ascending: true))
	var posts
Now the Posts are displayed grouped by author/user.
Let’s say we only wanted to see posts by the user called CascadeMystic (cool name, right??!)
In this case we’d use a where clause, like the one below:
@ObservedResults(Post.self, where: ({ post in
   post.author.username == "CascadeMystic"
})) var posts
For info, we use SortDescriptors to sort by a specific keypath, and Where clauses for filtering the objects we want to fetch.
To sum up
To use Realm in your app, you gotta follow these steps:
- Install Realm Swift using your preferred method – we used
Swift Package Manager. - Make the Objects you want to persist conform to
Object, and add@Persistedto their properties, so they can be persisted using Realm. - Make the Objects conform to identifiable to be queryable.
Once that’s done, you can use Realm in any Swift View by observing it: @ObservedResults(MyType) var myCollection
Now you easily access the elements within myCollection. You can iterate over it using a for-loop or retrieve individual elements by their index, as necessary. For instance, to display all objects in the collection, you could employ a loop like for item in myCollection { print(item) }.
Add new elements with an append: $myTypeArray.append(myObject)
And delete them with a remove: $myTypeArray.remove
Finally, for more complex operations with the ObservedResults, you can sort them with SortDescriptors, and filter them with where, or filter clauses.
The more you practice and play around with this, the more you’ll see the benefits of Realm when adding and using local database capabilities in your apps.
You can really get creative here, so be sure to experiment!
Expect The Unexpected!
Debug Faster With Bugfender